


Decided it was time to revisit my favorite among the designs I came up with, the Ditko style costume. And this time, I decided to hem the base, sleeves and collar. Not too bad.

Decided it was time to revisit my favorite among the designs I came up with, the Ditko style costume. And this time, I decided to hem the base, sleeves and collar. Not too bad.

Through the finger pad and out the fingernail. Nice.
So, I just had to try the Spider-Man shirt one more time, didn’t I?
I’m guessing that getting a sewing needle in the finger is just a rite of passage in the dangerous world of sewing. It was bound to happen eventually, the way I am always sticking my finger under there to retrieve pins, not bothering to turn off the machine or even move my foot away from the pedal. But I didn’t think the needle would literally stab in one side of my finger and out the other, honestly. I have an entry wound AND an exit wound. This might as well be a gunshot wound like in those cop shows. (Me, exaggerate?)
The best part was that once the needle was all the way through, the machine jammed–naturally–and wouldn’t do anything, including raise the needle. There was probably something logical I could’ve done to raise it manually, but I just stood there cursing, talking to myself and my girlfriend who had come in to the room as I fumbled for the little screwdriver tool to try and remove something–anything–to get my finger out of there. It was kind of surreal–and mildly upsetting–to see my finger with a sewing machine needle stuck through it, the foot of the machine crushing my finger down in place. (That was probably a good thing, in retrospect, as it kept me from shifting my finger and thus worsening the wound.)
I eventually got the needle carriage (is that what it’s called?) up and out of my finger. Then I lay down on the floor for a bit. I’ve passed out with less cause, honestly, and didn’t care to do so today.
My GF brought me a cool washcloth and a paper towel, made me put antibacterial cream on the punctures and take some Ibuprofen. It was all very ridiculous.
But the good news is, the machine isn’t broken, and I went on to finish the shirt:

Like the last two, but longer-er.
I feel like this one is the best balance I can get between long-enough-not-to-ride-up, and not-a-dress. Looks like this is the size I will use when I get around to making the Ditko multi-piece costume.
So, all’s well that ends well. I literally suffered for my art(?) today. And learned a valuable lesson: Don’t jam a sewing machine needle through your finger. It does NOT feel good.
I guess I pretty much have a full Spidey costume now. Once I clean up the edges of this shirt, I’ll have to do a full trying-on of the whole thing.
Later, all!
So, I am in a bit of conflict about this particular installment of the Guides, which is why I have saved it for the near-end of the series.
As with the boots, for the mask I have been using a pattern I extracted from the bodysuit pattern I purchased from Gunhead Designs, and I don’t feel like it’s mine to share, plus I didn’t create it and couldn’t really tell you how to create it from scratch using your measurements. But unlike the boots, I do not have a good alternative pattern of my own.
But I do have a not very good alternative, if that means anything. More importantly, I can at least offer options.
Option 1: Purchase just the mask pattern and sewing guide from 4 Neo Designs for $25 (as of this writing)

From the 4 Neo Designs web page listing for the mask: http://www.4neodesigns.com/downloads/amazing-spider-man-mask/
Above is the image from the 4 Neo Designs page that lists the mask pattern file for sale. $25 (as of this writing) gets you the pattern and sewing guide.
You can do what I did and modify the pattern design to match the rest of your costume.
Option 2: You should definitely not reverse engineer the above image to make your own pattern:
So, while I don’t feel comfortable literally sharing the pattern file, I will say that this same basic mask pattern shows up on Gun Head and 4 Neo, as well as at least a couple of other unrelated Spidey costume tutorials. That makes me wonder if its really the design that you’re purchasing from those sites more than the underlying pattern concept.
Of course, I wouldn’t go so far as to tell you that you use the visible layout of the mask as pictured above to reverse engineer the pattern. Or that if you add your own design on it, and just use it for your own personal purposes and not re-sell, that it should be totally fine.
I mean, it’s not my place to say that I think you can figure out how to do that using your keen mind and some of the skills we have been putting to use in these guides.
Just…you know. Not sayin’ that at all.
Option 3: The Not Very Good Mask Pattern I have sewn with little satisfaction
Way back when, I did manage to reverse engineer a sort-of mask pattern (a little ways into the post, version 2 of the mask) from a cheap Spidey costume I bought years ago. It’s passable, sort of. I mean, if you really don’t want to use Option 1 or “not” use Option 2, then I guess you can do this one. Maybe you can make something better out of it than I did.
It’s easier to sew than the other mask pattern. Sort of. You just have to be sure to get the stitches right. Because of how the seams are placed, it’s obvious if you don’t stitch them just right.
Here’s the down and dirty of it:
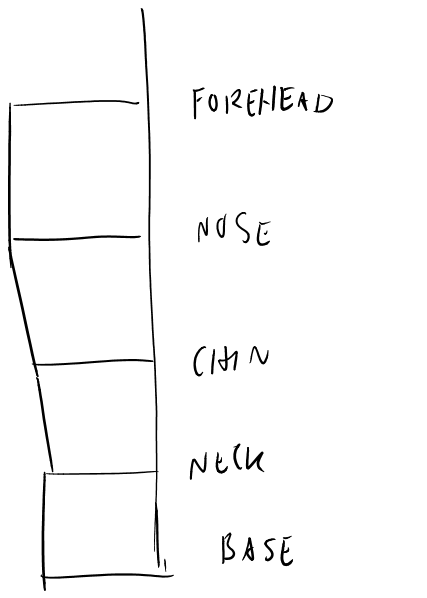
1) Horizontals: Measure your head circumference at forehead level, nose level, chin level, and neck level. Add about an inch to the neck level circumference. Because of reasons.
Convert Horizontals to 90-95%
2) Verticals: Measure the vertical distances: from the middle of the top of your head to forehead level ->From forehead level to nose level ->From nose level to chin level.
3) Total: Measure from the middle of the top of your head down to the base of your neck, tucking the measuring tape under the contour of your nose and chin as best you can.
4) Draw the Pattern ON PAPER: I recommend against just taking a chance on this one. You’re going to want to try it with un-printed spandex first, probably more than once. Seriously.
(You’ll want to tape together about four pieces of printer paper in “portrait mode” (or use a bigger piece of paper). Find the middle of the width and draw your total height line there.)
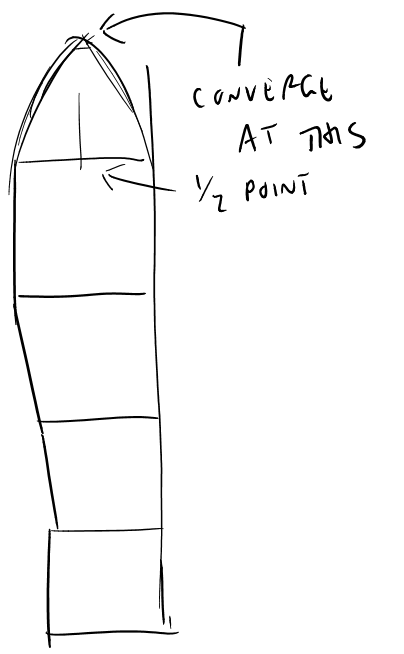
Using our usual method, except on paper, do your base pattern of vertical and half-width horizontal lines. Connect up as far as the forehead line.
Then add a near-pointy curve in the following manner:
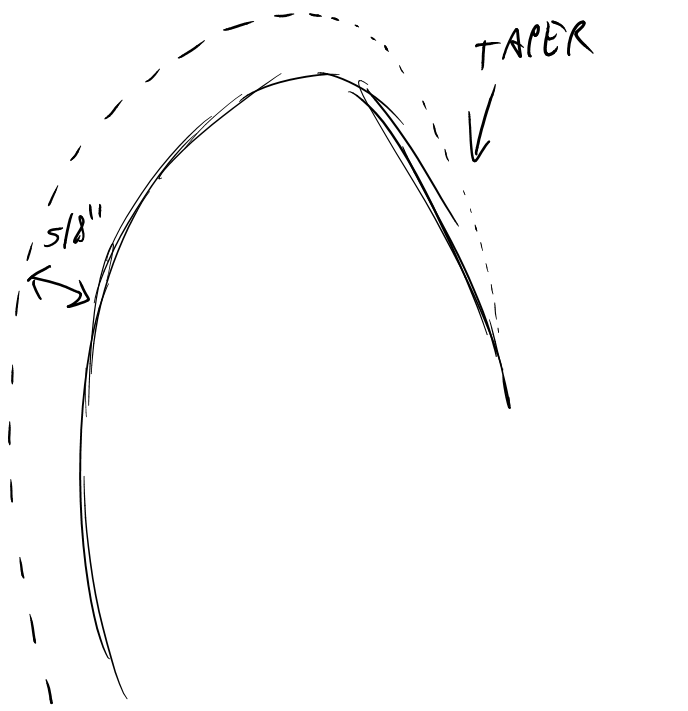
Once you’ve drawn that half, measure out a 5/8″ seam allowance and sketch it on. But pay special attention at the middle of the top curve, and taper it in at the bottom:
Now, fold your pattern paper in half along the center line and cut out that half so that when you unfold after cutting, you have the whole pattern, mirrored side to side.

Next, tape together four more pieces of paper and trace the pattern to make a duplicate.
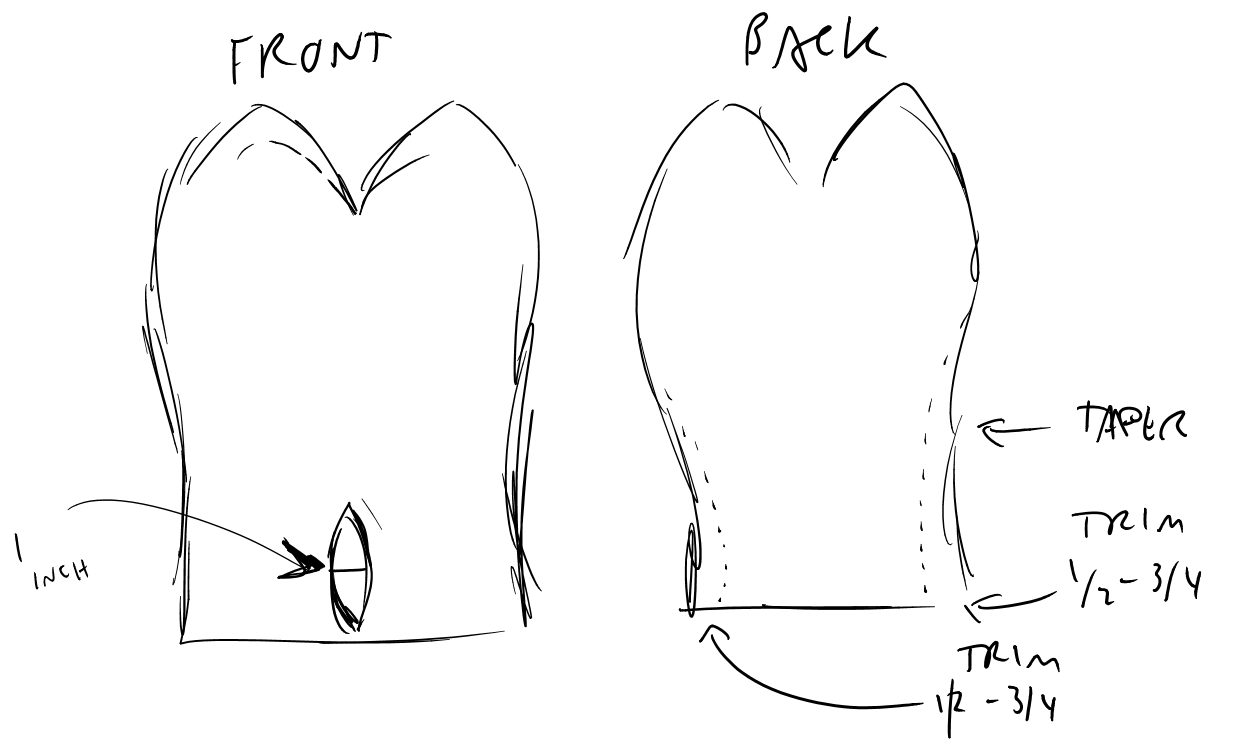
Mark one of the patterns as Front and one as Back. It doesn’t matter which yet.
On the one you marked as Front, draw a sort of sideways eye that measures about an inch across at its widest point.
On the one you marked as back, trim about 1/2 to 3/4 of an inch off of the sides of the bottom, tapering that trimming as you go up.
5) Experiment with how the web lines should lay out on the pattern. Do this on separate paper, or in whatever manner of visualization works for you. This is something you’ll probably need to do more than once in your sewing experimentation.

6) Trace the Pattern onto Fabric:
Tape the pattern down to some spandex and trace it with permanent marker (this is just for testing, so whatever). Draw the web lines on the pattern in the way you think will work. You could do just one half, or do a a different attempt on each half to maximize the usefulness of a single test.
7) Sew it together:
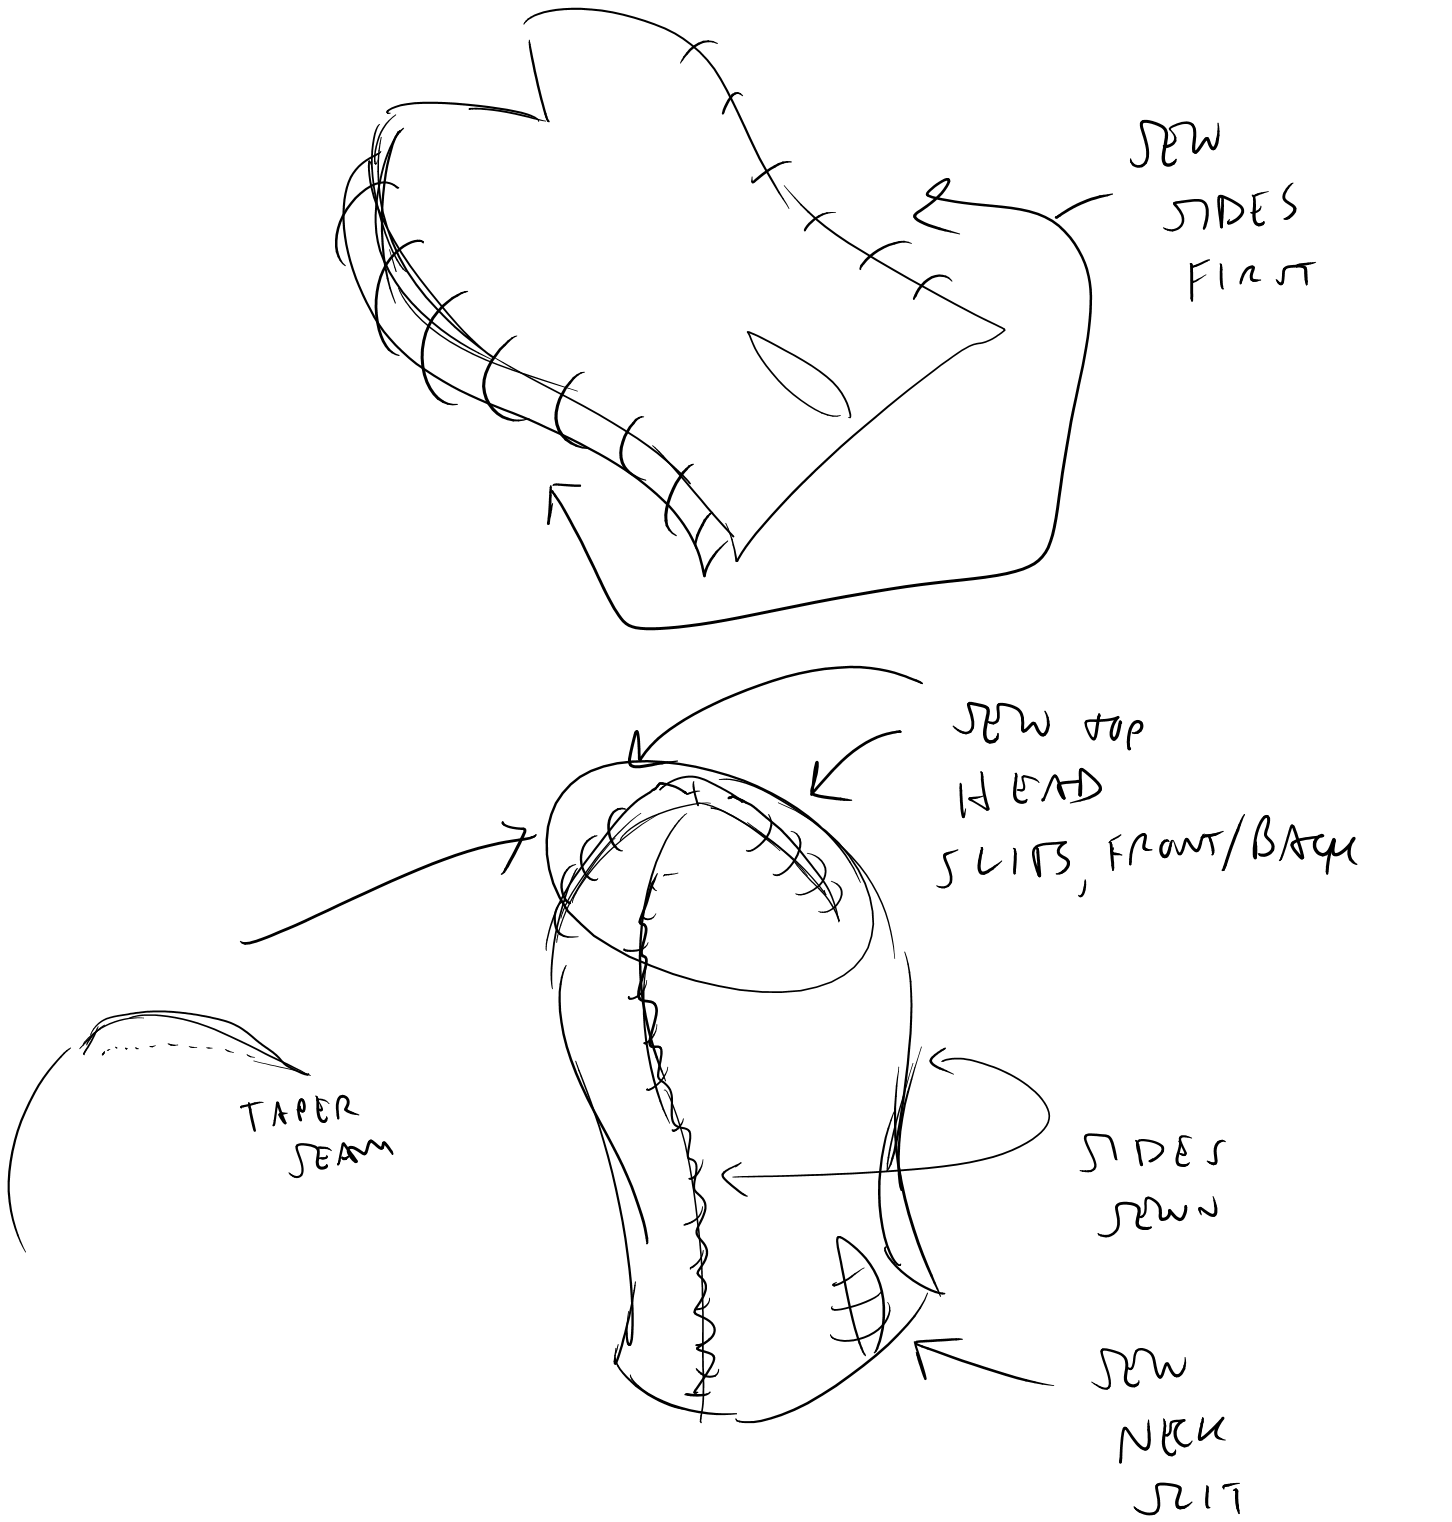
If you play around with this pattern and sewing it enough, you might come up with a passable mask for your needs and want to get a final printing of it. The trickiest part is getting the seams at the top front and back of the head to not bulge out (hence the tapering). If you can get a smoothly sewn surface, then a final printing, with web lines, would probably make the seams less obvious.
I might still revisit making a mask pattern I like at some point, but honestly, I still prefer the purchased version best so far.
Wrapping Up
So, that covers the main costume pieces. I’ll throw in some thoughts on such things as the eye frames/lenses, boot soles, and other details in the next few posts.
I decided to go ahead and see what I could salvage from the traditional costume, and so set to work ripping some seams and removing zipppers, slicing and dicing…
Now I have a pair of high-waisted Spider-leggings:

I could probably take a little more off the top. If I do the shirt, it will have velcro along the bottom to attach to velcro along the line of the bottom of the red belt portion remaining on the impromptu leggings, to keep it snug and hide the leftover pattern of the former torso section.
I also now have a standalone mask, with a velcro-thingy to snug it in the back (the velcro area will mostly be hidden if I end up doing the shirt):

So, I feel like the work on this costume doesn’t have to be a total loss.
Anyway…happy Sunday everyone! Rest up for the week ahead!
Spidey-style Tortilla. That’s what the results of my first Worbla outing resemble. But not in a bad way. That’s just what the unpainted Worbla material looks like.

Above, on the left, are the foam sheet versions of the eye frames, which I traced from construction paper with chalk onto the foam sheet and cut out with scissors and an X-acto knife.
To the right is the roll of Worbla thermoplastic. While looking at a shaped, curving piece of it might remind one of taco shells or tortilla chips, touching it will put you in mind of those “rawhide” dog treat things. When cool, it is stiff (yet somehow rubbery), with a rough surface. It has a shiny side that is slightly tacky. When it is heated, the shiny sides will stick to each other, which can be useful.
Step 1: I eyeballed how much Worbla I would need, made marks on the roll and cut it out with scissors. It’s tough stuff, but even the crappy scissors I use when I don’t want to ruin good scissors didn’t have too much problem. The trickiest part was that it was rolled, thus curved, which made it hard to cut, and then, of course, it wasn’t flat for tracing. But that’s where the cool part comes in.

Step 2: The whole point here is that Worbla becomes pliable when heated, and that came in handy even for this basic first step. I took the fairly standard hair dryer above, set it to the highest heat and highest fan setting, and then moved it over the curvy Worbla pieces. In a surprisingly short time, they began to soften, and I could sort of push down the edges to coax them into flattening out.
NOTE: In my experience, the Worbla did not get so hot that I ever felt like I was in danger of getting burned, but definitely proceed with caution in case your particular hair dryer or heat gun or heat sensitivity surprises you with a different experience!
ALSO NOTE: I am using a crudely homemade “heat-resistant” surface clumsily crafted from aluminum foil wrapped around cardboard. See this tutorial for a better way to do this, especially if you find yourself working with a heat gun.

Pretty quickly, I had two flat pieces of Worbla.
Step 3: I laid out the foam frames for tracing:

NOTE: The tutorial I referred to (see said tutorial at worbla.com) called for layering two sheets of Worbla around the craft foam for each shape involved. I realized that made sense for armor, but I didn’t want my frames to be that thick. So I just used one layer of Worbla, minus the craft foam. But I still traced and cut the Worbla slightly larger than the foam so that I could fold over the edges for neatness. That may or may not have been necessary, but we’ll get back to that.

Step 4: Next, I cut out the shapes. Cutting around the outside was easy enough, but it was tricky getting to the inside portion. I had to poke and saw out a small section with the X-acto knife in order to get in there with the scissors. I think I’ve read that people use a heat knife to cut precision shapes with Worbla, but for this I got by with an X-acto and scissors.
Step 5 (no pics, sorry): I then used the hair dryer to heat up each frame for working with it. I made small slices along the inner edges and the bottom edge in order to fold over those edges and kind of pinch them together. I neglected to take pics of that part, being rather involved in the process. But it might not have been necessary anyway. The top edge is un-pinched, and it seems to look all right.
Step 6: Anyway, once I had done the detailed shaping with my fingers (again, be careful in your own efforts!), I heated each frame to softness once again and gave each its turn on Bob’s face for final shaping:

Within maybe–I don’t know, 30 seconds to 1 minute, each frame had cooled, and could hold the shape.


The curves are a bit wavy, but that’s a reflection of the wavy surface they were cooled on (I’m talking about you, Bob). It might be good enough, but if not, the great thing is that I can always smooth out Bob’s face and then re-heat and reshape the frames on the newly smoothed surface.

So, there they are. I feel pretty good about these as a first attempt, if nothing else. The next step is to paint them. First, a base coat or two to smooth them out (the surface is pretty rough), and then the final coat of black. I think if I go with a good matte black, the waviness of the curves won’t be too obvious. Or I might try to fix the waviness first. Once they’re painted, the reshaping is not an option.
To sum up, here’s what I learned about working with Worbla:
Up next: Finishing and Painting the Frames (or more about web-shooters if I don’t get a chance to get paint today…)
Italy & the UK in way too short a time
"A Word of Substance"
Who knew vampires need medical insurance?
