[Insert cliche about trying again after failing here.]

Well, heck. Botched my first screen prep last night.

I was excited to finally have time to apply emulsion to my 16 x 20 screen for exposure this morning, but even as I was working on it, I couldn’t help but feel like it wasn’t going well. But I reminded myself that I felt the same way applying emulsion to the first screen. Plus, I’m still sick and feeling pretty negative… So I finished it up and put it in my freshly cleaned closet to let it dry overnight, figuring it would look better in the morning to my rested mind.

Sonuva-- Was I drunk? Asleep?

Sonuva– Was I drunk?

When I went to get it out this morning, not only was it clear that the emulsion was uneven and globby (Did I do it with my eyes closed or what? I mean, horrible!), I had not properly raised the screen off of the cardboard it was sitting on, and part of it had gotten stuck to the cardboard with the dried emulsion. Argh.

Oh well. I’ll need to clean it and start over. But first I’ll need more emulsion. That was going to be necessary soon enough anyway. The kit only included enough for two or three screens. {sigh} But I had kind of wanted to get a more proper exposure bulb  before exposing this screen anyway. With the lower wattage bulb I have, it will take an hour and a half! A proper bulb will cut that to 20 minutes (!) and I think will result in a crisper exposure.

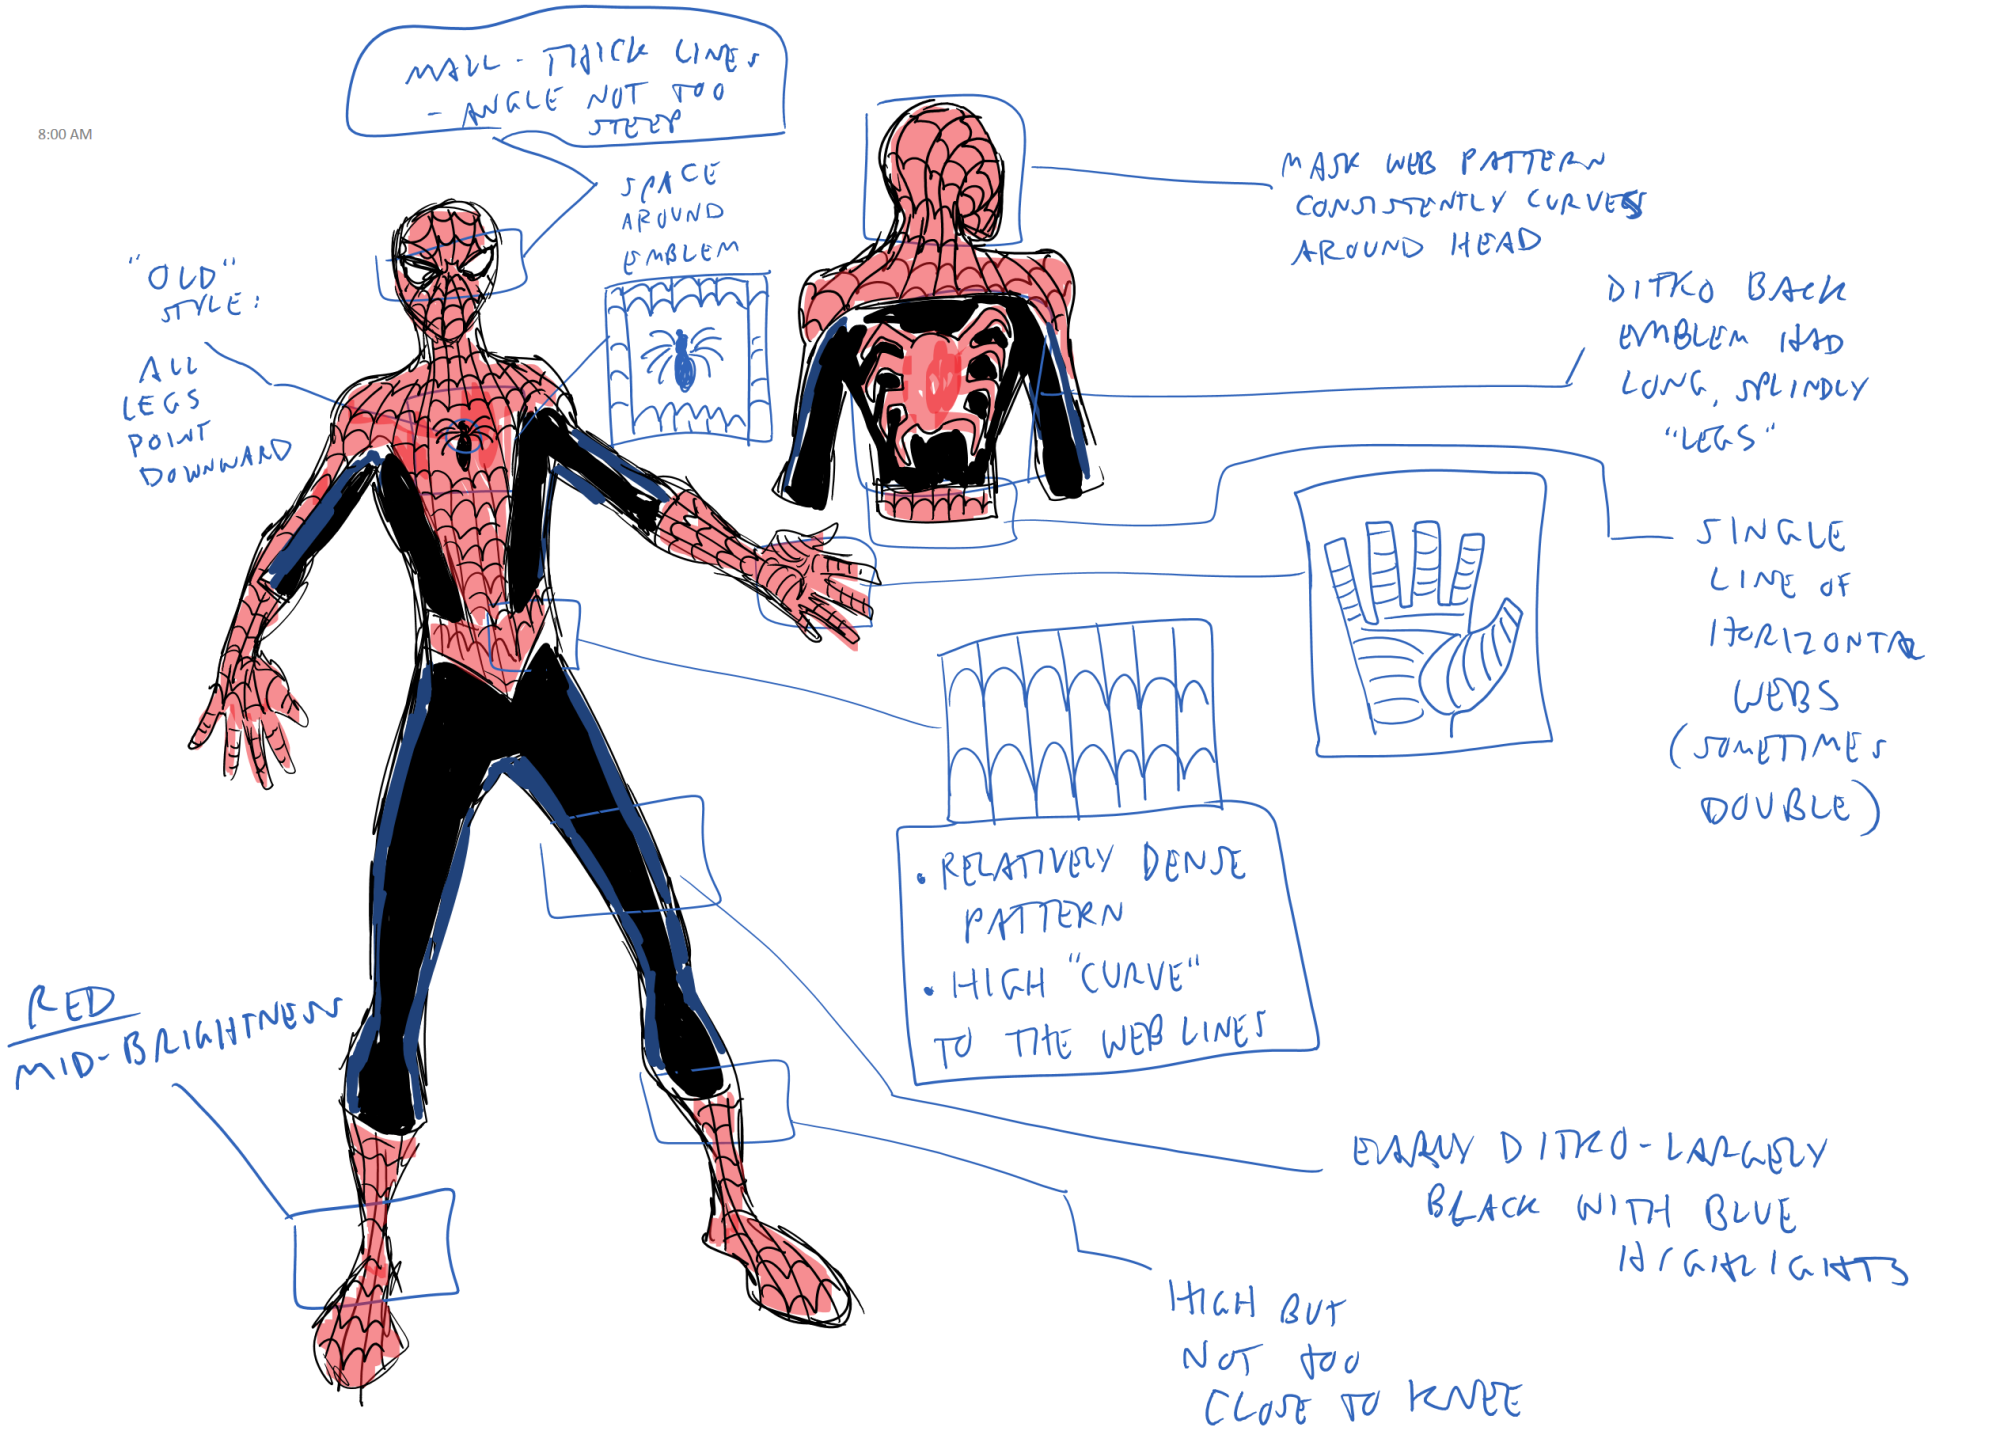
I did, however, get the transparencies prepared for the webbing patterns on the lower torso of the costume, and did some Sharpie touch ups to be sure that they will align with the chest web-and-spider pattern:

wpid-img_20140618_054246.jpg

I’ll tape off the portions of the shirt on the sides where the web patterns should be absent. Anyway, nice to have that done, and to have a general strategy for getting the web patterns lined up across the different screens. By assuring that they line up in the transparencies, then I know that I am exposing the screens with patterns that will line up, which means they should line up–or be able to be lined up–when it comes time for the actual printing.

So, I’m going to call this “two steps forward, one step back.” ‘Cause that seems like the optimistic thing to say.

Now, if I can just shake this stupid cold/possible sinus infection, I will feel even more positive and cheery!  {sniffle snort}

Up Next: Taking on The Torso Take Two And Also Additional Alliteration If I’m Into It 

A Selection of Spidey’s Sewing Shenanigans

Recently, I’ve been re-reading–in digital form– the Steve Ditko run of Amazing Spider-Man. (Marvel Unlimited Digital Comics has got to be one of the most important achievements of human civilization, right?)

If I could go back and tell my eight year old self that in around 30 years he would be re-reading many of his favorite comics on a tablet, he probably would’ve said something like, “What’s a tablet?” And once I explained that, he would  be pretty impressed.

Anyway, I have been surprised to be reminded just how often Ditko and Lee had Spidey dealing with the mundanities of costume maintenance. So I put together a little selection of panels from the comics to go with our “sewing a Spidey costume” theme.

Costume Repair:

repair_costume1

tumblr_lyya0fbMDZ1roej9io1_500

Making Costumes/Spare Costumes:

makesuitpanels

ASM4_Sewing

sewingnewcostume


I’m kind of interested at the level of detail here regarding how he made his suit. I had kind of gotten the impression from the first issues that he silk screened an overall set of colors/patterns onto a single color suit (like I’m trying to do), but here he is clearly sewing the red material (looking already silk screened with the webs) onto the blue material.

This next one is fun. Aunt May found the suit-in-progress and confronted him about it. He said it was for a costume party (or a prank or something). She confiscated it. So Peter poked around the house looking for it…

sewanewone…and, unable to find it, started over.

Why not just Buy a Costume?

Then there was this time. I think I mentioned this in an early post, but couldn’t find pics. Without a costume, and without time to make a new one, he buys one in a costume shop. But…

Screenshot_2014-06-14-11-29-58

This is an ongoing issue/gag throughout the next set of bad guy battles. He keeps having to re-web the pieces together in the middle of fighting.

But it also ends up saving his secret identity. He’s knocked unconscious but the bad guys can’t get his webbed on mask off before he wakes up.

And of course there’s this issue as well…

More than once, Spidey ran afoul of an issue we have all deal with: his good suit being in the laundry right when he needs it!

He had to wash the thing sometimes, right?

dryingcostume1

dryingcostume2

But finally…

dryingcostume3

As they say, it was little things like this–dealing with real-life, everyday stuff amid the action–that made Spidey and other characters in this era of super heroes stand out and resonate with readers.

My First Screen Printing Test…

wpid-wp-1402778539485.jpeg

So, first off, I think that rough-edged, fade-out effect is pretty cool. Second, that rough-edged, fade-out effect was totally accidental and a result of sloppy technique.

BUT, this was an experiment, and practice, and I have learned from it. I know what happened, actually. I needed something to weigh down the screen so that it was tighter against the fabric. My first pass actually left no paint on the shirt, so I tried again, trying to hold the screen down as I ran the squeegee across it, which is just as hard to do with only two hands as it sounds like.

But now I have lessons learned, and a plan for addressing what didn’t work. That’s what experiments and practice are for, right?

Oh, and I think I got a pretty cool T-shirt out of the deal too.

So, a few upcoming steps…

+ Devise a way to hold the screen down against the fabric while applying the paint.
+ Do a test on some of the spandex from which the costume itself is made.
+ Print out and expose more screens. (I need to get at least one more frame, I think, to ease this whole process. It will take forever to keep removing and replacing the fabric in one screen!)
+ Do some testing and experimentation with lining up separate screen prints to form a larger, cohesive pattern
+ Start measuring and cutting cardboard to insert into the costume pieces for properly stretched flatness.

I’m excited to be getting so close! And now that I’ve actually done the steps of screen printing, it isn’t quite so scary as it was. And not as horribly messy as I feared either. Messy, but not as messy as I thought.

Up Next: Testing, Experiments, Practice, and so on…

Swimming, Eating out, Revamped Mask Pattern & Screen Prep

wpid-img_20140613_193322.jpg

Cleaned. Now drying. Exciting Stuff.

wpid-img_20140614_065317.jpg

Oooh. Mysterious. And quilty.

Movie Day: How to Train Your Dragon 2 !!

Yesterday was a good day, but a busy day. It was my daughter’s first day out of school for the summer, and her summer camp doesn’t start until Monday, so yesterday was a day at home. I did some work-from-home stuff in the morning, and then she and I headed out to see “How to Train Your Dragon 2.” I LOVE those movies. (Even more than my daughter does, actually.) This one was as good as the original. Well done, and pretty powerful stuff, I think.

Pool Time!

After coming back from the movie and resting a bit, my daughter talked me into taking her to the pool. I’ve got some kind of allergy/sinus thing going on, so I was really hoping for the predicted thunderstorms to prevent a pool visit, but no such luck.

We headed over to the pool, and my plan was to sit under an umbrella with a box of tissues while K swam. Even when I’m feeling good, I need the water to be perfect before I’ll get in, and I was sure it would be too cold for me this early in the summer.

But with my girl urging me to get in, I stuck a toe in the water, just to check, and would you believe it wasn’t bad? I actually forgot about my allergies for a while as we played and swam. I was sure to tell her that I was glad she dragged me to the pool, and she was nice enough not to say “I told you so.” At least, not outright. It was definitely implied.

Ahh, the Joys of Observing Public Drunkenness…

After my girlfriend came home from work, we all headed out to eat at one of our go-to restaurants, a sports pub type place. We don’t really watch sports (on account of me hating them and all; my girlfriend is more likely to watch than I am), but there are a few sports pub type places around here that are worth the noise and sports just for the food.

There was a table full of guys and gals next to us who were I think about 19 going on 12. One girl in particular was talking–no, pretty much yelling in a high-pitched voice much of the time, dropping F-bombs like crazy. My daughter, good girl that she is, covered her ears. But I think that was as much due to the noise as the cursing.

In any case, I figure it was a good way to deter her from someday going out and making a drunken fool of herself.

But at least they were having fun. Or something.

Cleanliness & Messiness

Once we got home, I was determined to get a start on screen printing steps. Step 1 was “clean the screen.” I did that, and set it down to dry, not thinking I would touch it again until the morning. But then I decided I wanted to go ahead and apply the photo emulsion, so that it could dry overnight in the dark.

As I have likely said before, there’s a reason I do most of my creative stuff digitally. Doing artsy stuff “in real life” is so messy and imprecise. Applying the photo emulsion to the screen always sounded so easy and straightforward in instructions.

But I did it, for better or worse, and covered the whole affair with a well-sealed and light-shielded cardboard box (and added a quilt this morning to avoid any light leakage from my office lamp and the sun through the window).

Once the household is awake, I can start being noisy enough to print out a transparency of the chest emblem screen design and make an attempt at exposing the screen. I’m a bit worried about whether I got the layers of emulsion thick and even enough. But that’s what testing is for, I guess.

I was relieved to discover that I can actually clean the emulsion of the screen completely and start over if need be. I had thought it was automatically a permanent thing. You can choose to leave an exposed screen as is, if you want that pattern/stencil for re-use. But otherwise you can wash out the emulsion. Nice.

Redesigned Mask Pattern

Front

mask_topFrontBack_curved

mask_Bottom_front_curved

Back

mask_topBack_curved

mask_BottomBack_curved

This made a lot more sense once I converted to the actual shape and curvature of the mask in flattened/stretched form. I adjusted the front webs, and then added a new layer to my file to draw the back webs superimposed over the front webs, and then moved those back webs to a separate file and yada yada. This should come out pretty well, I do believe. We’ll see.

Today should be a quieter day. A quiet morning at home, at least, before we do much else. So hopefully I can at least expose my first screen!

Up Next: Getting Some Screen Time


Delays & Progress

That Ol’ Parker Luck

I’m not having much luck getting everything lined up for screen printing.

I was able to make a little shopping trip before work yesterday to get some peripherals for the screen printing process: latex gloves; nylon brush; 150 watt clear bulbs; black poster board… But one of the rather important items I need is a stack of inkjet compatible transparency film, which is not so easy to find, especially in small enough quantities to make it readily affordable. Long story short, I ended up ordering a box of 20 for a good deal on Amazon, with free 2 day shipping (I still defend my Prime membership just for the savings on shipping!), so I should have the transparencies by tomorrow.

It’s probably for the best, though, since I still need to prepare my limited apartment space for the process of preparing and exposing screens, doing the screen printing, cleaning the screens…

I also need to cut some largish pieces of cardboard. I need to stretch each portion of the costume flat to a degree of stretch matching–or at least approximating–what it will be when I’m wearing it. That shouldn’t be too hard for the leggings, boots, and mask. The torso portion of the shirt will be easy enough, but getting the cardboard pieces sized and inserted in the sleeves…that should be interesting. And the gloves–specifically the fingers… I wonder if maybe the right size tongue depressors might work for that.

Completing Complicating the Mask Design

I mentioned that I wanted to do a screen specifically designed for the back of the mask, where originally I was going to use a generic web pattern that would also be used for other portions of the costume.

Well, I got a start on that this morning, and I owe an apology to some Spider-Man costume designers out there. I’ve seen masks on Spidey costumes where the webbing pattern on the front and back didn’t quite match up the way I thought it should. But it is pretty darn difficult to design that sort of complex pattern–which ultimately curves around the oblong geometry of the head–on a two dimensional template. Imagine that.

I’m sure there’s some kind of math-ness that would make this easier and more correct, but I figured, hey, who needs math when you can just painstakingly wing it and most likely not get it right before the third or fourth try?

Here’s what I’ve got so far:

mask_Back_halfFinished_preview

[UPDATE: You’re right, you’re right. This won’t work unless I make the design with some curved edges. I have a new plan… ]
I think it will turn out well enough.  I’m doing each half of the back separately on each side (there will be some copying and pasting from one side to the other to match things up), and I will do separate screens for each side so that I can do some lining up during the screen printing process. One nice thing about the Ditko Spidey is that the webs are dense and random-ish enough that I can get away with a lack of precision, within limits.

Here’s an example of Ditko Spidey in profile.

There was, at times, some fudging of the lines to wrap the web pattern around the mask. And if you look at some three-quarter views of Spidey’s head, the web pattern lines aren’t drawn such that they would properly wrap around if you could turn that 2D head in 3 dimensions. This is by no means a criticism of Ditko’s (or any other Spidey artist’s) art. It is just commentary on the inherent difficulty of consistently translating the web pattern into 3 dimensional space.

Meanwhile…

So, maybe tonight I can at least prepare the first screen with the emulsion, let it dry. Then tomorrow–once my transparencies arrive–I can finalize and print out a test portion of the design for exposure on the first screen.

Baby steps.

Up Next: The Journey of a Thousand Webs

Eager to Start Making a Screen Printing Mess…

wpid-img_20140612_054446.jpg

It turned out that the art store had a screen printing kit that was cheaper than the sum of its parts, so I went ahead and grabbed it. I ordered a mess o’ extra screen fabric online for about $10. I need to grab a few optional but important peripherals, but overall, this has not hurt my wallet as much as I thought it would.

Now I just need to find time to start experimenting! But the weekend isn’t far off, so I can focus on getting my screen patterns ready.

The List of Screen Patterns…probably mostly complete…

In listing the screen patterns needed for the costume in my last post, I was missing two, the upper and lower mask patterns. I completed the pre-final versions of those this morning:

mask_Top

mask_Bottom

No eyes, as you’ll notice. That’s because while I have a pretty good idea where they’ll be, it seems best to wait and cut the holes/add the eyes/lenses once the mask is screen printed so that I can get the best adjustment and placement for my actual face and all. That’s the theory anyway. But I did design the eyes, and couldn’t resist doing a full “preview” image of the mask design:

mask_topAndBottomPreview

I am SUPER happy with how this came out. Here’s a comparison to my primary reference:

mask_topAndBottomPreview_besideDitko

I think I will also end up doing a screen specifically for the back of the mask, rather than using the general web pattern screen. It is a special webbing area that I would like to merge properly with the front of the mask. Since I’ve decided to go with the cheaper (and messier) screen printing option, I will have enough fabric and emulsion to make more screens.

So…yeah. Getting close to the final stages here. Just need the time to make one of my screens and test it on a t-shirt or something. Which will, if nothing else, result in a cool t-shirt.

Up Next: Either Screen Printing Experiments or Some random filler to stall until I have time to screen print. (Because heaven forbid I go for too long without babbling about something or another.) (I’m babbling now, aren’t I?) 


Piecing Together a Ditko Spider-Man

n002b_pg02_pn05

As I reported in some detail in my previous post, I have settled on a Ditko-style design for screen printing onto my practice Spidey suit. And since it is impractical to create two screens my height to just slap down patterns on the front and back all at once, I will need to lay down that design in pieces.

I’ve gone back and forth regarding the exact method I will use, the choice being mainly between (A) preparing my screens myself using the typical components and mediums or (B) spending extra on some pre-prepared screen “sheets.”

I’m leaning toward the former at this point, but either way, the size of each “piece” of this screen printing puzzle is going to be in the 8 x 10 to 8.5 x 11 range, since either size can be printed out on a letter-sized transparency.

So, the trick is to break the design pattern down into as few letter-sized chunks as possible. If it works the way I plan, that comes down to these six chunks:

1) General web pattern: applies to lower and upper torso/shirt (front and back); arms/sleeves and back of gloves (to base of fingers); boots; possibly back of mask

webs_genericPNG

2) Chest Emblem/web pattern “frame”: applies to center front torso/shirt

chestwebsPNG

3) Half Back Emblem x 2: applies to center rear torso/shirt

backEmblemPNG

4) Palm/finger web pattern: whole screen applies to palm side of hands/gloves; finger portion applies to fingers on back of hands/gloves

hand_palmPNG

5) Mask/upper front: applies to, unsurprisingly, the upper front portion of mask

[Not done yet]

6) Mask/lower front: you get the idea

[not done yet]

Since I am adding red, thus forming the web patterns from the remaining uncolored black of the spandex, the patterns are negative, which will result in the screens being “open” where the black of these patterns is, laying down the red only in those areas.

This is my first time screen printing (it’s been a time of first for me lately…), so I am hoping that a couple of portions of my plan are possible:

A) Flipped Screens: Once I have a screen complete, can I use it flipped over to create a mirror image of the pattern rather than creating a separate screen? This is my plan for the back emblem. But if I have to, I can create a screen for the other half, mirrored.
B) Partial Screen Pattern: How hard will it be to lay down paint with just a portion of a particular screen pattern? I have designed the general web pattern screen to be used in multiple areas, most of which will require only a portion of the pattern.

These “unknowns” are a good argument for me using the option without the pre-prepared screen sheets. I can get more overall screen fabric for much less than I get extra pre-prepared sheets, so if I need to do more screens than I have planned, it will save me a lot of money. Plus, that will allow me more room for experimentation ahead of actually printing on the costume itself. There will be no “undo” button after I start laying down the ink.

Okay. What about those underarm webs?

So, I didn’t really talk about one of the most interesting parts of the original Spidey costume: the webbing mesh stuff under the arms.

I don’t recall there being a  real stated use for the webbing under the arms (or “pit webs” as I’ve seen it called), but I always assumed it provided some level of glide for Spidey. {shrug}

Ditko drew it quite prominently and proudly, but after he moved on, the webbing waned, waxed here and there later on (McFarlane used it), and just kind of became dependent on the whims of the artist. I think I remember in one comic Peter having added it back, and having thoughts about it, but I couldn’t begin to tell you what issue and/or when that was…

Anyway, the question is, how will it apply in my Ditko costume? I haven’t decided yet. But I might play around with it. If I could work up something that is (A) removable and (B) not too silly looking, I might incorporate it.

I mentioned the underarm webbing to my girlfriend–who has been observing this whole process with what can best be described as supportive bemusement–and she showed the closest thing to a real opinion on the whole thing yet: “Uh, no.”

Up Next: More Plans and Hopefully Some Screen Printing Experiments


The Steve Ditko Spider-Man

The best I remember, I received my first Spider-Man comic in my Easter Basket when I was around 8 years old. It was a reprint of “The Amazing Spider-Man” #4 (“Marvel Tales Starring Spider-Man” #141 according to the Internets). I went on to read (and re-read) these “reruns” of the original Spider-Man series for years, and of course got a hold of any other Spider-Man comics I could. There were other back issues and current issues to read, including several different monthly titles such as “Peter Parker: the Spectacular Spider-Man,” “The Web of Spider-Man,” and so on.

But I feel very lucky that it all started with these reprints of the originals. I mean, for one thing, I was still a few years away from being born when the originals were being produced and released. For another, I’m pretty sure my mom–out shopping for Easter basket goodies for me and my siblings–just stopped by the comics with the idea of getting “a comic book for Ben.”

She likely knew that Spidey was a good choice. I was probably already watching Spidey on the Electric Company. (I told my mom I wanted a Spider-Man costume like the one on the Electric Company. She said I should write them a letter asking for one. I think I actually did. But I assume the answer was no, as I never received said costume.) I might have already been watching the Spider-Man and His Amazing Friends cartoon on Saturdays. But did she know that she was introducing me to the original stories from the 60’s?

I don’t know. But I’m glad this was where I started. Because these were the comics by artist and co-creator Steve Ditko, and as I might have said before, Ditko’s Spider-Man is sort of the Primal Original Spider-Man to me. The images from his run on Spider-Man are very much embedded in my mind:

“Ahh, my leg! Is it supposed to do that?”

Look at that! I mean, look at it! That’s not just Spider-Man, as in a guy who wears a spider-themed suit and goes by the name Spider-Man. That is a spider-man, a spider-like person. Humanoid, but evoking–no, oozing spider-ness in the lean and oddly flexible turn of his limbs, the splay of his fingers…

There is just such a “Ditko-ness” that I cannot really describe. You can see more Ditko Spidey in a couple of image galleries such as this one and this one at the Chasing Amazing blog. (And I highly recommend you Google Steve Ditko and just check him out as an artist and a person in general. Very interesting fella, and truly foundational in more comics and comic characters than you might imagine.)

There have been many updates and reboots and new takes and so on regarding Spidey’s look. I’ve liked most of them, not liked more than a few. I would even say that there are many “cooler” takes on Spidey than Ditko’s. Still, the Ditko Spider-Man was my *first* Spider-Man, and that look is firmly rooted in my mind.

The Test Costume (that has possibly gotten a little out of hand considering the original intent)

I started out this test costume with a couple of aims in mind. I wanted it to be much like the original costume Peter made in terms of components: mask, gloves, boots, shirt, leggings. I also set out to sort of explore just how hard it would be to basically hand-craft a costume the way he was depicted as doing. Not in the same way that Civil War reenactment types set out to create their uniforms using only the materials and tools available to them in the Civil War era. I was just kind of looking at it in the spirit of things.

I suppose I have stuck to the spirit of the idea in a lot of ways. I started with the basic material–spandex–and sewed it together in the form of the specified pieces. And I will be screen printing the design on that material, adding lenses and soles. But I definitely wonder how much more difficult this would have been in the pre-Internet age…

Anyway, I will save a full evaluation of the process for when it’s actually done. My point now is that considering the inspiration for the method of crafting the test costume came largely from those early Ditko comics, it only seems fitting to base the final design of the test costume on the Ditko version of Spider-Man.

The Design and Beginnings of a Plan

Since I have spent way too much time thinking about this, I have decided that there are 6 basic components to a particular Spider-Man costume “style:”

1) Web pattern: style and layout
2) Eyes: shape and style
3) Chest emblem: style and size
4) Back emblem: style and size
5) Color: how bright the red and blue are
6) Balance and lines of the red and blue/black areas of the costume

And to sketch out the Ditko aspects of that list in basic form:

ditkoplanPNG


So, fine for a general concept, but now I need to break that down into a specific, final pattern, and divide it into 8.5 x 11 “puzzle” pieces that I can screen print individually in such a way that they all fit together. And I need to do it using no more than 7 of those pieces, to save spending even more on supplies. Should be interesting…

Up Next: More Plan Details AND “Are we going to talk about that underarm webbing?”


Waiting to get ready to get closer to being almost done

The Costume Components Checklist is complete:

wpid-img_20140609_042500.jpg

Basically, I have achieved Spidey-esque head-to-toe coverage. Woo hoo! (Incidentally, though I said it before, it’s worth saying again: The gloves? Easy to pattern, a pain in the hoo-hah to sew. Oy Vey.)

I have made a slight change of plans regarding the finishing work. Since accepting the inevitability of screen printing being the best method for adding the color/patterns, I have been researching the best way to do that. More on that in a moment. But the more I thought about the process of screen printing the costume components, the more I realized that I would want to keep the components as flat as possible until that’s done. Hems and Velcro and such would be a bit disruptive for the smooth application of the ink.

So, I’m waiting on that finishing work until I have the screen printing done. This makes total sense, but did make for a bit of an anticlimax when it came to finishing the components. It was kind of like that feeling I get when I’ve been driving at Interstate speeds for a few hours and then get off on the exit for my destination. It’s hard to slow down from Interstate speed to in-town speeds, you know?

But then I found what I think is going to be my best bet for screen printing, and that led me to the next leg of my journey, and things started to speed up again.

Screen Printing Made Easy Easier & Cheaper Relatively Cheap Less Expensive…sort of

I was doing some fresh searching for screen printing tips & techniques, and ran across a link for one of this guy’s videos: NateScreenPrints.com.

I almost didn’t click the link. The video was named something like “Amazing Simple Way to Screen Print at Home.” It somehow reminded me of those ads to “Make $300,000 every weekend working from home!” But I thought, heck, it’s a YouTube video. It’s not too long. Let’s take a look.

It was a nice little guide, clear and not too flashy. I’ll be referring to it for guidance later, I’m sure. But the important part was not the video guide itself, but the products that it led to.

Nate was demonstrating the use of one of these sets of screen printing products, and they allow for a much simpler process than I had seen before. The screens are…”pre-emulsified,” I guess is a word for it. Rather than having to coat and prep a screen with emulsion yourself, these are pre-prepared sheets, ready for exposure using your design, which can be printed on a transparency with a regular printer.

Plus, there is not a traditional wooden frame involved. There is a “contact frame,” basically a backing and plastic (glass?) sheet that you sandwich the transparency and screen between for exposure.

Anyway, check out his site if you’re intrigued and want to see the details. But basically, this looks like a process I am much more ready for than the ones I had seen, in terms of simplicity and facilities (living in an apartment and all, I can only get so crazy with DIY stuff).

Nate links to two different sites that sell the products, both as individual supplies/accessories and as kits. You’ll see both sites on his page, but the one I chose is here, at the site for Circuit Bridge.

It’s a pretty reasonable price for what it is (I would need to get an extra pack of sheets in addition to the kit, as the kit only comes with two sheets), and even compared to other DIY screen printing kits I have looked at online, which seem to range from $150-200.

I also did a bit of comparison with putting together a similar set of supplies via purchasing frame, silk, emulsion, squeegee, etc. It adds up fast, doesn’t get you much more for the money, and isn’t as simple as the pre-prepared screens.

There are pros and cons, of course. Whether I do the kit and extra screens, or buy individual traditional components, it’s not what I would call “cheap.” And the limitation of the pre-prepped sheets is size. The typical ones are 8.5 x 11, and even though you can get an 11 x 17 sheet/roll, the contact frame in the kit is 10 x 14. But I have worked out a plan for the screen printing designs that will take no more than 6 sheets, which would be covered by the 2 that come in the kit plus a pack of 5.

The Kit

So…I think this is my best bet for the screen printing. Now I just need to wait for payday. 🙂

Up Next: The Plan for the Final Design of the Test Costume: Ditko Style


Yep–gonna have to do some silkscreening…

Sigh…

Well, I did some more experimenting with fabric painting yesterday, still doing my best to avoid having to do silkscreens. But looks like there’s a good reason why silkscreens are the way people put pictures on clothes. Who’d of thought?

Here’s a visual rundown of my not so successful experiments:

Tape

Tape

wpid-img_20140607_065716.jpg

Not a horrible result, but would be almost impossible to cut out the shapes with any precision.

Frisket Film (adhesive-backed film with peel-away backing) -- seems promising

Frisket Film (adhesive-backed film with peel-away backing) — seems promising

wpid-img_20140607_125341786_hdr.jpg


Oh well...

Blurry edges from paint leaking under. Oh well…

Unless I have some amazing revelation to the contrary, I will plan on doing some silkscreens in the not-too-distant future.

Costume Work: adding the collar to the shirt

I was a good boy and didn’t completely avoid costume construction stuff.

I was really avoiding tackling the addition of the higher collar to the shirt, and as I started taking a closer look at it, I understood why. I really had no idea where to begin. I took a general look at the Interwebs, but sensed that there was not going to be a definitive step by step for this one.

So I dove in. I did use a looser stitch, so that I could undo and redo if needed, and that was a good idea.

I examined, I pieced, I pinned, I agonized, but I pushed through.

I screwed up closing the final stitches, tore them out (I can’t get my borrowed machine to putt a straight stitch into spandex to save my life, so a looser zigzag was the best I could do).

I screwed up re-doing the final stitches, tore them out again (Harder to do this time since I back-stitched over them for some reason).

Re-re-did the final stitches by hand (they’re in a hidden place, so I was ready to not care what it looked like).

And here we go:

wpid-img_20140607_145936.jpg

wpid-img_20140607_145916.jpg

wpid-img_20140607_150047.jpg

There is some definite wonkiness to the stitches, but I have to say that I am overall proud of this, especially considering that I mostly made it up as I went along.

I do wish I could’ve figured a way to extend the collar up with fewer seams. The nice thing about the first version of my shirt was the smooth high collar, with only subtle side seams. But this new one fits better, feels more stable yet more flexible, and has the extra length I need to work with at the bottom for interfacing with the pants. So I’m pretty pleased with it.

Costume Components Checklist

Pants: check
Shirt: check
Mask: check
Boots: check
Gloves: 1 out of 2

Just one more glove to sew and the pieces are done. And then:

Costume Finishing Work Checklist

Pants: hem wasit and ankles; add velcro outside front/back (to attach to shirt); possibly add velcro at calves to keep boots up
Shirt: hem wrists; trim/shape waist(to add point to bottom front); hem waist; add velcro inside front/back
Gloves: hem; possibly add zipper or velocroed opening for easier donning/tightening
Boots: hem tops; possibly add elastic or velcro
Mask: maybe hem bottom; eyeholes/lenses (a whole plan to make there)

So, it looks like all that’s what I’ll be working on next. And then I’ll start gathering knowledge and  gradually gathering supplies for screenprinting/silkscreening (including figuring which of those two somewhat different things I am technically going to be doing).

Up Next: Devilish Details or Maybe a Vaguely Related Tangent, depending on my mood