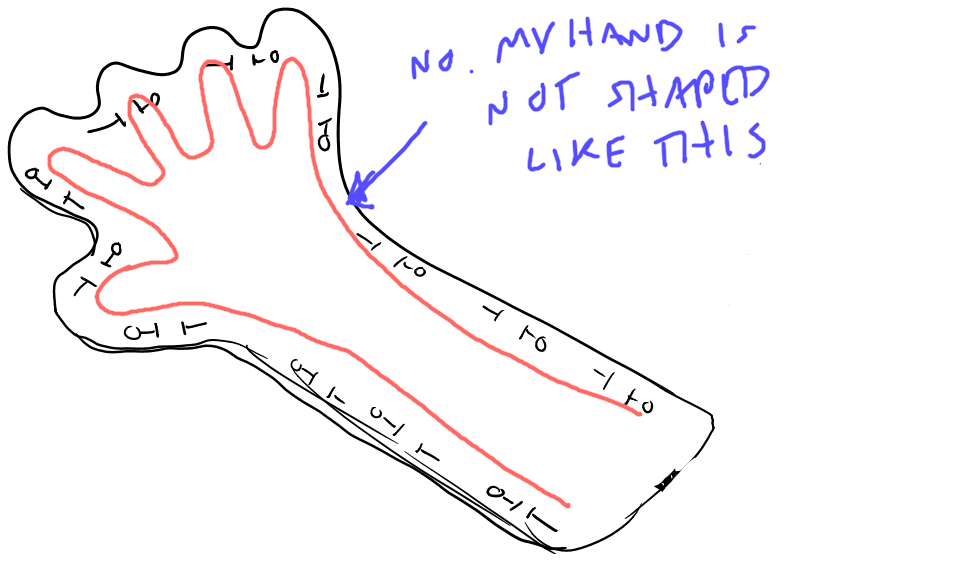
If the top of your sleeve piece actually is more of an arch than a line, that’s actually fine as long as you did your measurements right.
So, in the first part of the EARLY Guide for the shirt, we created the underlying pattern, which includes the dimensions based on your measurements and a Seam Allowance border for the eventual sewing process.
Before we go forward, let me just say this: We will ultimately hide the shirt dimensions layer[s] containing the horizontal and vertical measurements (the section inside the Seam Allowance in the pic above), but KEEP THAT LAYER throughout this design process. You will hide and unhide it as you go along, but it will be important to use for laying out the colors and lines and other design elements of the costume.
Anyway, in this second part, we will do the fun stuff, and add the colors, textures, and patterns for the shirt.
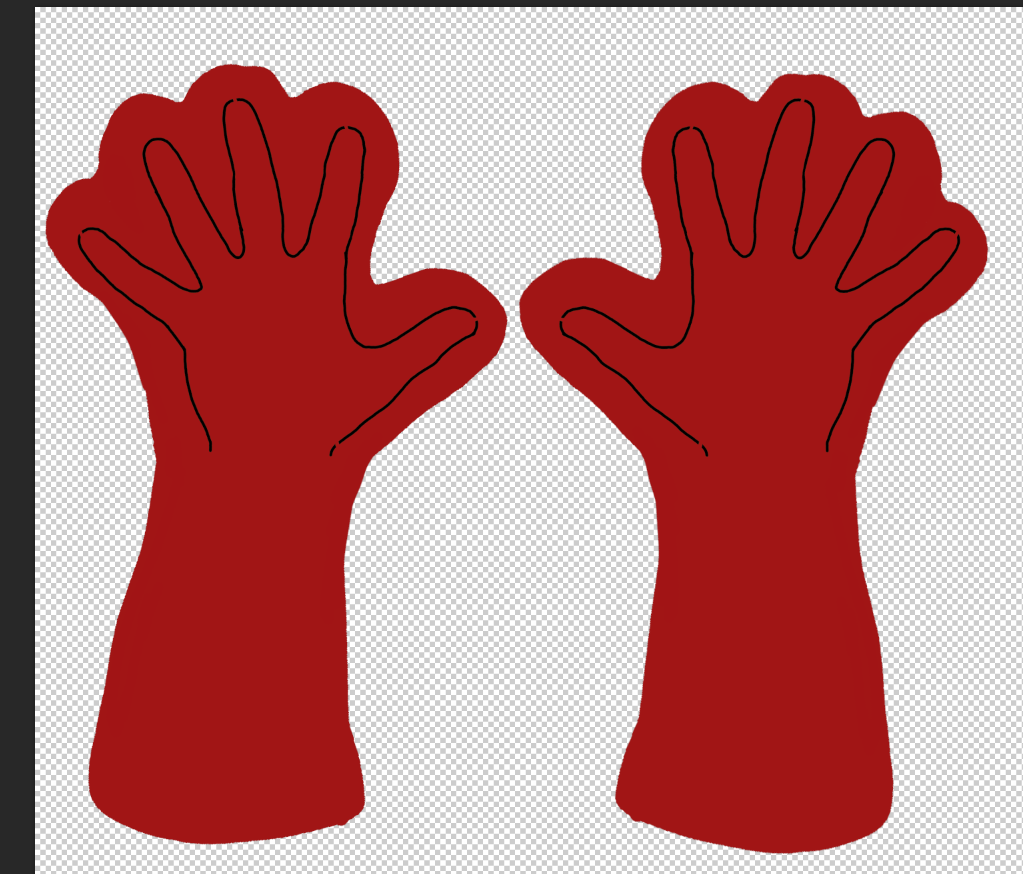
If you did a glove pattern/design based on the EARLY Guide for gloves, you will be familiar with the basic ideas here. Plus, if those gloves are meant to go with this shirt, you’ll want to be sure and use matching colors, textures, and such to bring it all together.
Laying Down the Color
Make a NEW LAYER, and place it under the torso dimension and seam allowance layers. Trace around the seam allowance line and fill that outline with the color. The important thing is to get the color to fill within the seam allowance line. It can go outside the seam allowance line as much as you want since, for the actual fabric, we will cut along that seam allowance line for the outside edge. But it’s nice to keep the edges neat, especially if you want to fit as many pieces onto a 36″ x 58″ piece of fabric as possible.
(NOTE: When choosing a color, you may want to go darker than you think you should. See notes below about allowing for fabric stretch in section F, part 3 of doing the costume layout.)


Choosing a Pattern Overlay–Or If You Even Want One
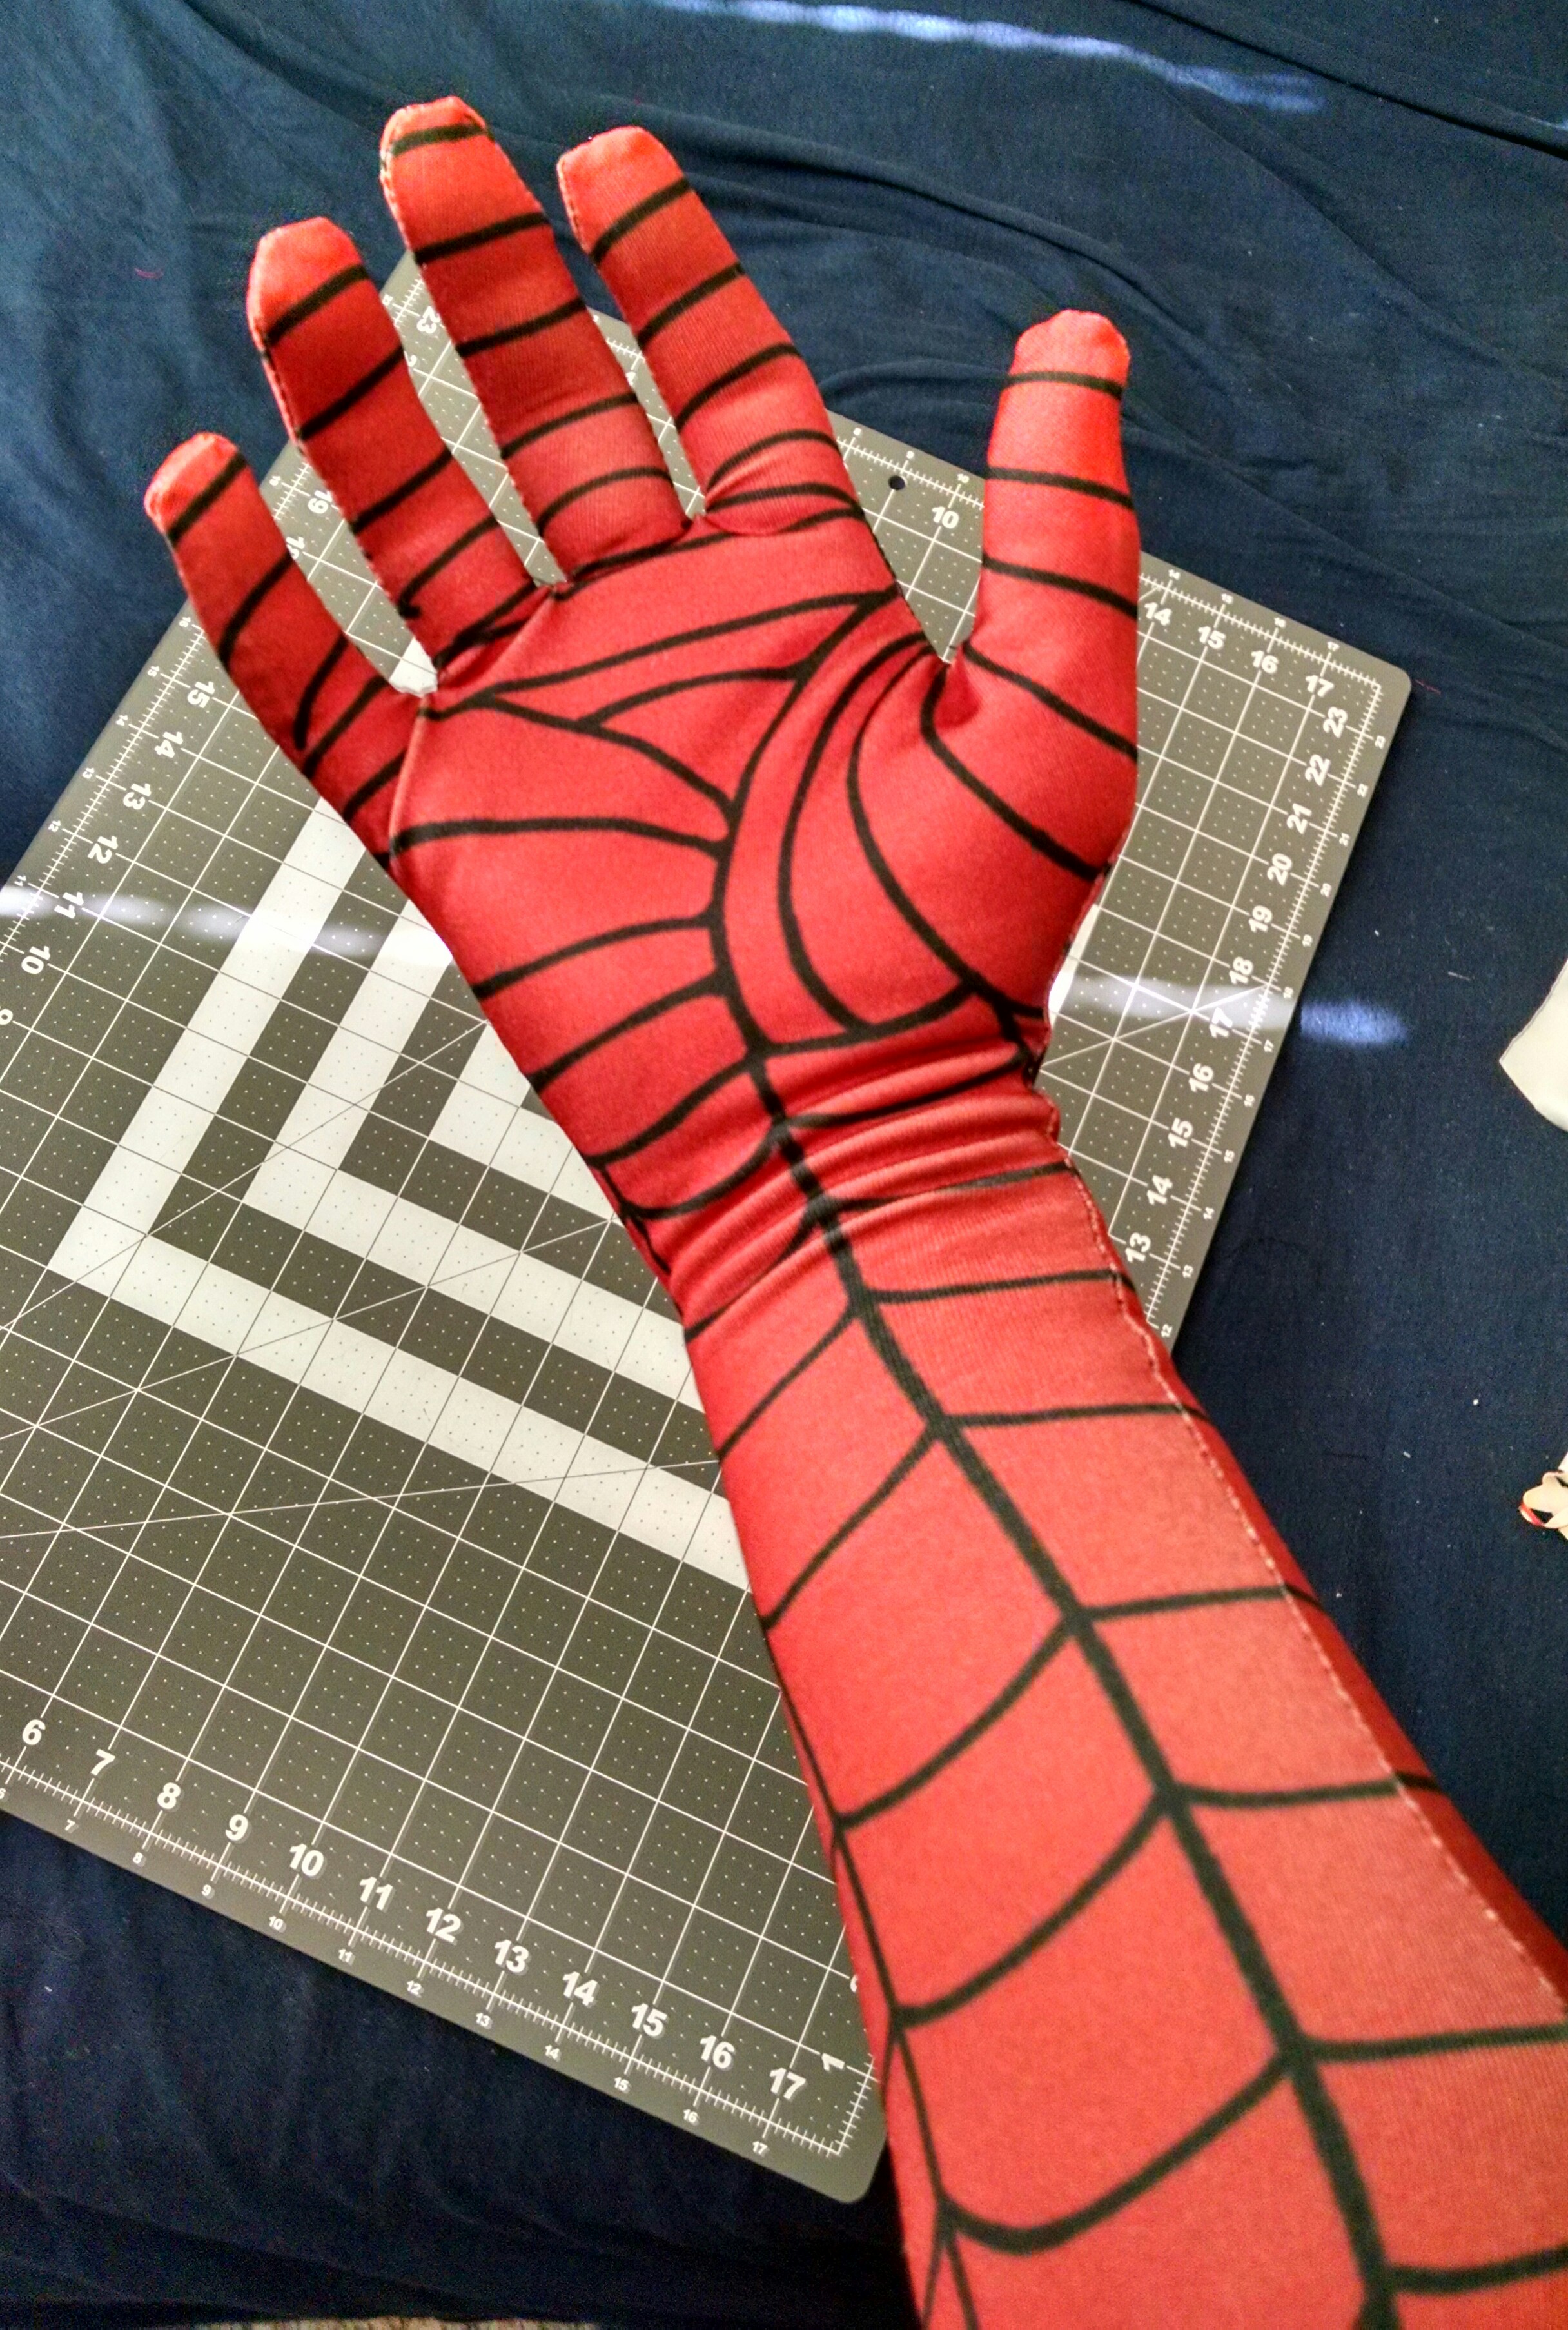
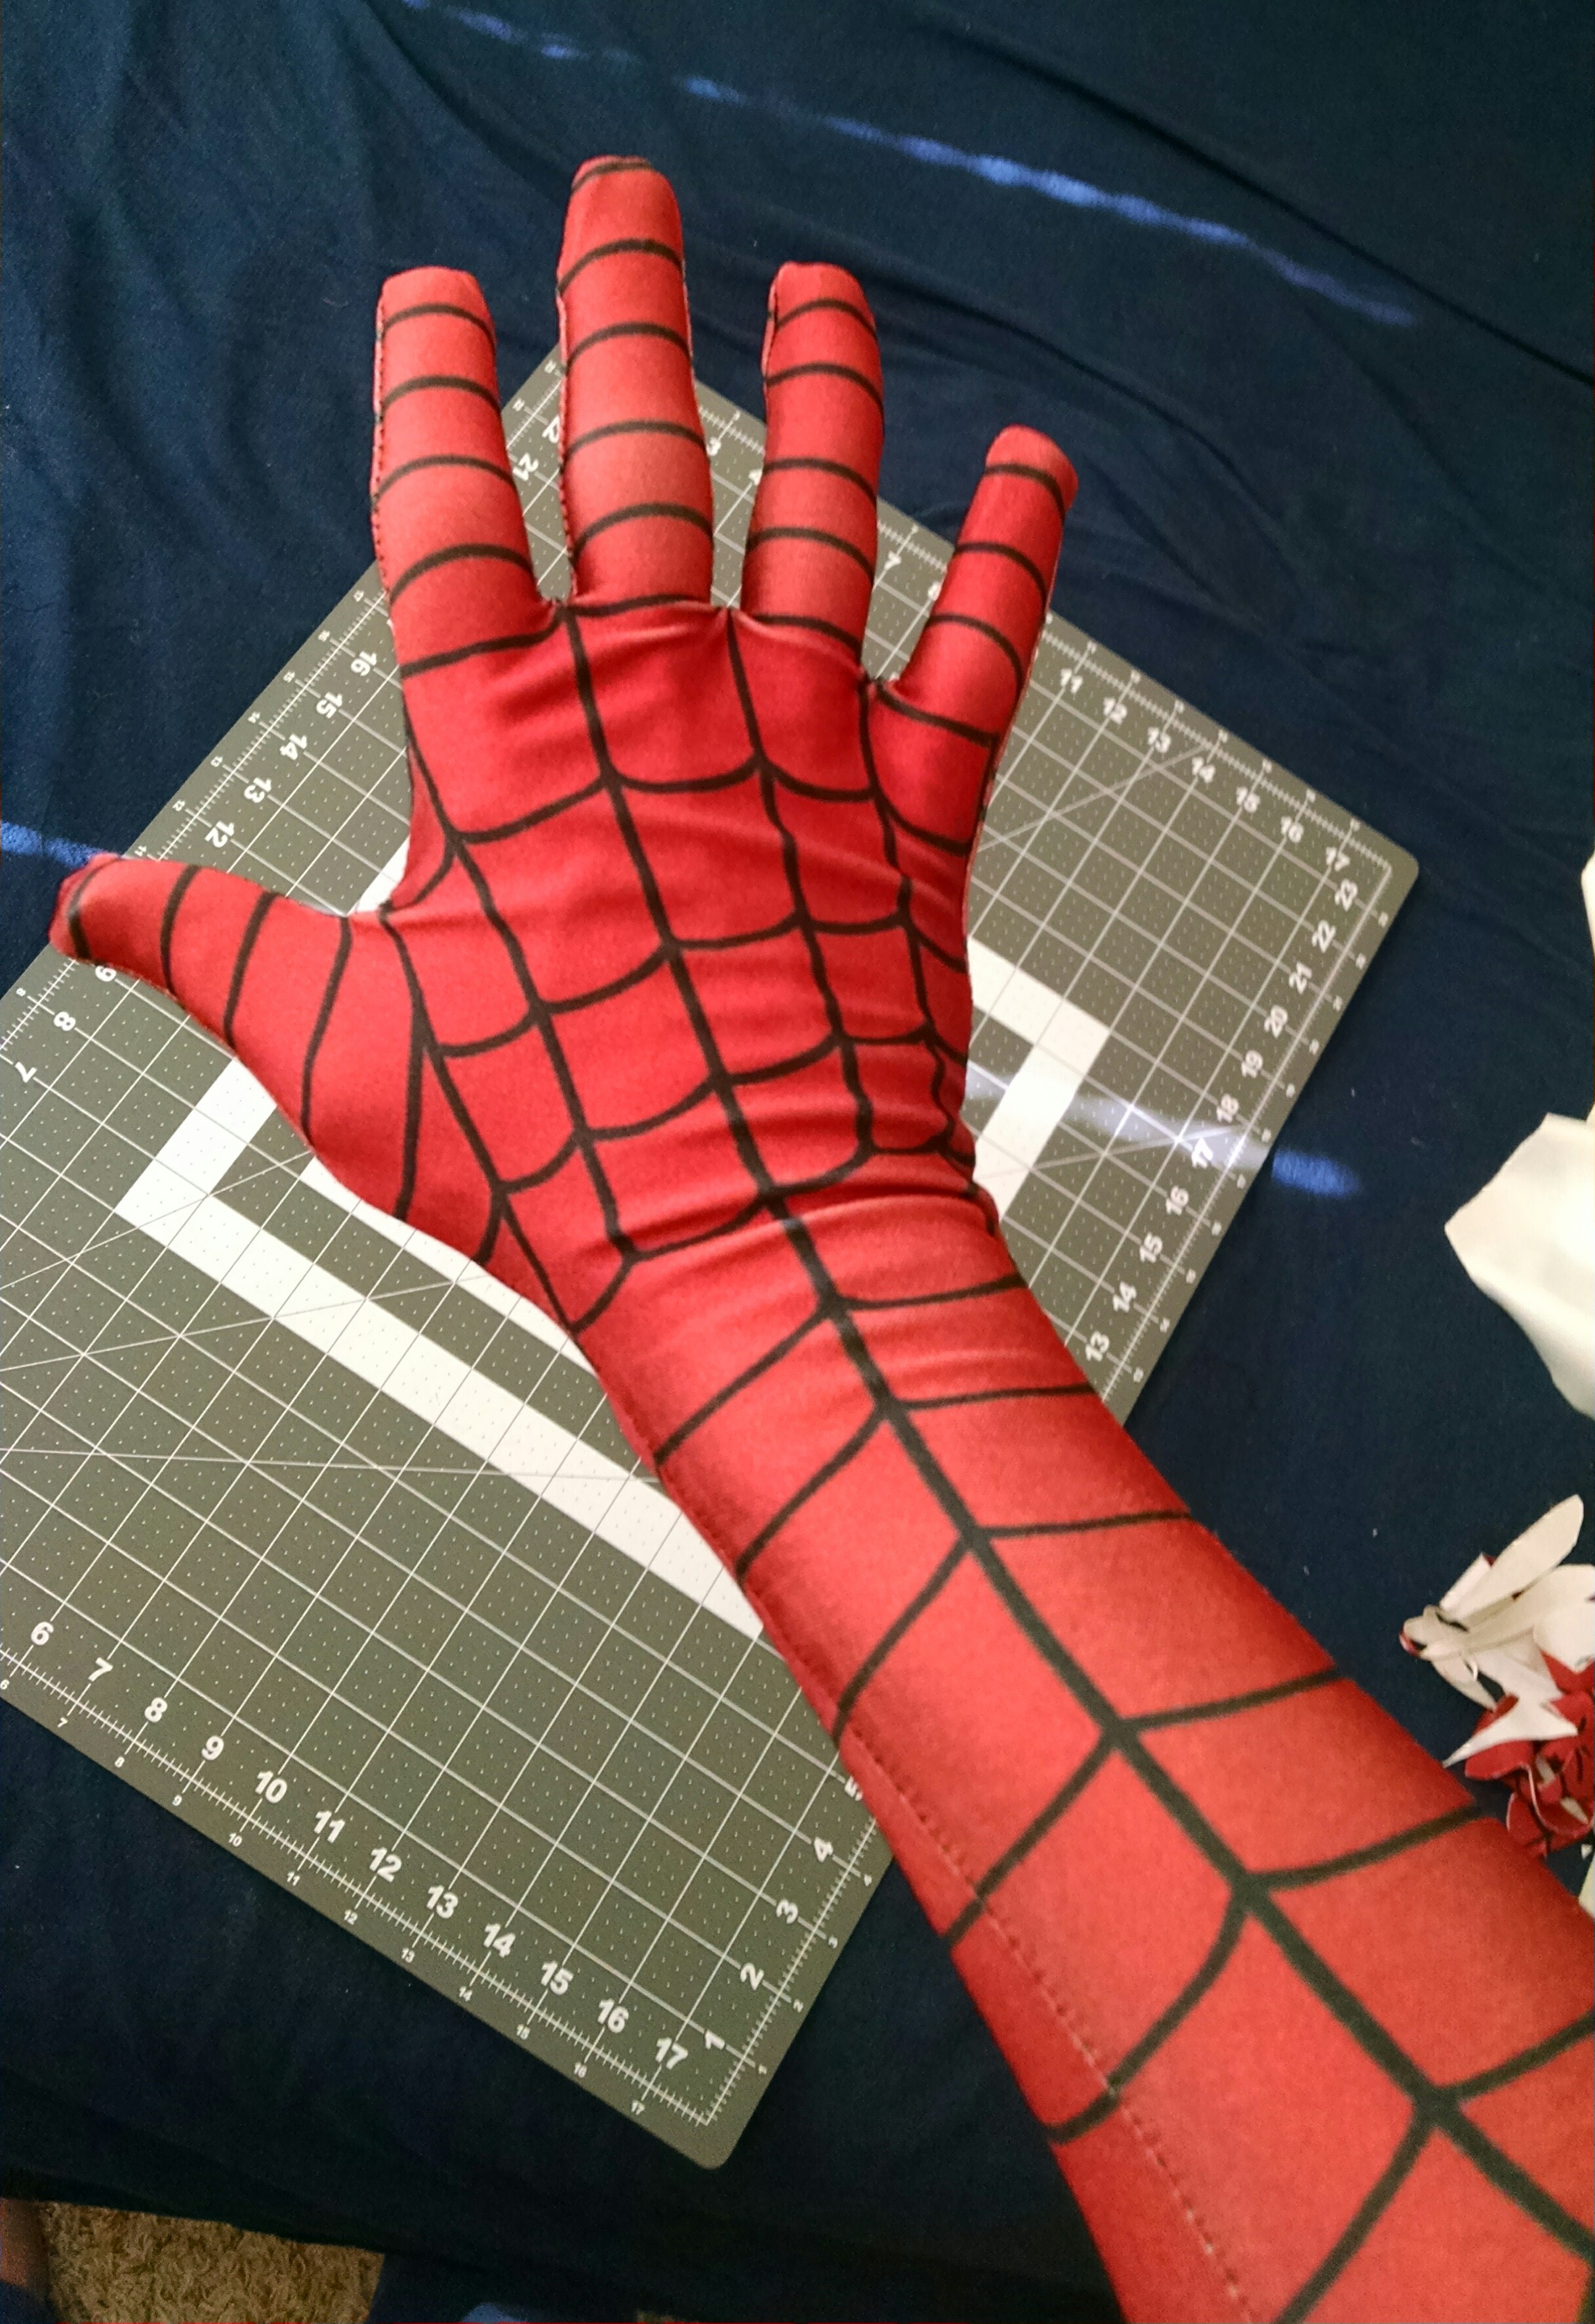
If you’ve seen the Spider-Man movies, and the Man of Steel movie, you’ve seen the thing they do with the costumes, the pattern overlay they add to the fabric to add texture. It’s not a bad touch. It does make the look more “interesting.”
But for our purpose, it’s totally optional. I’m of two minds about the way it has turned out for me. But I’ll cover that aspect briefly, and then you can take it or leave it. You can even add one now, and then remove it from all the pieces later. It’s easy to turn on and off in Photoshop.
If you’re not using Photoshop, there are probably other ways to do this, such as by making a custom layer manually, but that is beyond the scope of this Guide, I’m afraid.
Pattern Overlay Step 1: Get some Photoshop .pat files:
Photoshop has some built in pattern overlays, but they are not of the sort that I find to be suitable for this purpose.
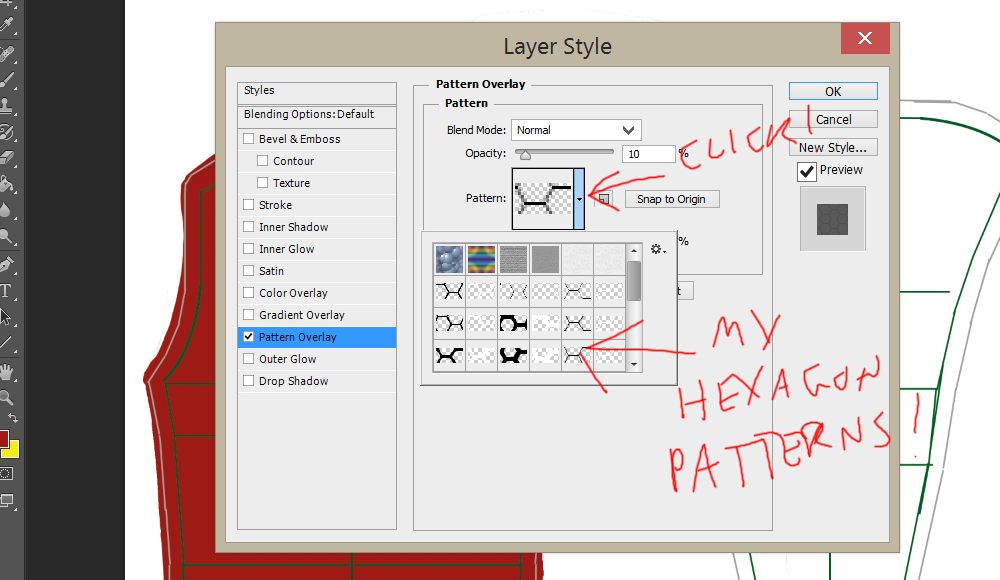
The usual approach is to use some sort of hexagonal pattern, and I found a great free collection of those here at Shapes4Free. You could also do a search for “Photoshop .pat files free download,” but–of course–use caution downloading from unknown sites offering free stuff, as it is all too easy to end up with Malware (I know all too well. Curse you, video game emulators. {shakes fist})
Pattern Overlay Step 2: Import the .pat files into Photoshop:
Thanks to ObsidianDawn for reminding me how to do this for this Guide.
Once you’ve downloaded the .pat file[s], you’ll basically want to get those into the right folder to make them show up in Photoshop. There’s a good chance the files you downloaded need to be unzipped, so then you will want to unzip them into the right folder. Otherwise, just move the files into the right folder.
That folder should be something like: Program Files > Adobe > Photoshop (version) > Presets > Patterns
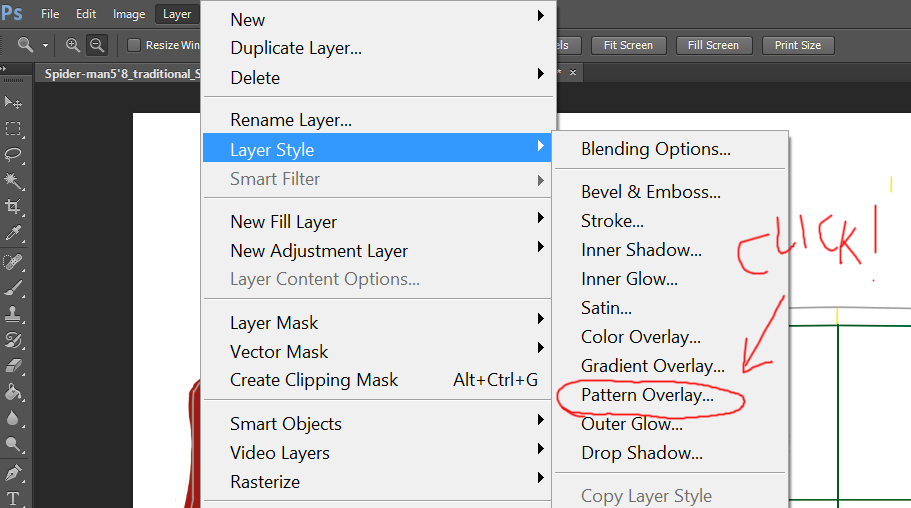
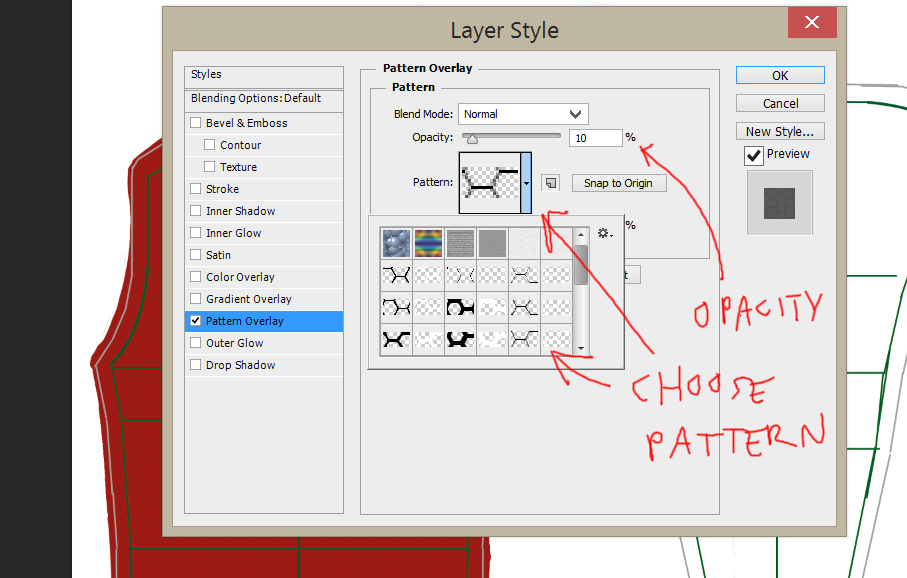
Once those .pat files are in the above folder, access the Layer styles in Photoshop and you should see the pattern[s] there, ready to use:


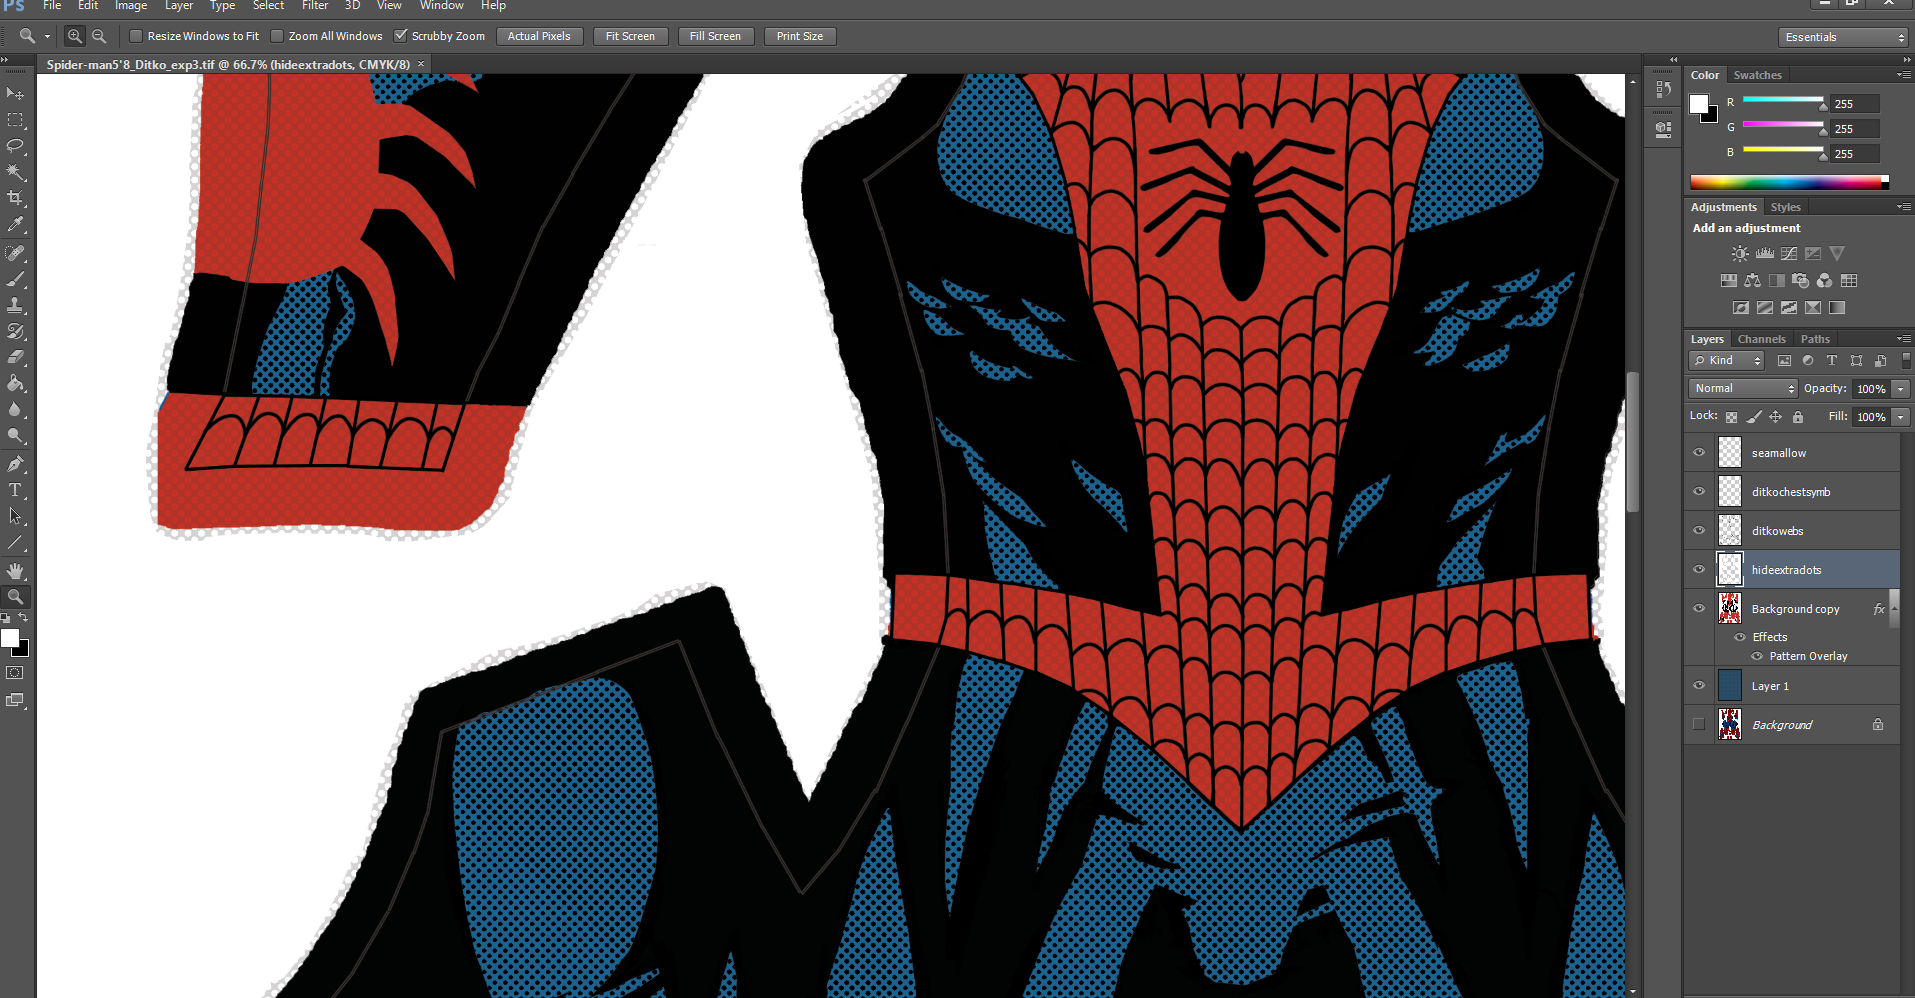
So, select the layer you want to overlay and then open up the dialog box above from the menu: Layer->Layer Style->Pattern Overlay. Choose the pattern you want, and adjust the Opacity (so far, I’ve used 10%, but it comes out almost too subtle on the actual fabric).

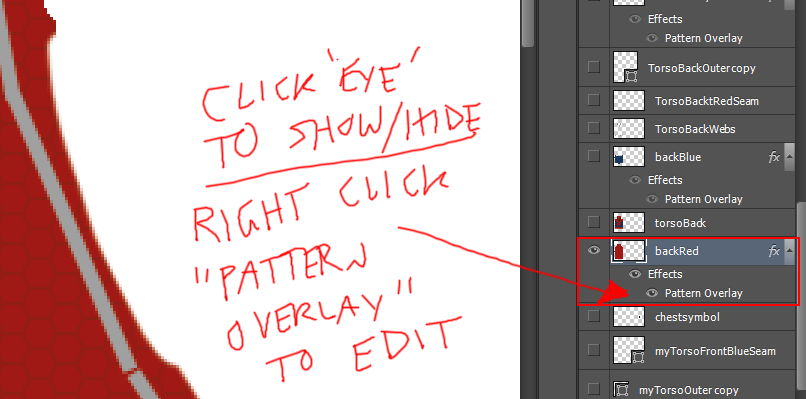
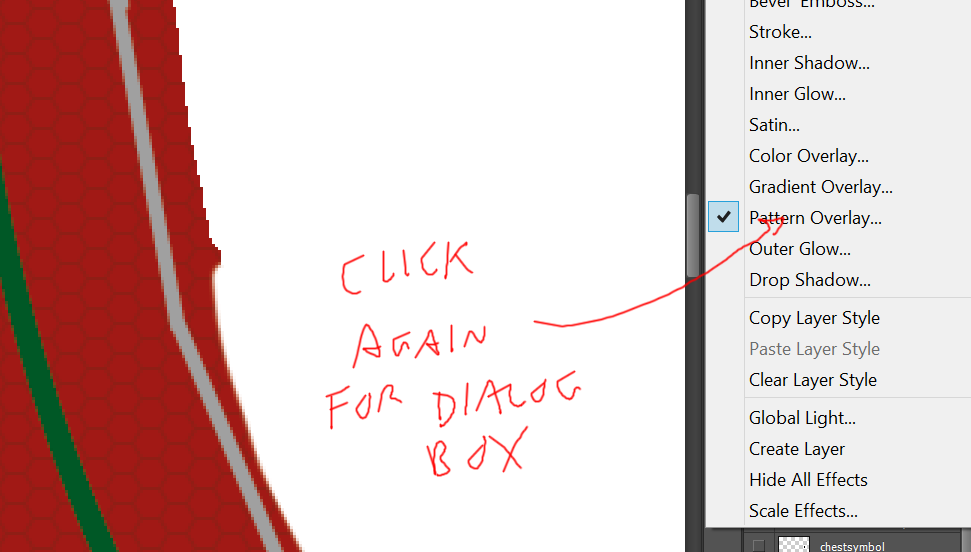
Click OK to lock it in and get a look at it. But then if you want to edit it after the fact, you can access the Layer Styles from the layer itself:


Laying Out and Detailing the Design
So, this is a tutorial for creating your own design more than it is offering a ready-to-use design, so this is where you will need to decide your own take on the Spidey (or other hero) costume and plan it out. I will offer some basic methods that worked okay for me.
But don’t worry. I will also show some examples of these ideas in action.
A) New Color = New Layer; New Design Element = New Layer:
Layers, layers, layers… Depending on how much you use Photoshop type programs, working in Layers may or may not be second nature to you. I remember when I first started doing art digitally, I had a tendency to just keep working on the same layer, because that’s how it works on paper, right? (I’m old, in case you didn’t know that.)
Anyway, sorry if I’m preaching to the choir, but keeping your colors and other major elements on distinct layers will make them much easier to edit.

B) Name Your Layers – and use descriptive names:
I don’t always follow this rule very well, which is why I am saying how important it is. It’s easy to get caught up in the creation process and forget to be organized. The next thing you know, you have 50 layers, and 40 of them are named things like Shape 6 or Ellipse 1, along with Layers 3, 8, and 4. Just sayin’: you’ll be very glad if you name your layers with descriptive names.
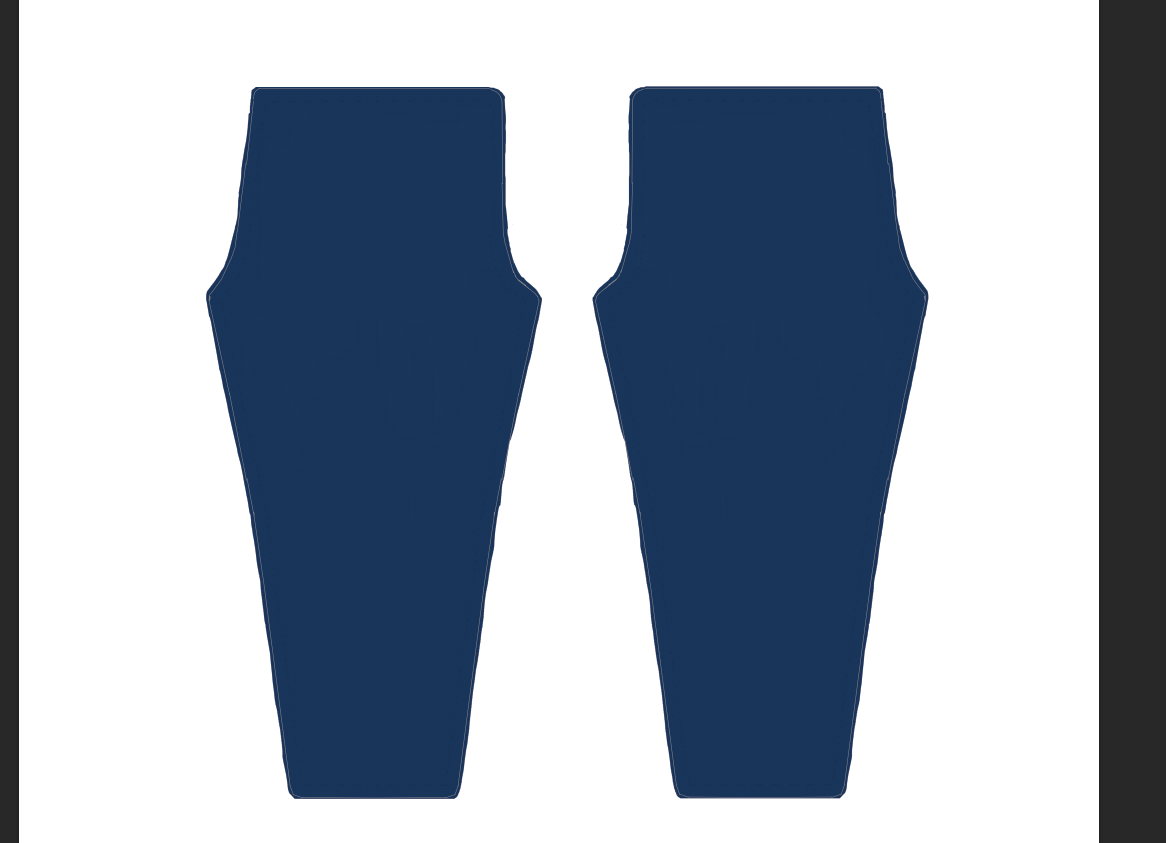
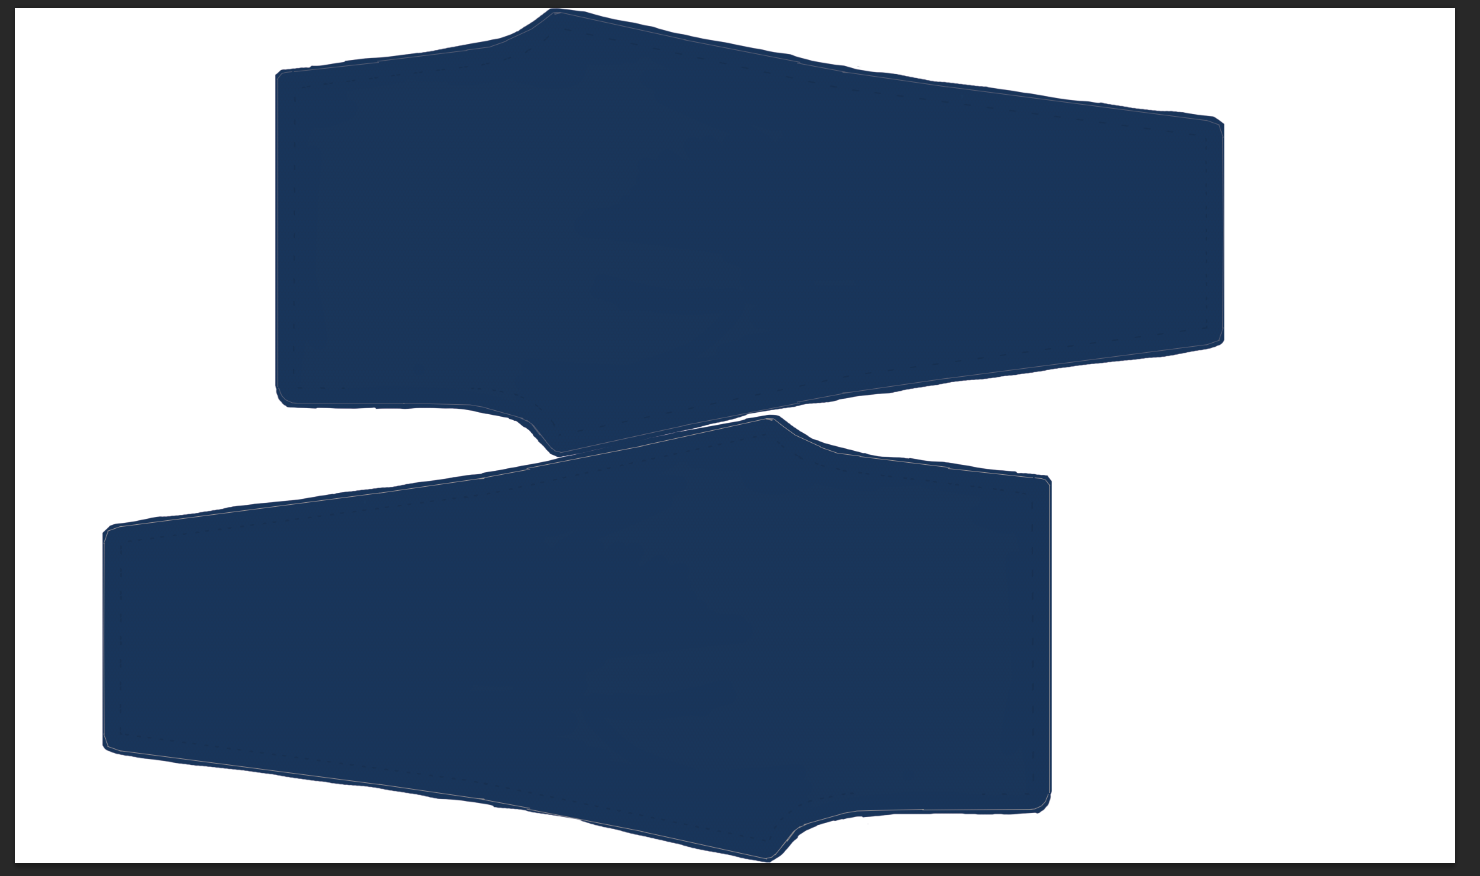
C) Use Symmetry to Save Work:
Again, maybe I’m preaching to the choir here, but as you’ve already seen, we want to use symmetry to our advantage. Most of this design is the same on both sides, so think in halves. Do one half, get it the way you are pretty sure you want it, and then copy it, flip it horizontally, and move it to the other side.

This will also apply–to a more limited degree–to the back/front symmetry of the torso. For example, the Spidey web pattern can be mostly the same for the front and back. The main difference will be that on the back, you cover up most of the middle portion with blue, and if you do a straight-across belt, you will alter then web pattern there. So you can copy and paste the web pattern from the front and only change what you need to.
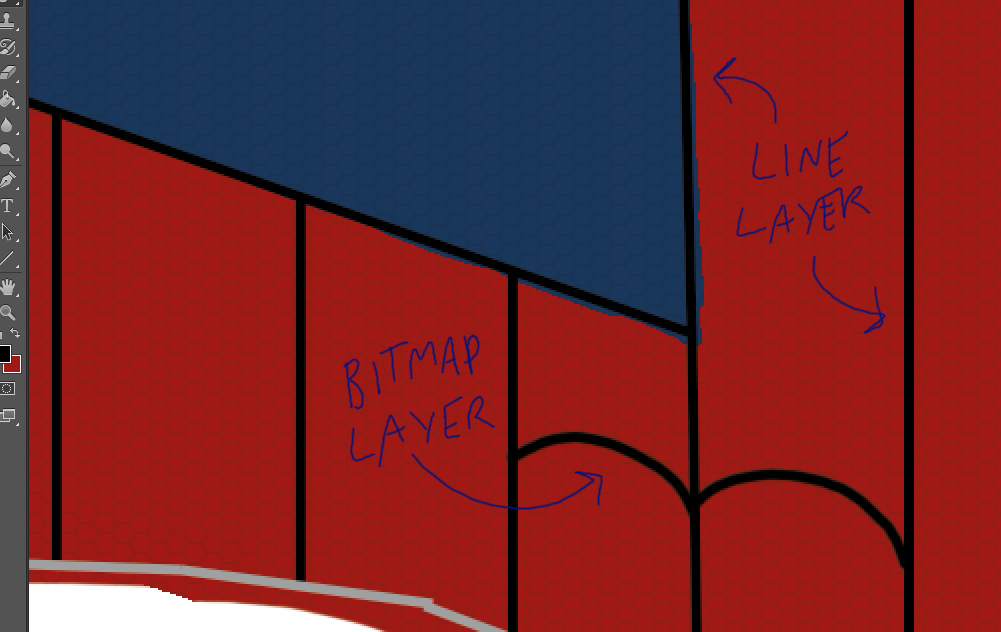
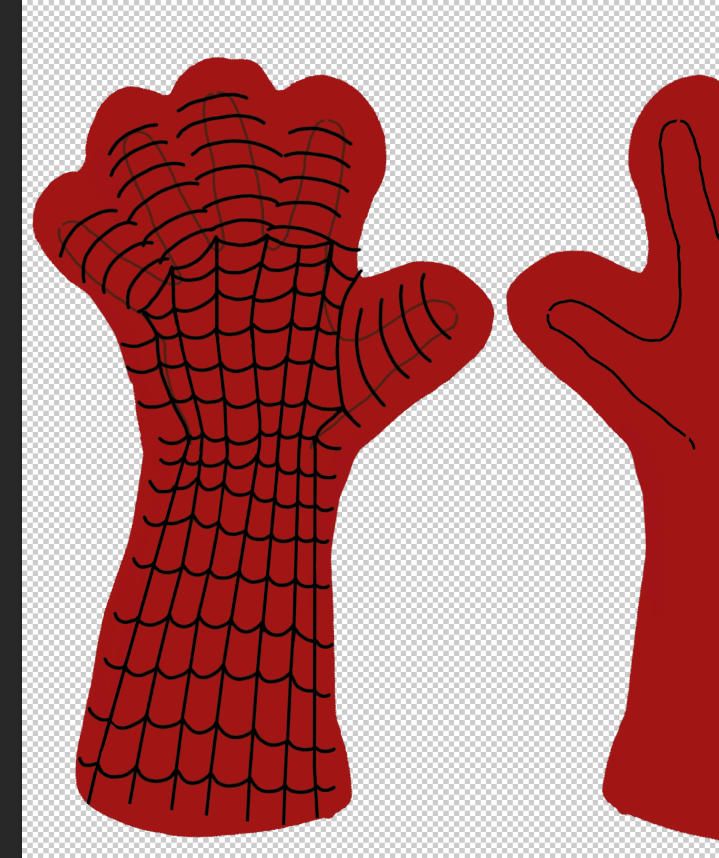
D) Spider-Man Specific Tip: Webbing – use separate vertical and horizontal layers:
Spider-Man’s web pattern is made up of two basic components: long “vertical” lines and “horizontal” curves “jumping” from one line to the next.
I found it easiest to lay out the vertical lines (grouped into one layer) with the line tool, roughing out any curvy portions. Then, I would make a separate bitmap layer for the horizontal curve jumps, and use the brush tool. I zoom in pretty close to keep the lines smoother, and I might draw a curve (or chain of curves) several times to get it just right.

I use a tablet PC with a digital pen, so I can “draw” pretty readily. If you’re using a mouse on traditional PC/Mac, or can’t get the curves smooth even drawing them, you could try other methods, like modified ellipses or the Path tool. Those probably take longer, but may result in less overall frustration.
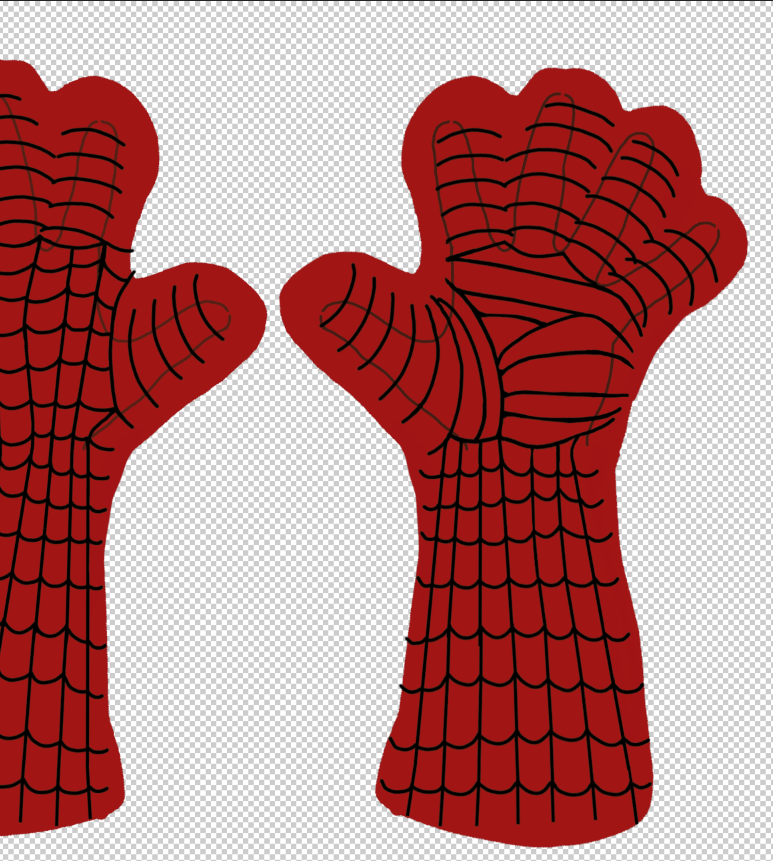
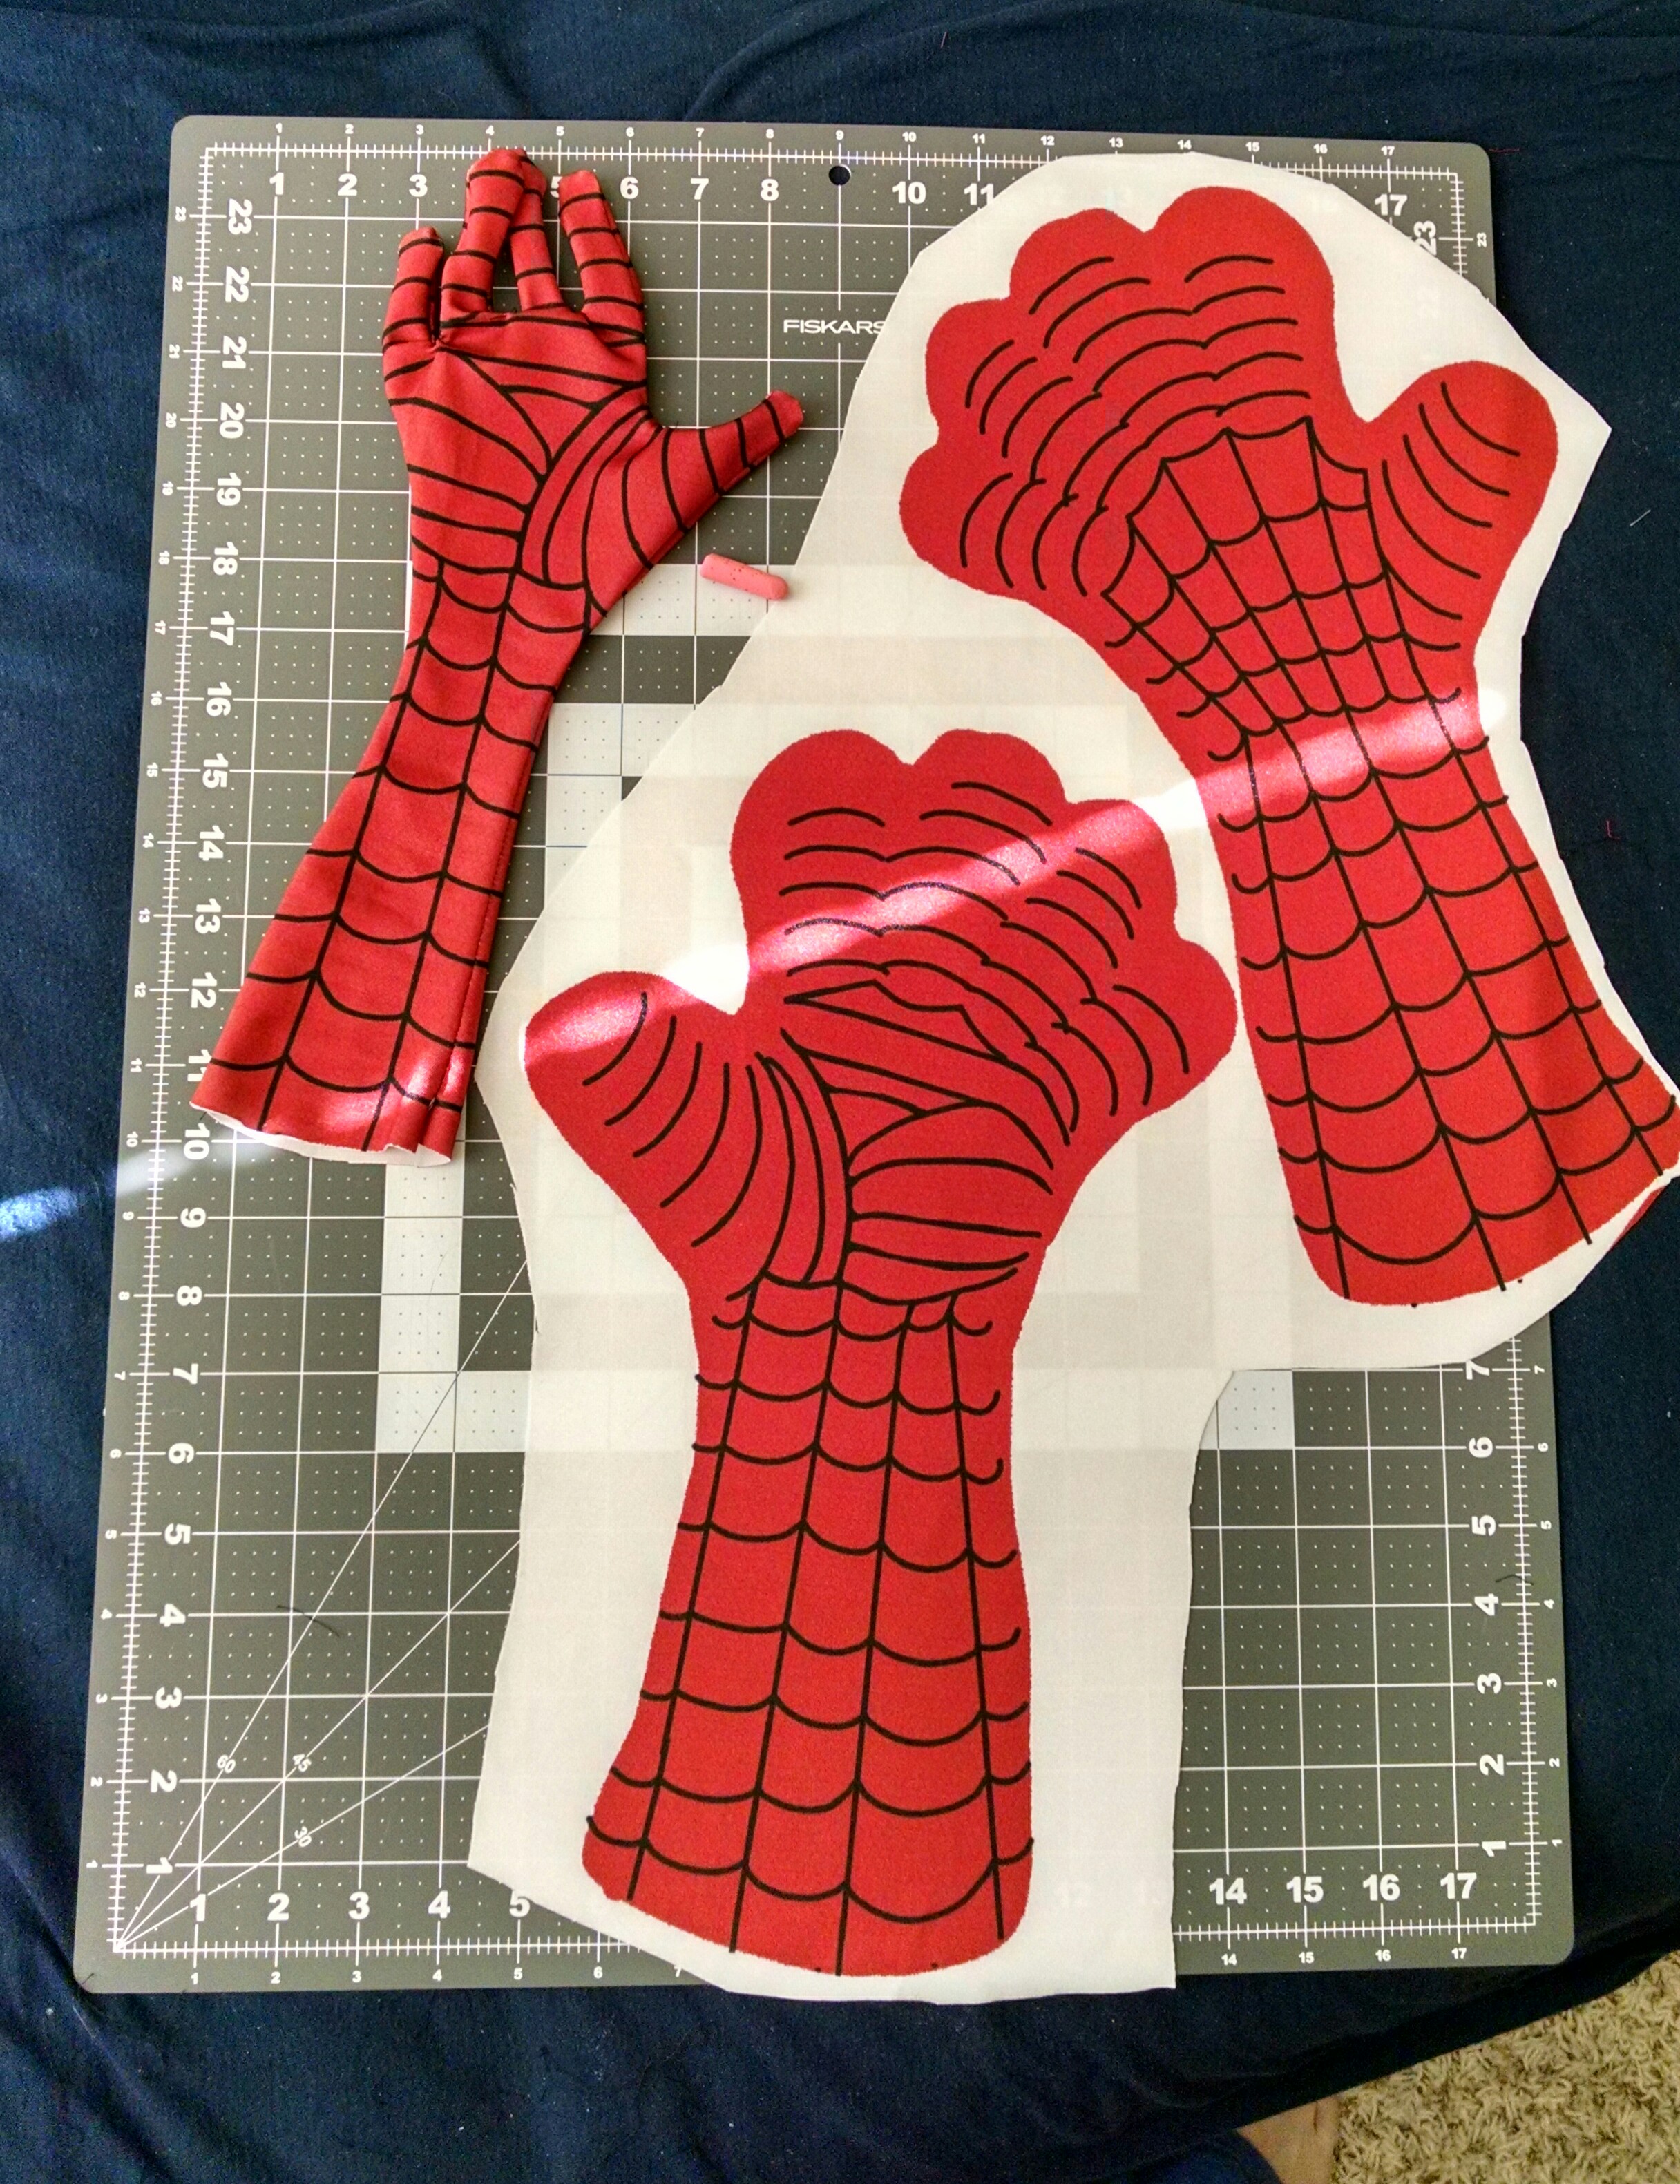
Once you’ve got a batch of web pattern (do it in half-sections, remember!), you can merge/flatten the vertical/horizontal layers into one so it is easier to copy and paste for mirroring.
As you do other sections, just try to keep the spacing and curvature of the web lines consistent.
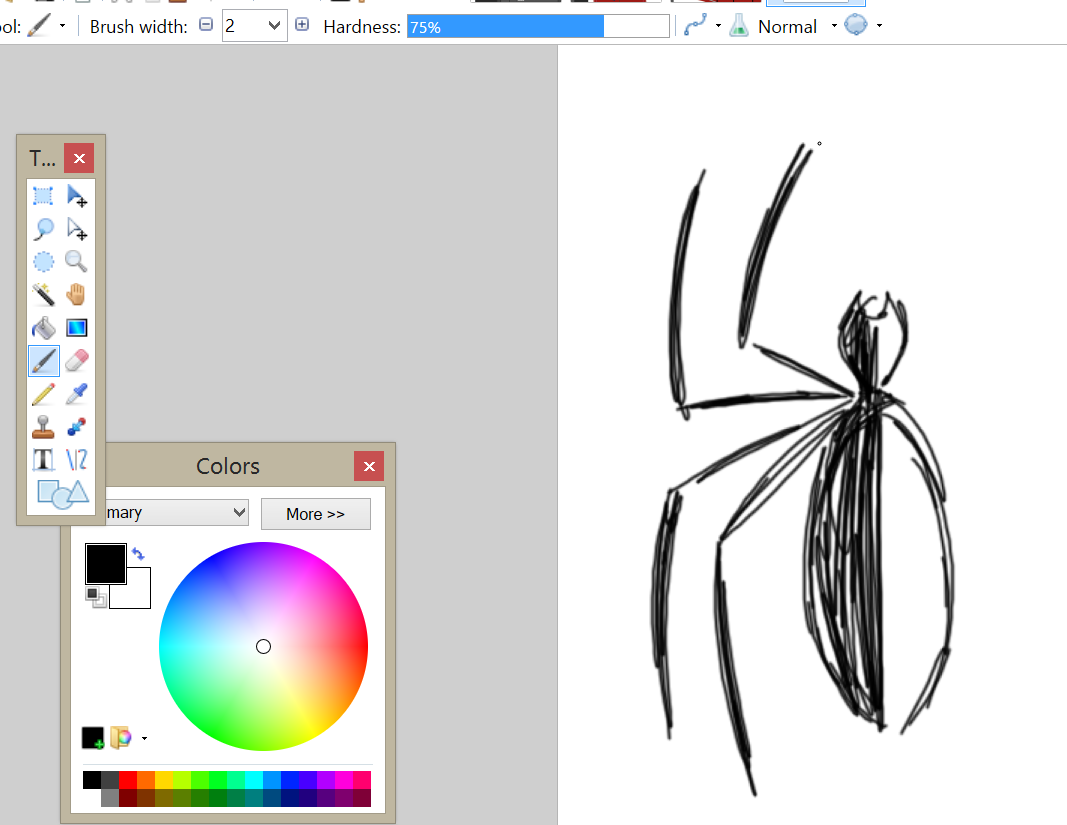
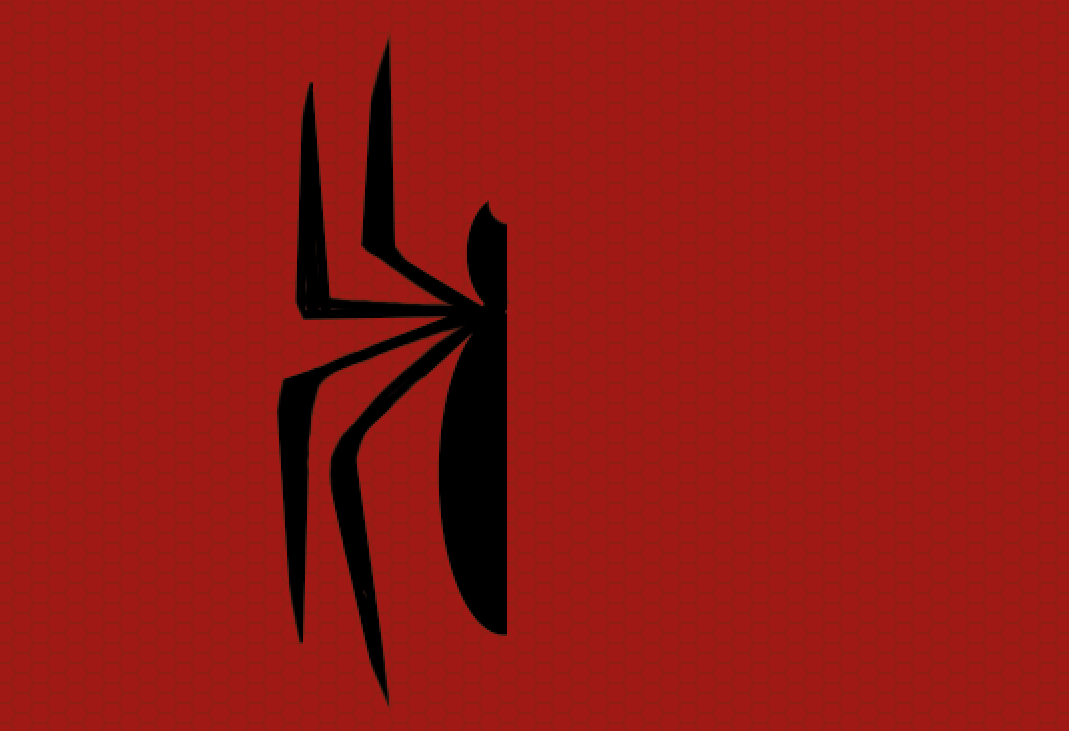
E) Making the Symbols: Sketch->Lines & Shapes -> Rasterize & Refine:
The symbols such as the Spider-Man’s chest spider logo and the spider symbol on his back (the comic version of which looks more like a tick) are pretty important parts of the design, but getting them to look symmetrical and clean can be challenging. I find this method to work well for me:
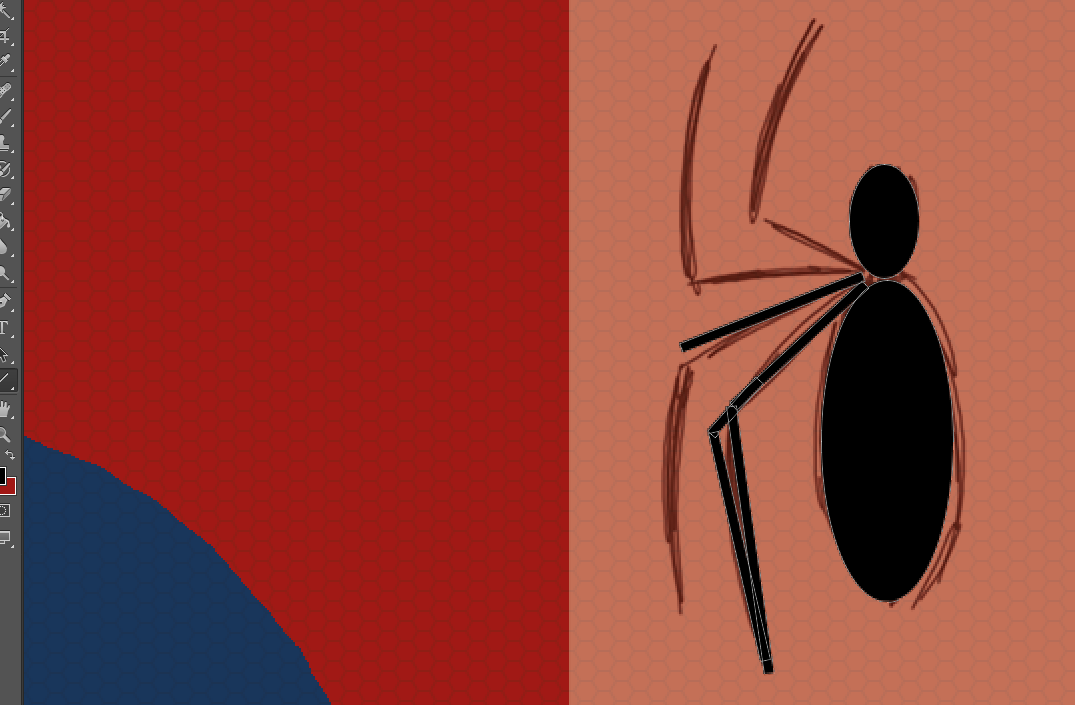
Do a rough sketch of the symbol (I like to use a simpler image editor for this).

Save the file as a PNG or JPG, and then place it in a Photoshop Layer. (File->Place->Select file). Move that layer/image to the general area where you want it to show up (you can center it later using the underlying torso dimensions lines, the usefulness of which was iterated in the intro to this post).
Take that layer’s opacity down enough that it’s visible but not distracting. Start laying down shapes and lines to get a rough layout of the symbol. (Yes, we will do half and copy and paste, but we can’t draw half-ellipses).

When you’re done getting the basic layout of the symbol, Rasterize your rough shapes/line layer:

Hide or delete the png/jpg sketch layer, and then refine the Rasterized half-symbol with the brush and eraser tools:

Once you’ve got the half-symbol polished up, duplicate the layer, flip it, move it, and you’re done:

F) General Notes & Guidelines for Laying out and Placing the lines, webs, and color sections:
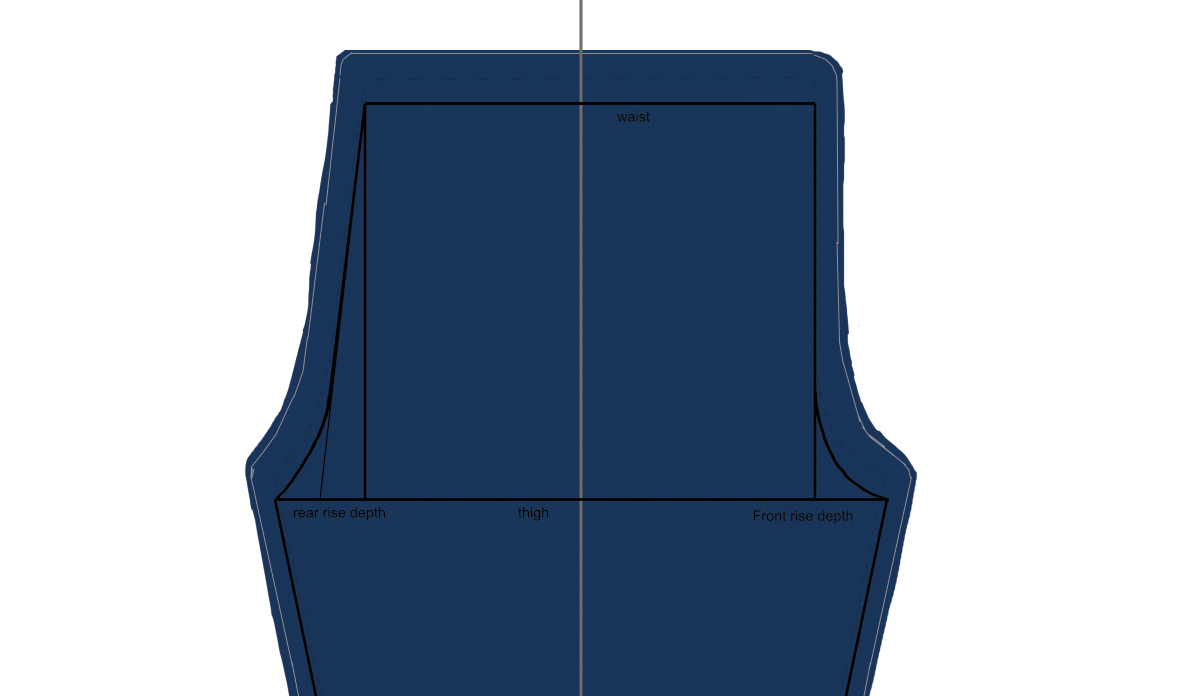
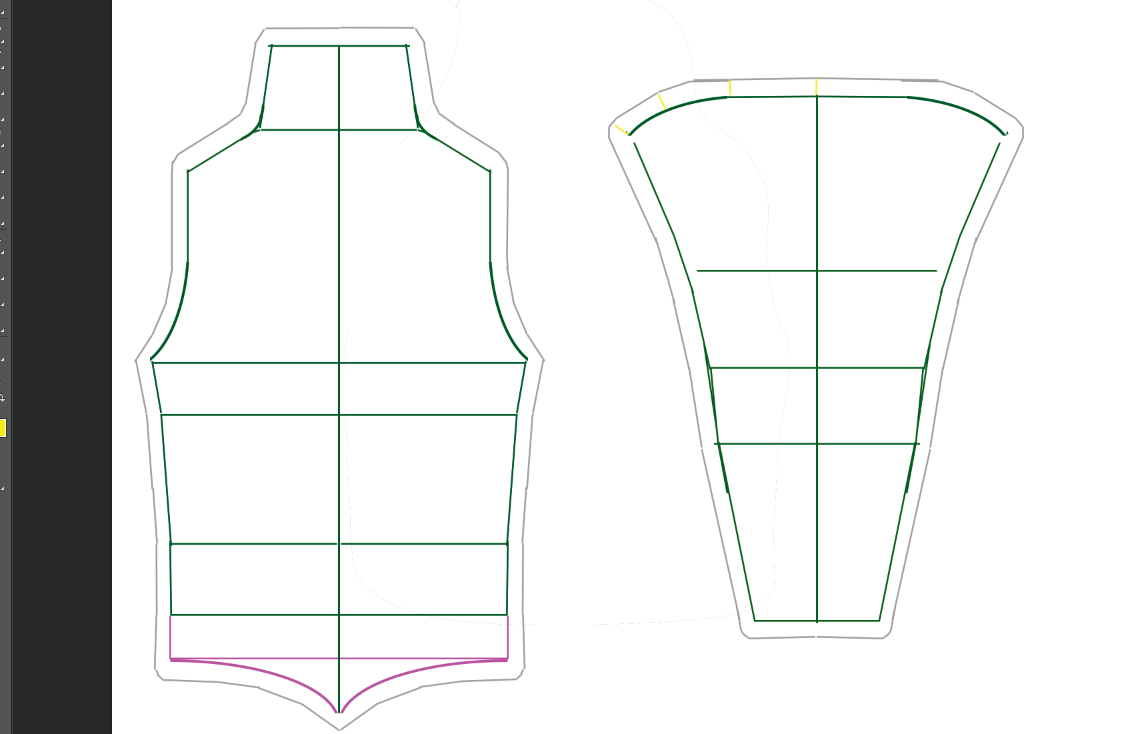
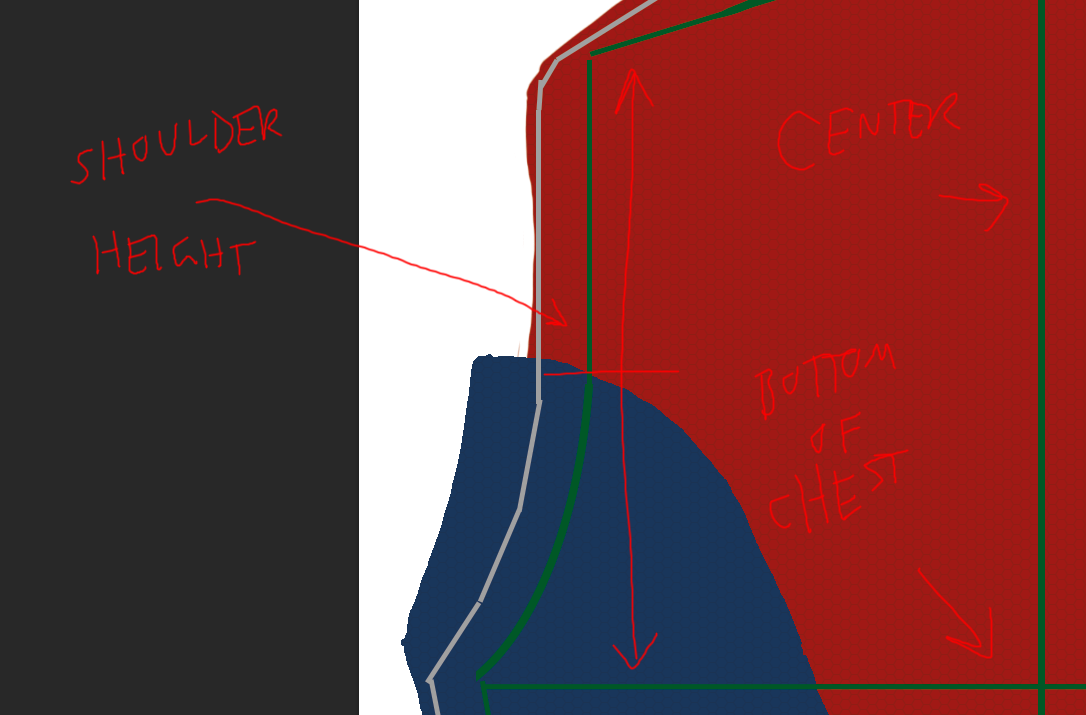
1) USE the torso dimensions layer’s horizontals and verticals to get an idea of where the lines and elements will lay out in the final product. For example, if you want the front symbol centered horizontally just a little above your chest, use the center line and chest circumference line of the torso dimensions layer to do so. If you want the blue of the sides of the torso to meet the sleeves about halfway between your armpit and shoulder, you have the “shoulder height” measurement to guide you in achieving that placement.

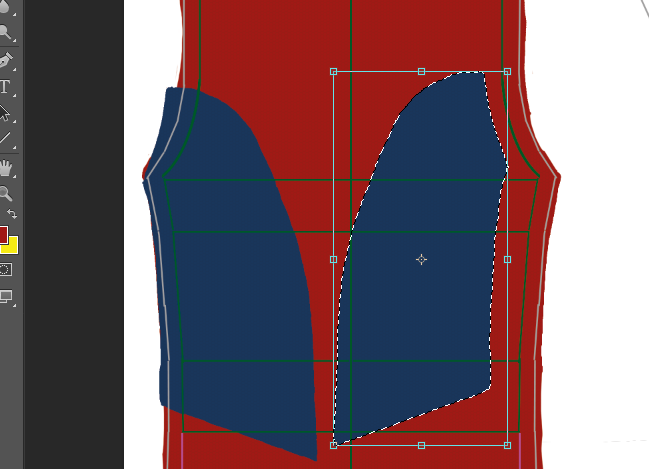
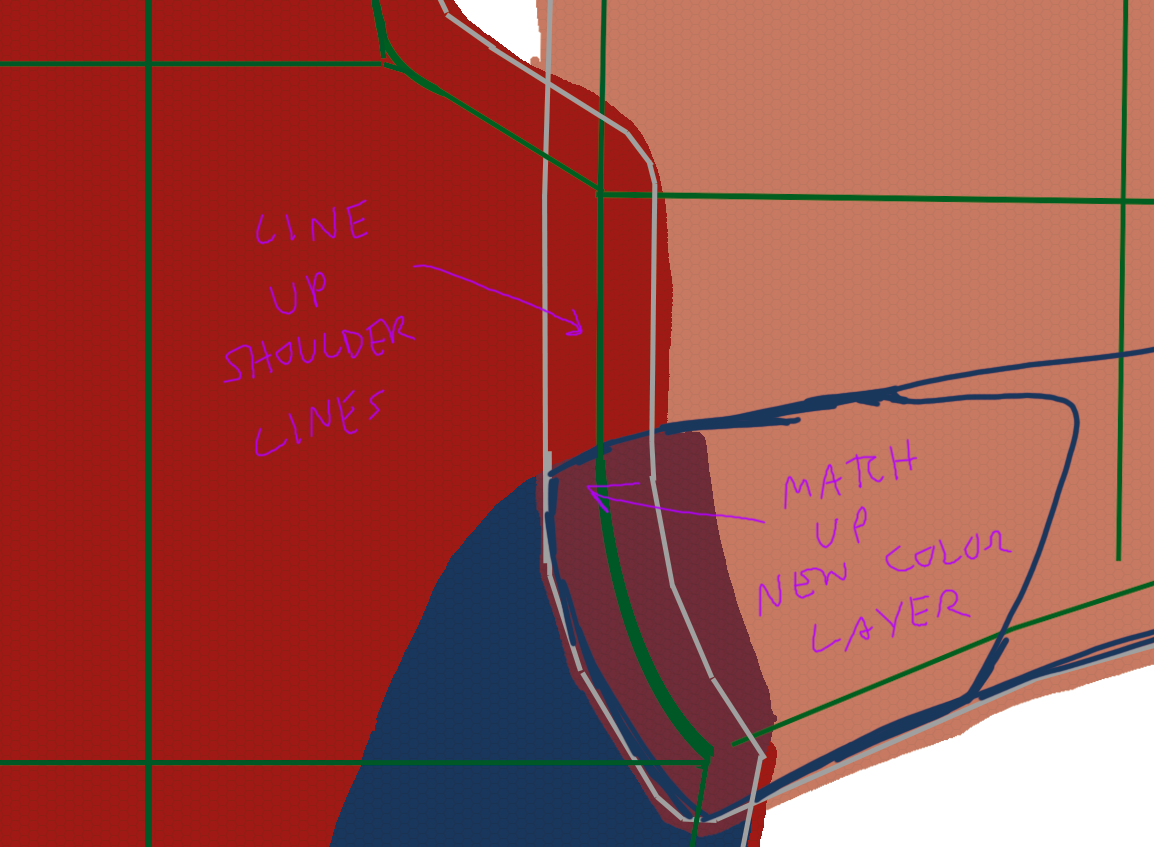
2) Use the Puzzle Method to line up Torso elements with Arm elements:
As with many of my methods, there is probably some more mathematical way to do the same thing, but for lining up elements across different pieces–such as the torso and the arm–it seems to make sense to move the layers into positions that simulate how they fit together in the final product:
For example, here I’ve lined up the shoulder lines of the torso and the arm (NOTE: Don’t line up the Seam Allowance lines, but the actual lines of the torso dimensions) and started sketching in the blue for the arm, so that it will match up with the blue from the torso. You will also want to do this when you do the webbing lines for the torso and the arm.

NOTE: (I know, lots of notes…) It’s possible that your shoulder width and height measurements are such that lining them up for the above process results in the sleeve attaching at a downward angle. That’s actually fine. That’s how mine usually comes out, actually. The important thing is that you did your measurements accurately.
3) Allow for Stretch in your design:
I don’t actually calculate the design stretch, but I suppose you could, since we made the torso dimensions a particular percentage of the actual (90-95% to be more specific).
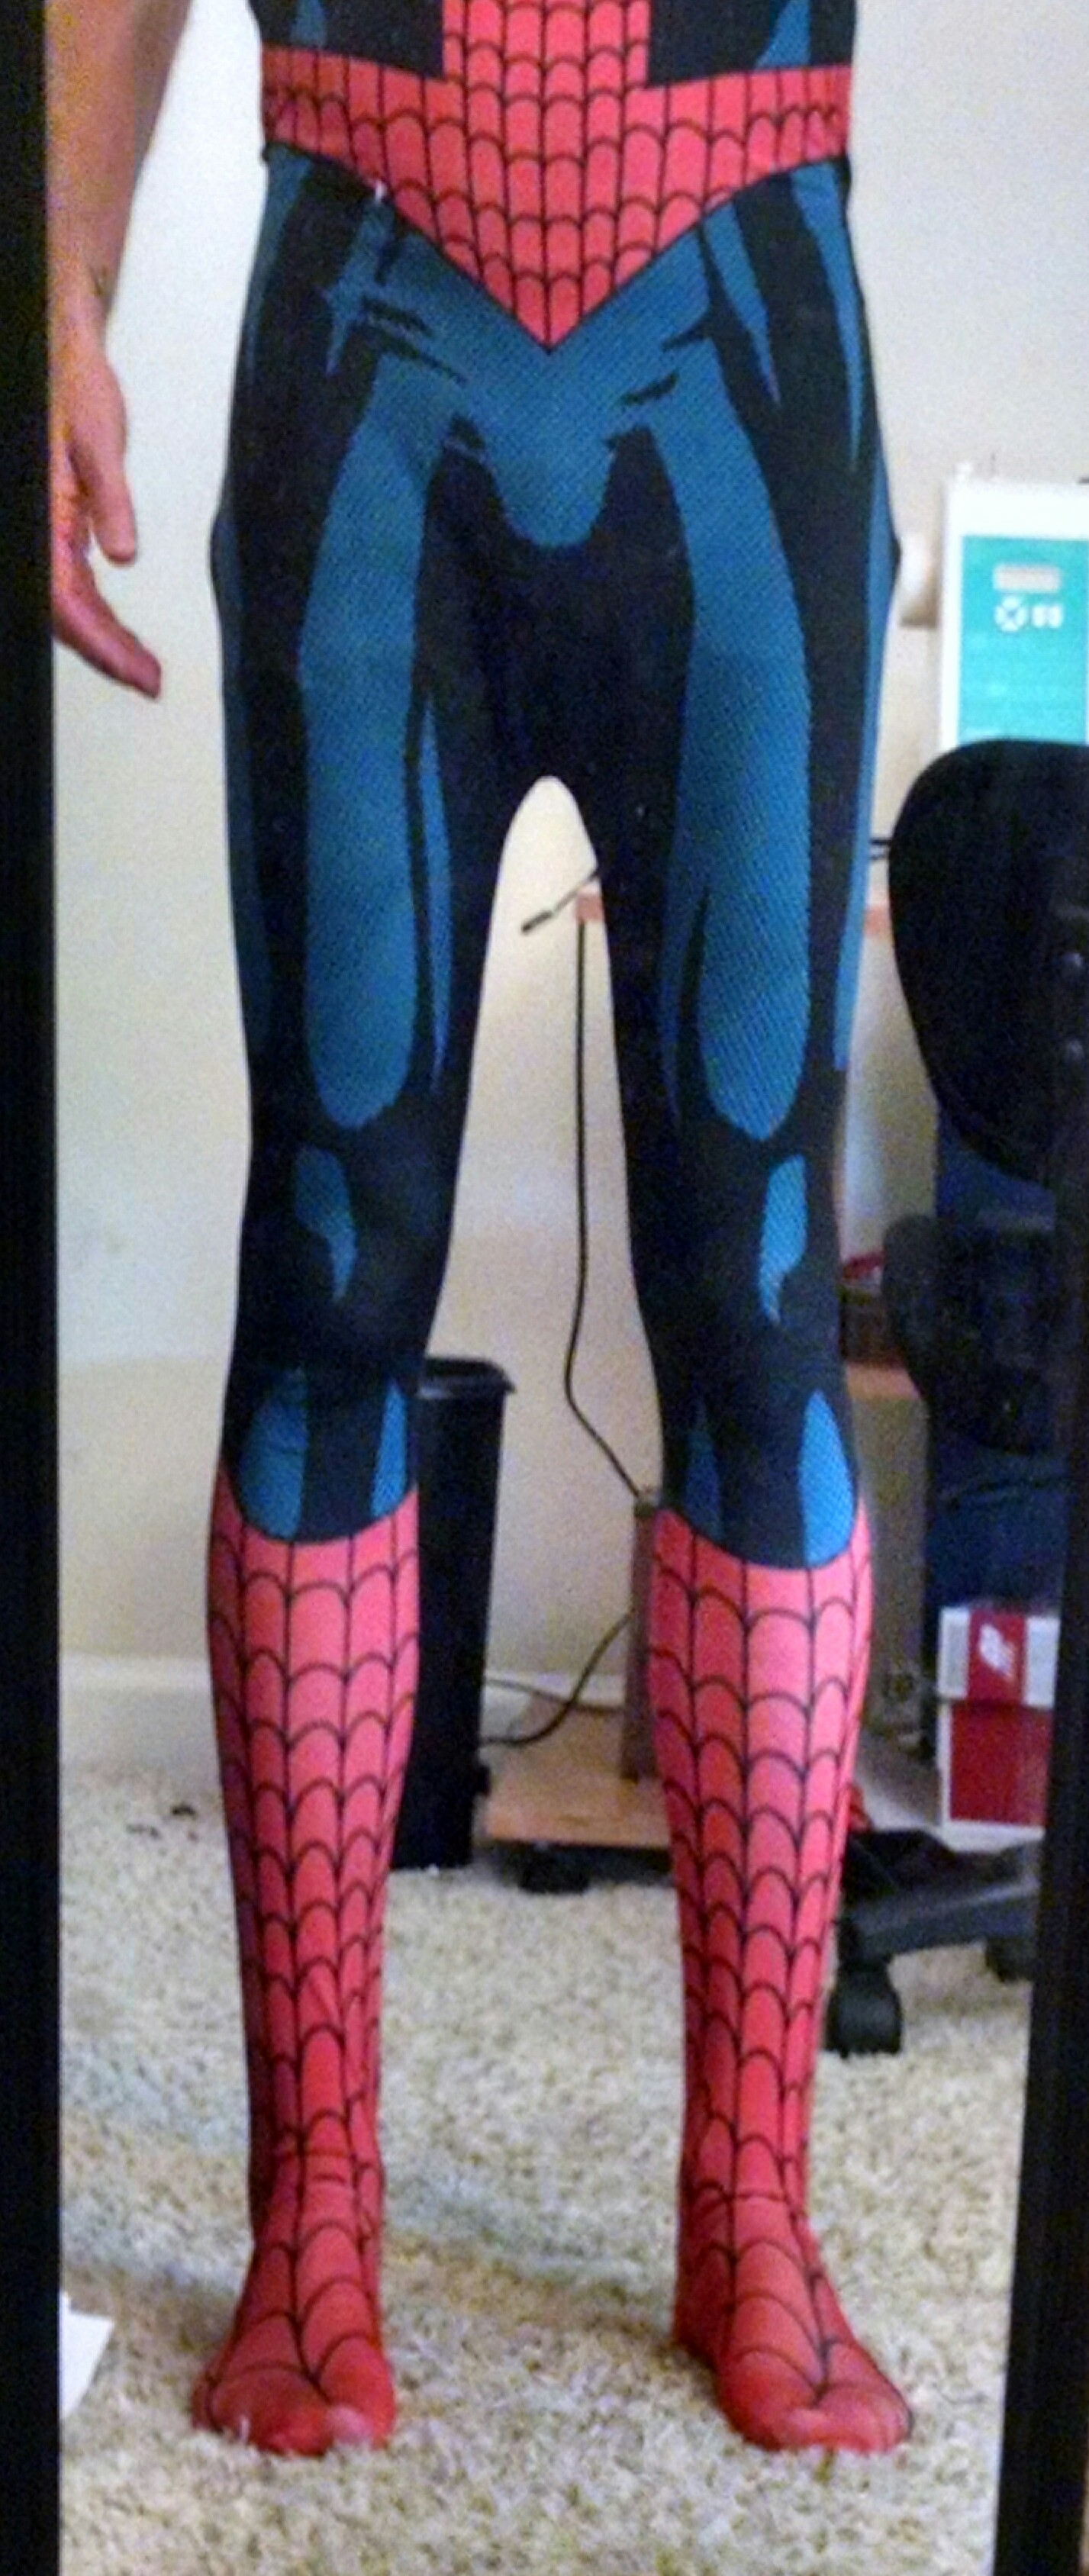
Regardless, remember that your design will stretch horizontally by a certain amount, so if the amount of red you have in between the blue on the front of the Spidey costume seems a bit narrow, it will be wider when you actually wear the costume.
This can actually affect color as well, since Fabric On Demand will print the design on white fabric. The color saturation is good, but the farther you stretch it, the more faded the color looks. This doesn’t become a problem for the most part, but I think that you might do well to make your colors slightly darker than you think you should.
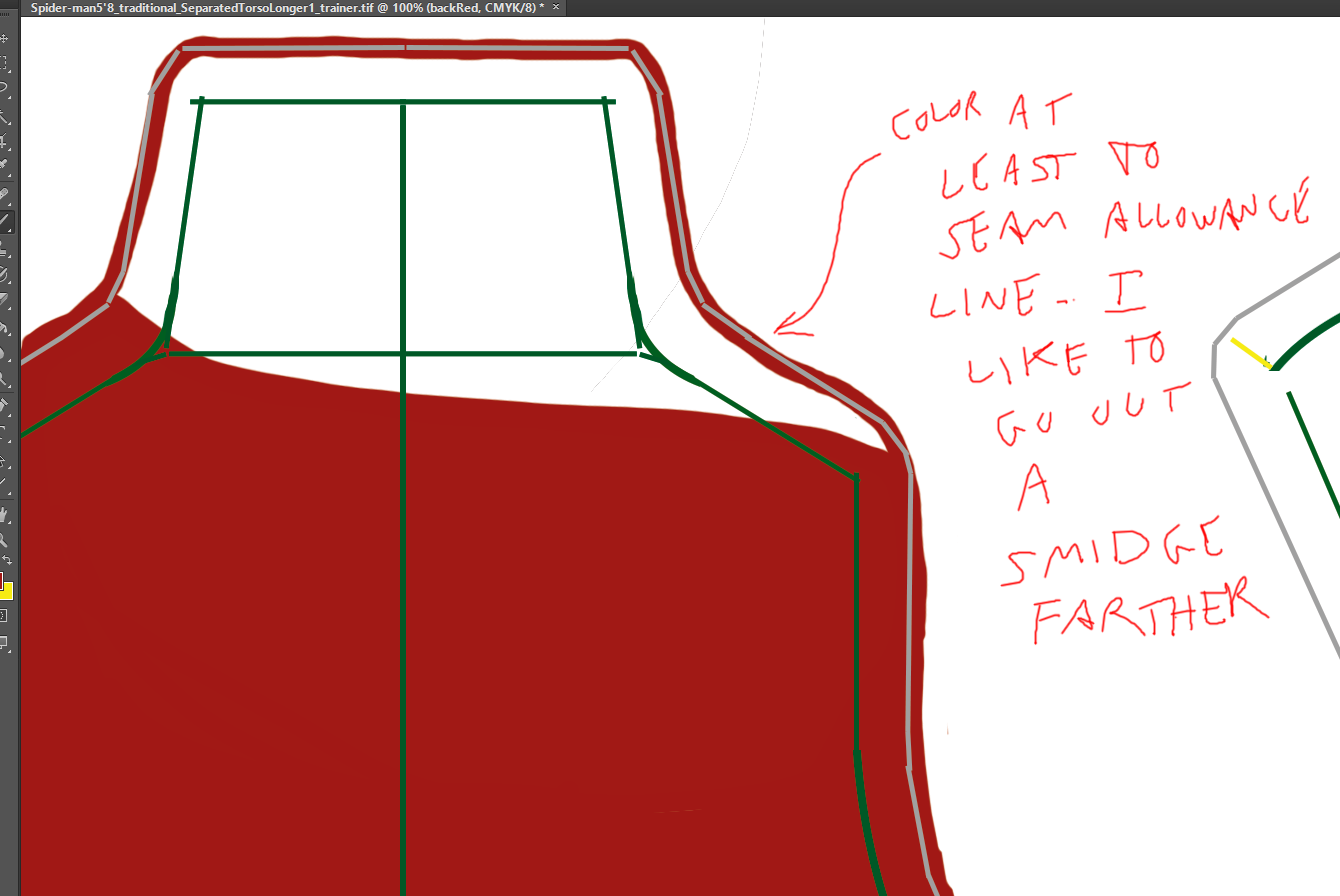
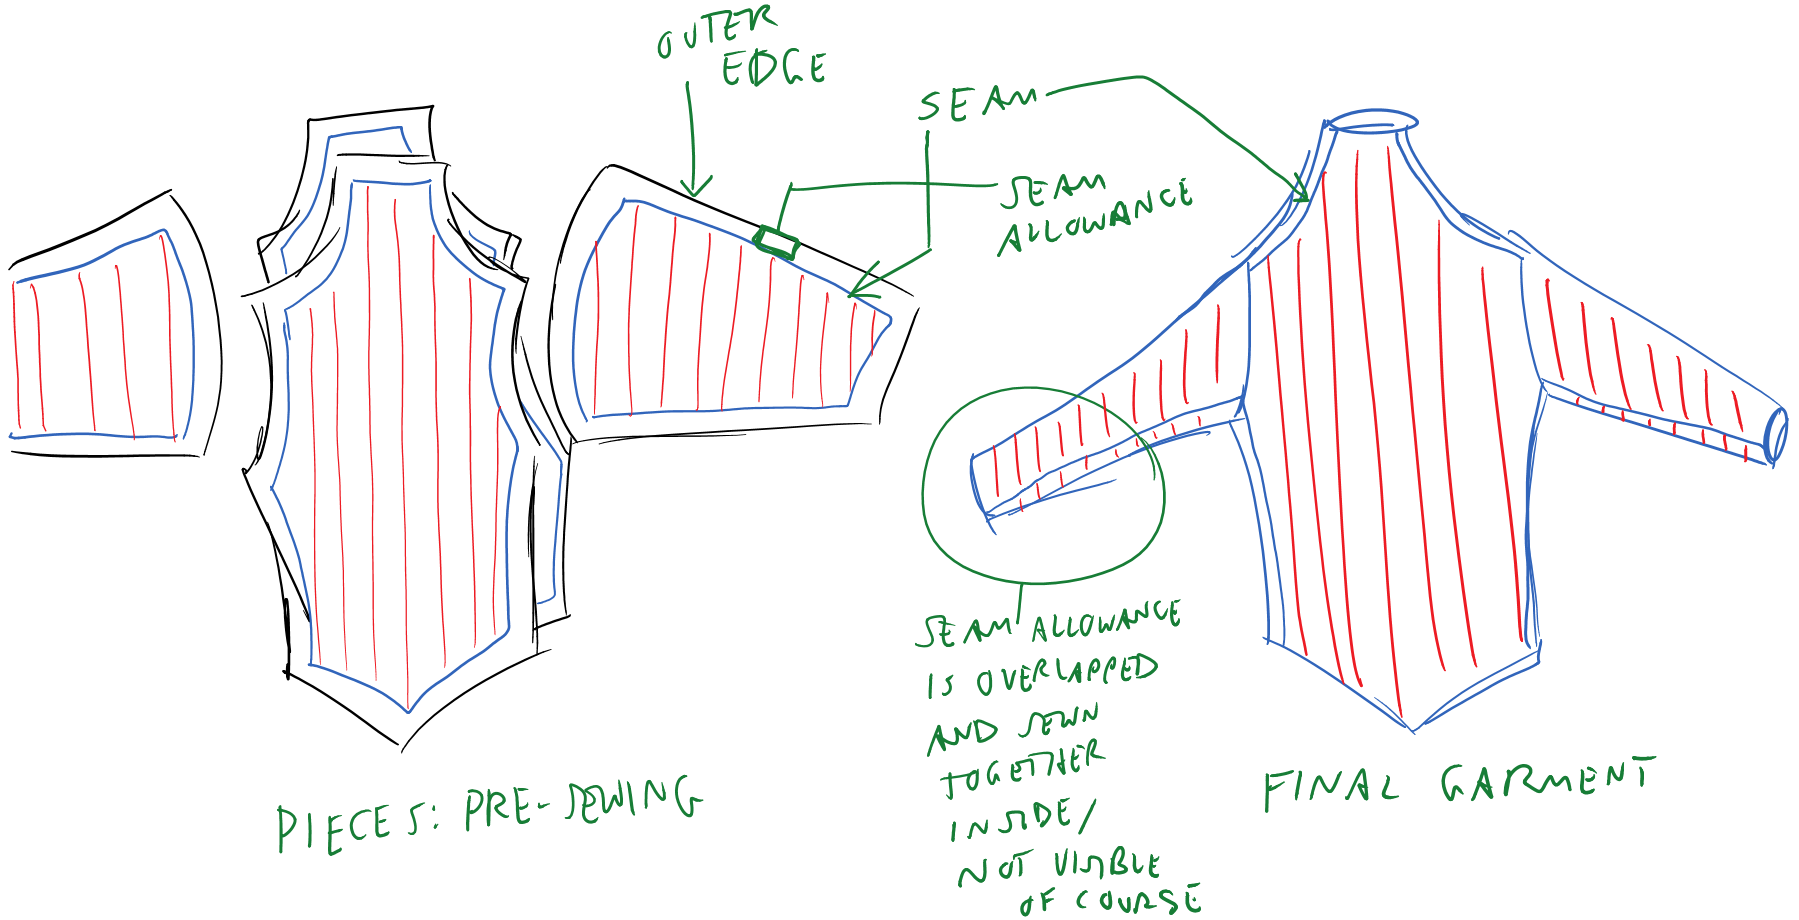
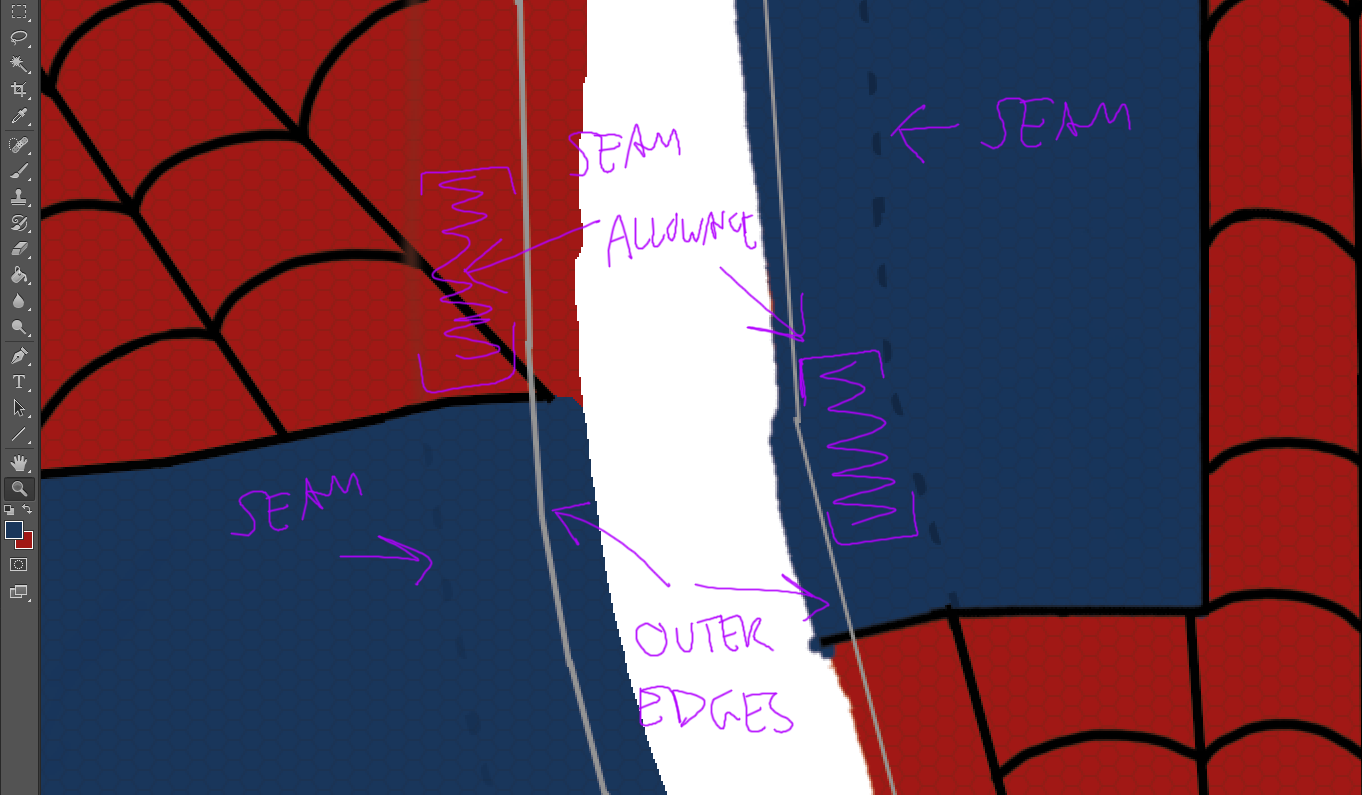
4) Understanding the Seam Allowance and Actual Seam:
This part might be a little confusing if you have little or no experience with sewing (I’m only about 6 months into it myself), but it is important for your design.
As you work on the design, it’s important to understand where the visible portion of the design on the final product will end, which will be where the actual seams are (NOT the seam allowance).
It’s good to allow for some “bleed” of your design beyond the seam lines, but be aware of where those seam lines are for the purposes of lining up webbing and colors and such.

Your seams will coincide with the edges of the original torso dimensions, which you will hide for the finished file to be printed. You can make VERY SUBTLE seam markings, as in the pic below, but that is actually optional. I am not always making those marks anymore, as I end up needing to mark the backside of the fabric with chalk lines for the seams anyway.
You should keep the Seam Allowance’s outer edge line for the final printing (gray lines below), because this is the line you will cut along when you cut out the pieces, and it should be 5/8 of an inch out from your actual final seam, whether or not you keep visible (but SUBTLE) seam lines.
That pre-measured gap between the original torso dimensions and the out edge is what will allow you to properly mark the backside of the fabric with chalk lines in the right place.

5) Label your pieces:
So, since the Seam Allowance won’t be visible, you can use it to add some handy labels in your file. Just be sure to put these as close to the outer edge as you can, so they don’t sneak into the visible portion of the final product.
I like to label the left and right arms with an “L” and an “R.”
You might also want to get a good understanding of how the pieces fit together and label the spots where they will meet with little codes or something. Sort of a “fit Tab A into Slot B” sort of thing.
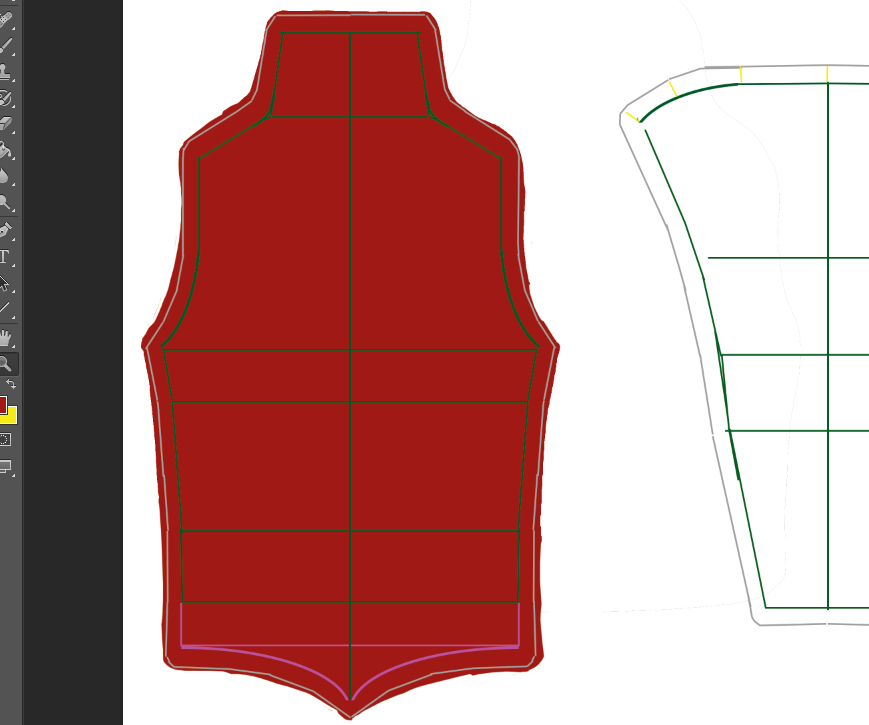
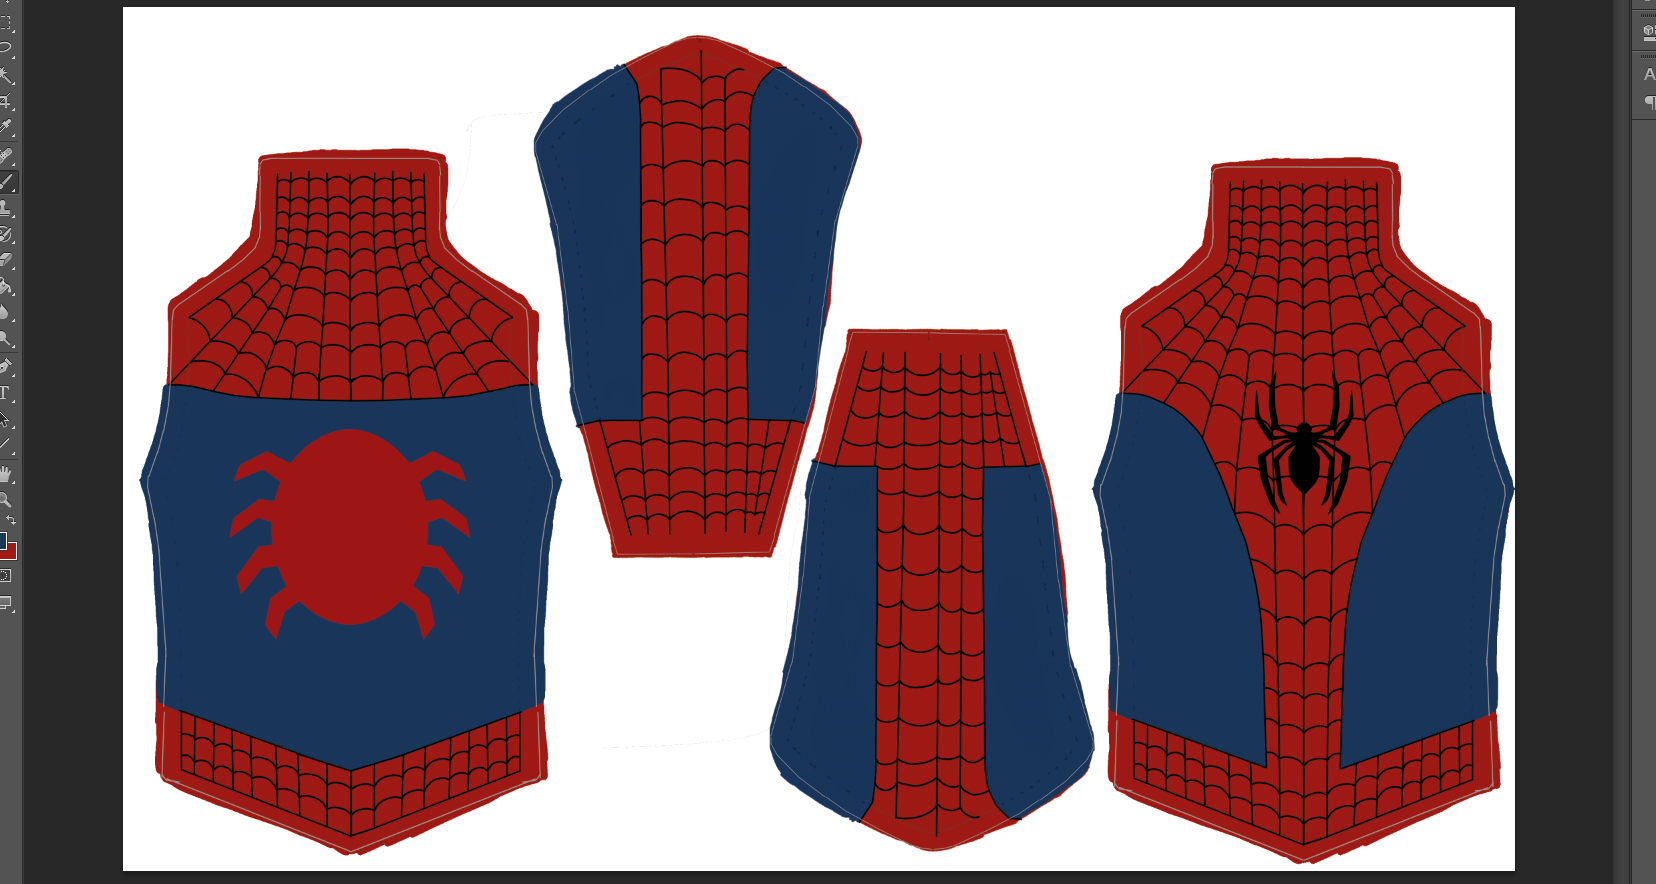
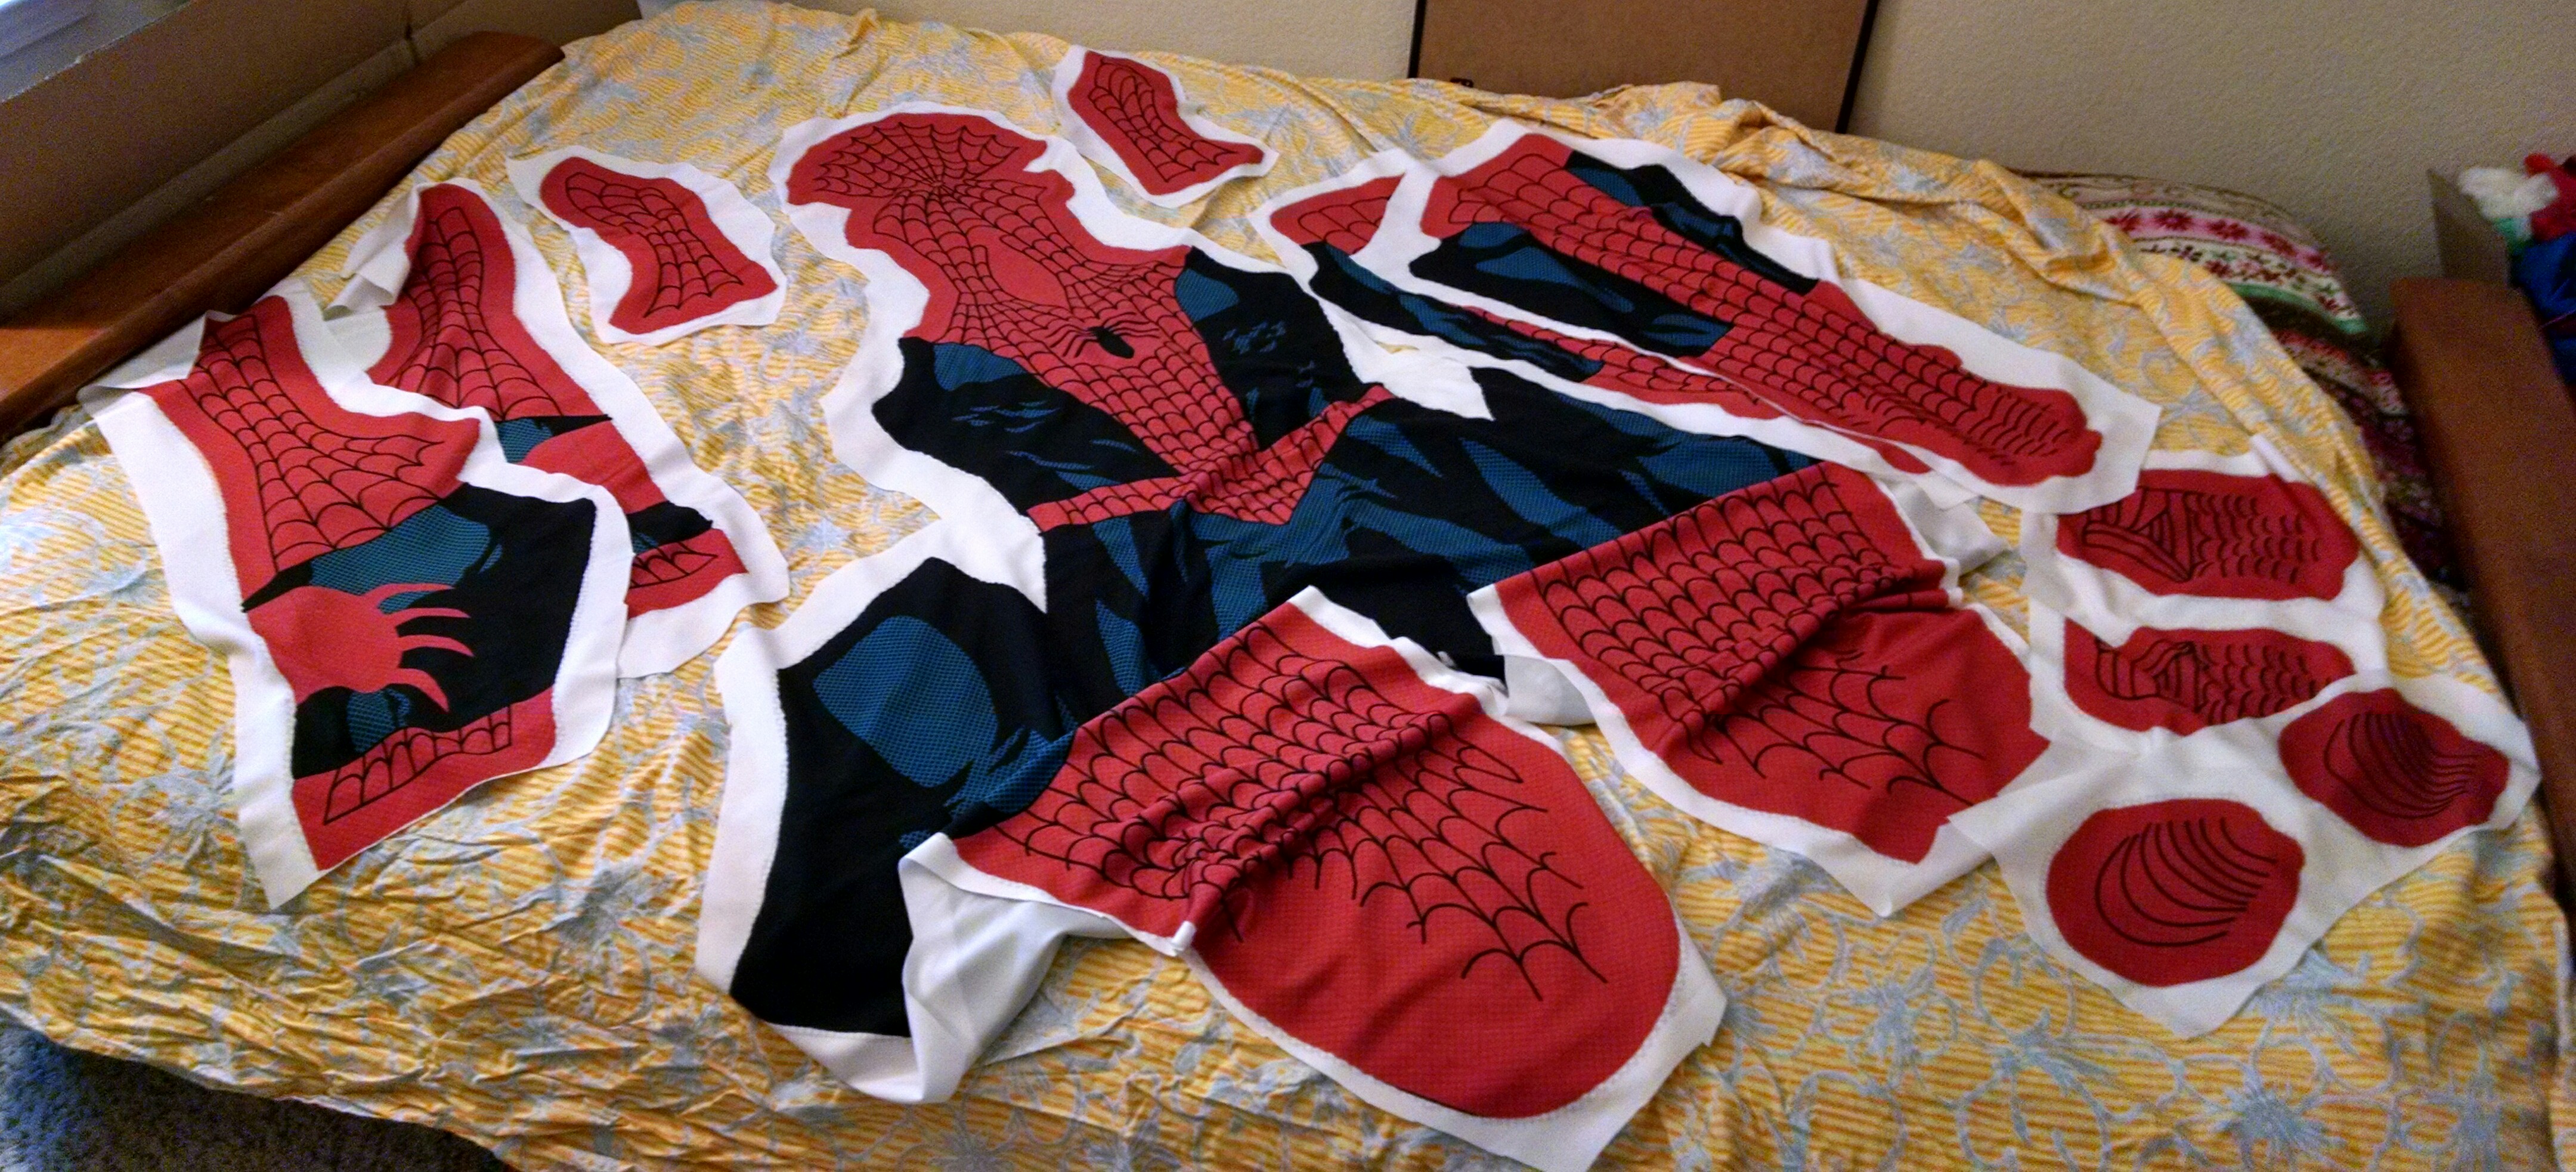
The Final Product: Pattern and Design:

You should end up with something kind of like the pic above. (This is an earlier pattern/design file, not the end result of the one from the screenshots in this tutorial. The almost pointy shoulder-tops are actually the usual way it comes out.)
Now, as a preamble/disclaimer: No, I am not an employee of Fabric On Demand nor do I get paid for sending people their way. Feel free to find another company that does the same thing. FonD is just the company I have been using, having heard of them from Gun Head Design.
In any case, if you are using Fabric On Demand, you’ll want to prepare the file in the following way:
- CHECK AND DOUBLE CHECK that it is looking the way you want, without any stray visible layers or blemishes or whatever.
- Flatten out all the layers and don’t Save. Rather…
- Save As a different file name so you can keep your original with the layers. I like to name my “to-be-printed” files something that ends with “_FINAL” or something like that. If it’s not already a TIFF file, go ahead and do that.
- Save it with NO COMPRESSION. It makes it bigger, but not too big. I’ve had troubles uploading compressed files to Fabric On Demand.
1) Pay and Send File: Go to Fabric On Demand, click the Get Stared button, and follow the instructions. The process of purchasing a printing and uploading a file is a little confusing at first, because really you can either order the fabric first or upload your file first. But you’ll figure it out. Just be sure to choose the Lycra Spandex fabric and the “Centered” design option.
If you have trouble getting the Upload to work, you can actually go ahead and complete the Order and Purchase first, and then send an email (indicated on the upload page) with the design file. Include the order number and other info in the email.
2) Approve Proof and Confirm: Once you’ve paid for your order and sent your file, you should get an email from them within one business day (in my experience) that includes a small version of your file as a “proof” for you to review. CHECK AND DOUBLE CHECK (I guess we’re into quadruple checking now) again to be sure it’s how you want, and if all is good reply to let them know they have the go ahead to print.
NOTE: The proof will be a downsized, lower-res version of your design, so it won’t look as crisp as your original. What you are looking for here is actual mistakes and such.
3) And Now We Wait… They say it takes 10 business days for processing, and that is usually about right. I usually choose the 2-3 day shipping option. So within basically a couple of weeks, you should have the printing. I did get one printing a few days earlier than I expected, but overall, 10 business days to process and a couple of days for delivery is pretty spot on.
Putting it Together
So, as new as I am to sewing, I will have to draw the line at an actual, in-depth sewing lesson here. You would do better to consult much better sources than me for the details. But I would refer you back to some of my sewing equipment and accessories advice from the gloves EARLY Guide. And I will provide a basic assembly guide for this pattern, since it is not something you can readily Google. Even still, if you find a tutorial on putting together a long-sleeve T-shirt pattern, there will be a lot of similarities.
Basic Shirt Assembly Guide

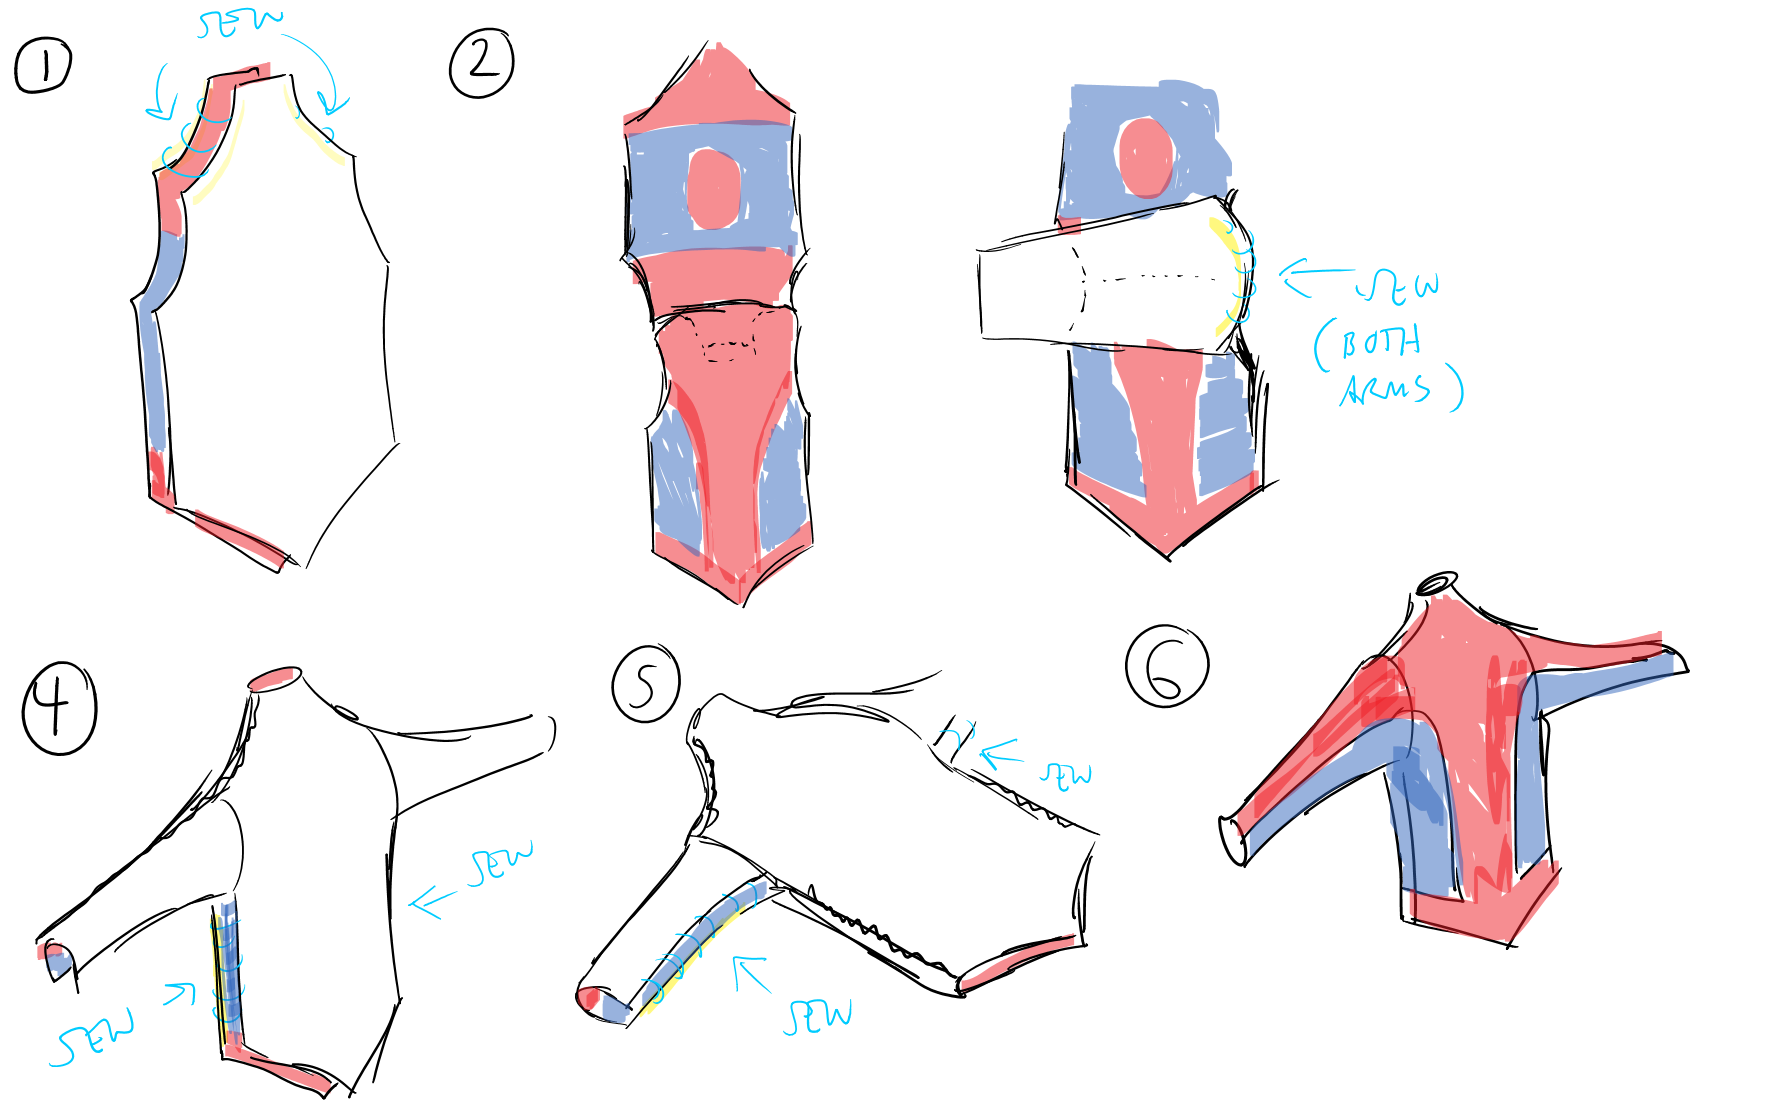
1) After cutting out the pieces along the outer edge line, lay the main torso pieces together with the colored sides facing. Pin/baste and sew the shoulder/neck edges together.
2) With the front and back now sewn at the shoulders/sides of the neck, lay those pieces out as pictured, with the colored sides facing up and the collar tucked inside out and under.
3) Choose which sleeve to attach first, match it up with the proper shoulder, and lay it as pictured above, with colored side down. This part can be confusing, so be careful to lay it out properly.
Pin/baste, being sure to line up where the torso blue meets the arm blue, and being sure to match up the end corners of the arm-armpits with the end corners of the torso-armpits front and back. These are curvy seams, so be careful to baste evenly and watch for bunching when sewing. Also, after basting, go ahead and check again that you are not attaching the sleeve wrong side out.
4) Turn the in-process shirt inside out as pictured, and then pin/baste sew the sides, preferably starting from the bottom and ending at the armpit.
5) Pin/baste sew the arms, preferably starting from the ends of the sleeves and ending at the armpits.
6) Turn it right-side-out and you should be mostly done, other than hemming the bottom, neck, and sleeves.
What’s Next?
So, this has been a long guide, but I think I mentioned before that it introduced a lot of concepts and methods for the first time.(Is it redundant to say that something was introduced for the first time?) The upcoming guides for the other pieces will refer these processes, but assume your familiarity with them and focus on what’s different for those particular costume pieces.
And actually, the next Guide should be pretty easy for me and for you. It will be how to make the leggings, and much of the heavy lifting will be done by the tutorial I started with (and have linked to a billion times) at So Sew Easy.