If you’re just joining us for the EARLY Guides, please do see my intro and general disclaimers on the previous post.
To sum up: I am very NEW to sewing and pattern making, and this is just my take on things, and it is still very untested so I cannot guarantee ANYTHING with these guides. Got it? Good. 🙂
Also, this post is REALLY long. Just thought I’d point that out…
Thanks!
Credits: The Pattern
So, I ended up with the actual sewing pattern for this shirt from a sort of mashup of techniques, methods, and images culled from the Interwebs. I can’t point to a singular guide, but here is a list comprised of what I remember informing the final form of the pattern:
Credits: The Design Technique
First, let me clarify what I am referring to when I say “the design technique.” Obviously I don’t mean the tried and true design of the Spider-Man costume itself, or the design of whatever super hero costume you want to make. Here, we are talking more about the method of replicating that design in a form that can be transferred onto multiple pattern pieces and ultimately recombined in a relatively cohesive way once it is all sewn together.
In terms of the design technique on the shirt and some other pieces, it certainly started with my efforts to work with the pattern/designs from Gun Head and 4 Neo Designs. I debated how much I felt I could share of my technique since it started with designs that are for sale on those sites. But three things make me feel okay about it.
(A) The basis of the technique shows up in various places, including those two sites and the process that goes into this video tutorial (which is a pretty helpful tool if you go the bodysuit route and are brave enough to sew it on your own).
(B) Even though I started with the bodysuit templates/designs, I have had to modify the process and make it my own enough that it feels pretty independent of those designs I initially paid for.
(C) I am not charging you for this. Though I wouldn’t refuse any voluntary offerings of cash or fabulous prizes that you feel compelled to send my way. 🙂
Okay, now that I have gotten that out of the way…
Taking Torso Measurements
What you need for this section: A body measuring tape; a second measuring tape or a ruler; paper to write on; a pencil; a friend and/or a mirror; a body

For advanced advice on taking measurements, refer to the Sew So Easy or Stretchy.org sites above. You at least want a mirror, because sometimes you just can’t easily see certain measurements, but having a friend to help is very nice.
Recording the Measurements: So, there’s nothing wrong with writing things on paper and stopping there. I sometimes do. But more often than not, I lose the paper and then have to start over later. Just saying, you might want to consider transferring your numbers to a digital form, and a spreadsheet works well since it can be set up to automate the math we need to do.
Torso Measurements (for best results, read all of this part before starting the measuring)
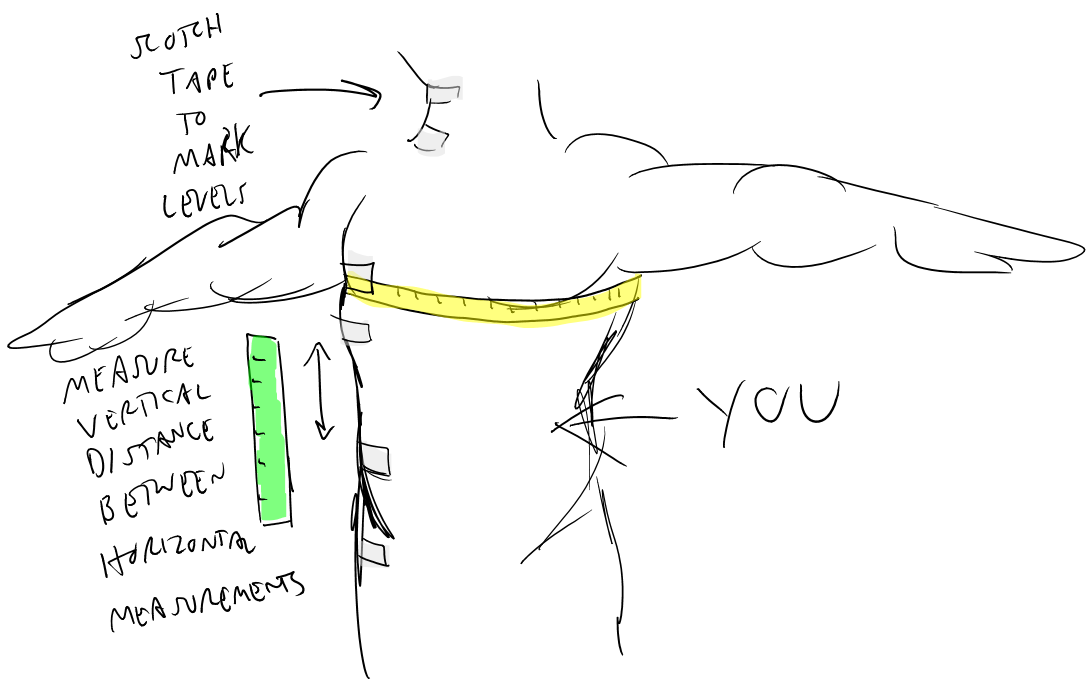
You’ll want to use a measuring tape for the horizontal measurements (circumferences), and either another tape or a ruler for the vertical distance between the horizontal measurements. Exactly at what vertical point you take each measurement is less important than accurately tracking the distance between measurements.
It might help to go ahead and choose the levels where you’ll measure and stick pieces of not-too-sticky tape at those spots to mark them.
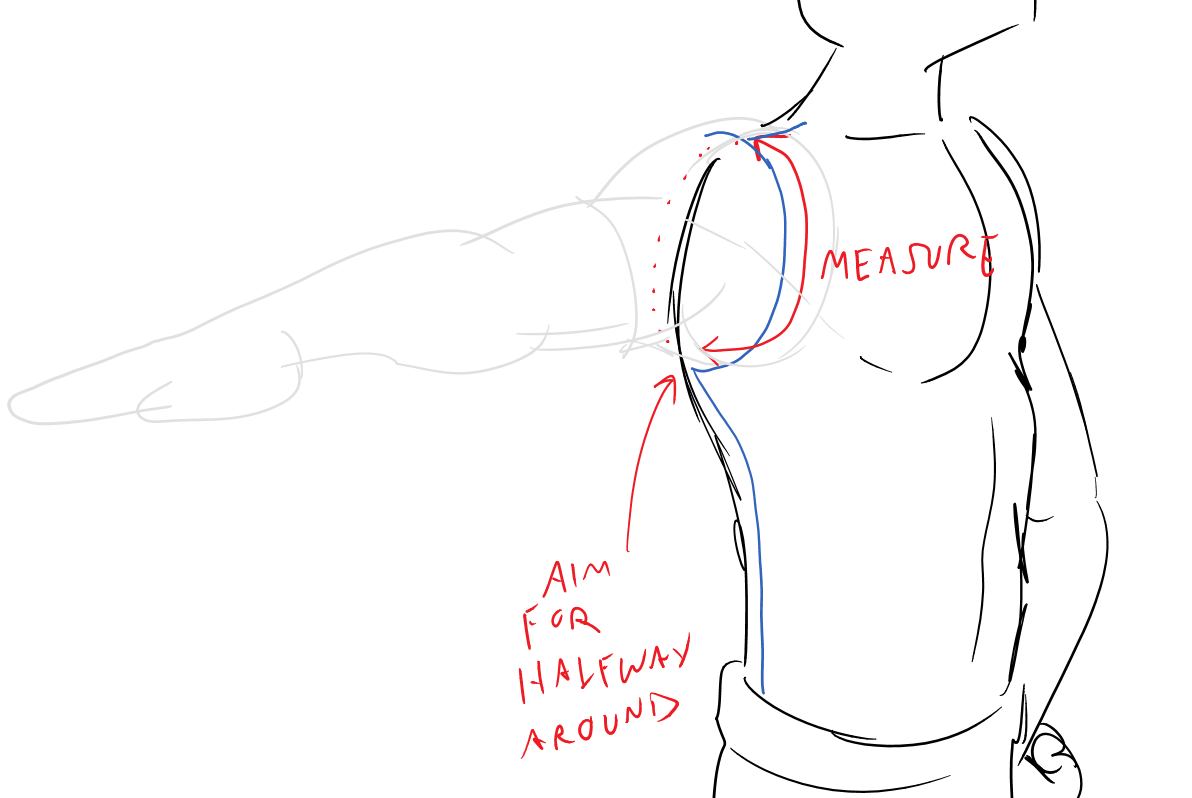
Here is a visual example that will either clarify that or make it even more confusing…

With that in mind, get the following measurements. I usually end up writing them in two columns, one for horizontal and one for vertical, but do what makes sense to you.
- Horizontal: Top of neck circumference
- Vertical: Distance from top of neck to base of neck*
- Horizontal: Base of neck circumference
- Vertical: Distance from base of neck to chest
- Horizontal: Chest circumference (measuring tape should be snugly up your armpits as it goes around)
- Vertical: Distance from Chest to Under Chest (right about where the rise of your chest flattens out. If your chest has no rise, then go about an inch and a half below the nipples)
- Horizontal: Under chest circumference
- Vertical: istance from Under Chest to hips (about belly button level)
- Horizontal: Hips circumference
- Vertical: Distance from hips to waist (below the “love handle” level)
- Horizontal: Hips circumference
- Vertical: Total distance from top of neck to hips
- Supplemental Guesstimate-Measurement #1 – Shoulder Width: Distance from base of neck to top of shoulder. You can approximate this by putting on a T-shirt (if you’re already wearing one, you don’t need to put on another one) and measuring from the collar to the seam where the sleeve connects. (This guide does not use a rocket science level of precision, truly.)
- Supplemental Guesstimate-Measurement #2 – Shoulder “height”*: Put on a T-shirt that’s not too tight and not too loose. Starting from the spot where the shoulder seam meets the sleeve connecting seam, measure down to about halfway into your armpit.*
- Supplemental Guesstimate-Measurement #3 – Extra “Drape” length: Put on a T-shirt that hangs to a few inches below your belly button, or around the area where you want the bottom of the shirt to hit (which may or may not match up with the hip area from above). Measure from the point at the top of your neck (that you used above) to the bottom of the T-shirt, and then add a few inches. This will help account for the “drawing up” and the cling of a spandex shirt versus a standard shirt. We’ll talk more about this later.
* Does this help with the shoulder height measure?

Now, you should have a list of numbers that represent your actual torso measurements. (We’ll get to the arms in a minute.) But those are not the final numbers we’ll use. Since we are aiming for a snug/skintight level of fit–this being a super hero shirt–we’ll need to adjust most of those numbers accordingly.
In sewing terms, I believe that adjustment is called “ease.” For standard clothing, you’ll adjust upward, so that the garments are looser. But for stretchy material like spandex, which we want to fit snugly, we’ll adjust downward.
To do that, you will want to use some minor math to convert each horizontal/circumference measurement you took to 90-95% of it’s original value. Again, adjust the circumference measurements by 90-95%, not the vertical ones. The sort-of exceptions is the shoulder “height” measurement–which is actually a half-circumference–and the shoulder width measurements. Do the 90-95% thing for those too.
Anyway, 90% is pretty darn snug, so you might want to try loosening it up a bit and using 92% or 95%. I leave that experimentation up to you.
If you’re math-challenged like me, you’ll want to know that you just have to get a calculator (virtual or otherwise) and multiply each measurement by a value between 0.9 (for 90%) and 0.95 (for 95%).
For example:
100 x .9 = 90
I use inches, because of the American allergy to the metric system. From what I’ve read, you get uglier decimals using inches when your final measurements don’t come out to whole numbers. So if you don’t already use metric, it might be worth a try. It might be too late for me. In any case, if you end up with a number like this after calculating…
32 x .9 = 28.8
You might as well round that up to 29. It’ll be easier to work with going forward. I would say just round those decimals to the nearest .0 or .5 spot. Sometimes I do some .75 or .25, but I’m not convinced that the final product–being spandex–is ultimately affected that much by a .25 difference either way.
But I digress.
So, soon enough, you should have a list of your 90% adjusted circumference measurements and the distances between each.
The Arm(s) Measurements
Now that you’ve mastered the basics of measurements, repeat that process on an arm (or both arms if your arms are of drastically different lengths, which I suppose could be the case).
The horizontals/verticals for measuring the arm are:
- Horizontal: About halfway down the bicep – circumference
- Vertical: The distance from bicep to elbow
- Horizontal: The circumference of the elbow
- Vertical: The distance from elbow to mid-forearm-ish
- Horizontal: The circumference of the mid-forearm-ish
- Vertical: The distance from mid-forearm-ish to wrist
- Horizontal: The circumference of the wrist
- Vertical: total distance from top of shoulder (roughly where the sleeve seam of most t-shirts fall) to the wrist

Now, get the 90% values for the horizontal/circumference measurements (not the vertical/distance ones).
Digitizing the Pattern
By this point, you should have a list or two of arm and torso measurements. Even if you have so far avoided going digital, it’s time to whip out the computer.
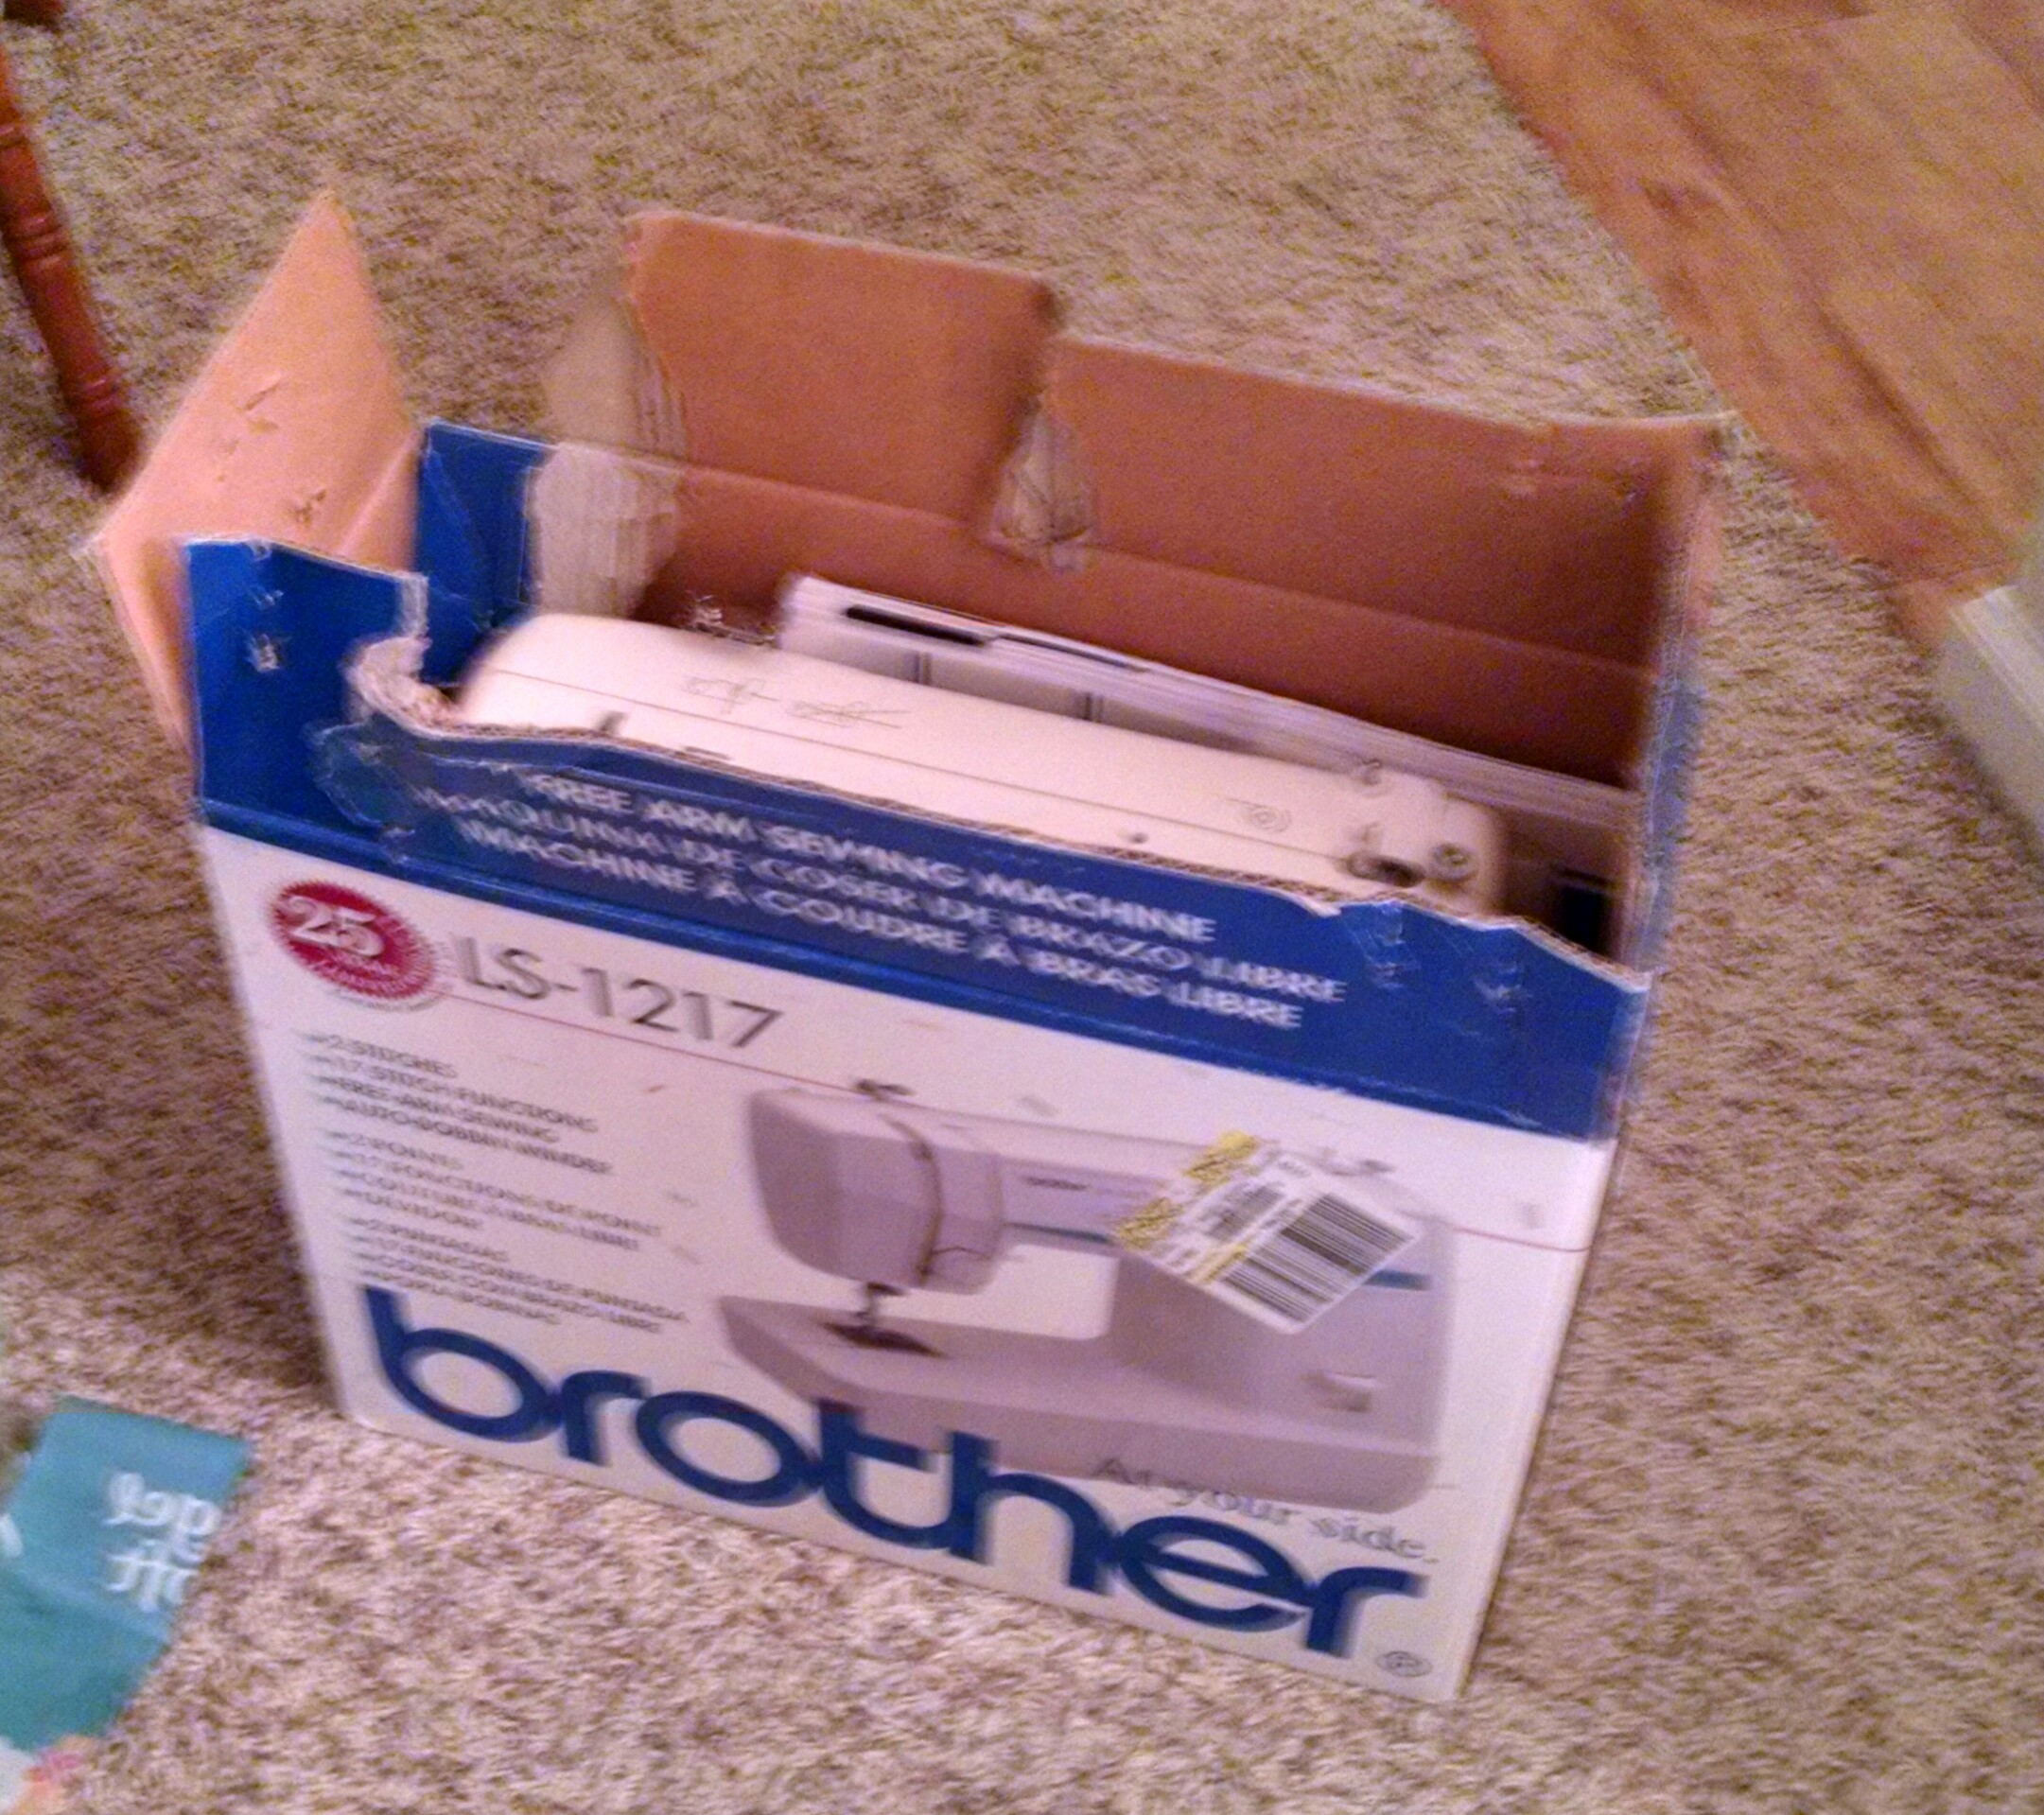
I’ve tried this digital pattern thing in two different programs: Inkscape–a free vector imaging program–and Photoshop.
I am going to recommend Photoshop and give instructions based on using that, because the design portion of this Guide (coming next) will require things that Inkscape can’t do as well as Photoshop or a comparable image editor.
Step 1: Open the image editor
Step 2: Go ahead and create a file with a similar setup to what we used for the gloves in the previous guide: minimum 72 dpi, with dimensions of 36″ tall and 58″ wide. Depending on your height, you might end up having to go taller than 36″, but keep it at 58″ wide for purposes of ordering the fabric later on.
Step 4: Make a new layer and name it something like “torso dimensions.”
Step 5: Referring to your measurements list, use the line tool to make a vertical line that matches the total length of your torso from neck to hips. (There will be a picture below, so hang tight.)
Tips: Make sure the line tool is set to inches (or the metric unit you are using), and in Photoshop and many image editors, you can hold SHIFT while drawing the line to make it stay straight.
Step 6: Referring to your vertical measurements, mark off the spots where you’ll place your horizontal measurement lines. For example, how far down from the top of the neck to the base of the neck, etc. I usually do this with a combo of offset vertical lines and horizontal lines.
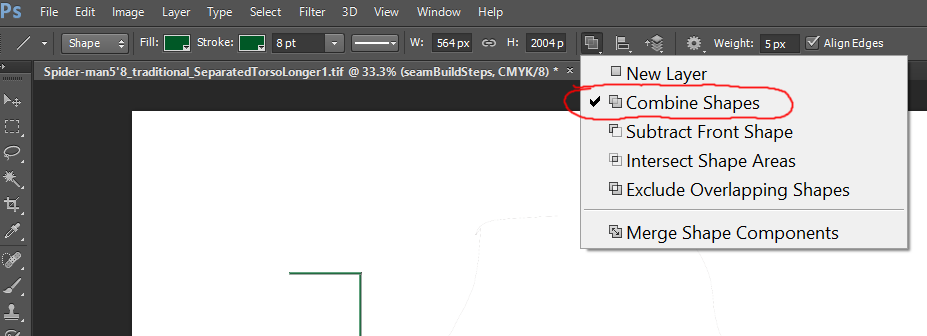
Tip: In Photoshop, the line tool will create a new layer for each line by default. But there is a place in the options to Combine Shapes into one layer. It will generally default back to “New Layer” if you switch tools, so it’s good to check often.

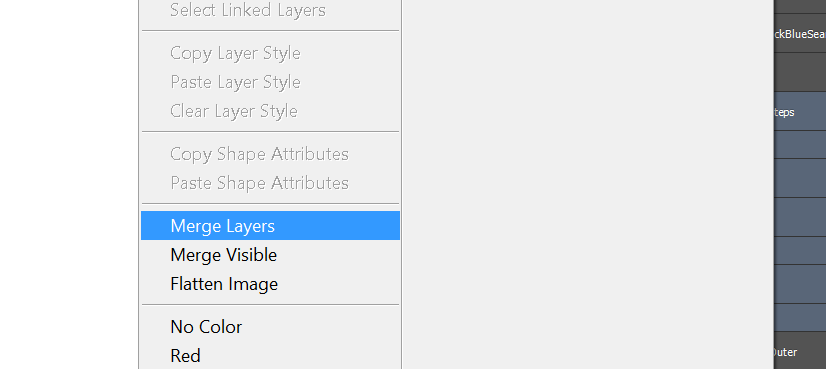
If you do create multiple line tool layers–accidentally or purposefully–and then want to combine them, you can just select all the shape layers you want to combine (CRTL + click to select multiple layers) and then right click the layers so that you can select “Merge Shapes.” (If it’s a mix of Shape and bitmap layers, it will say “Merge Layers” I think.)

Step 7: Now you know where to put the horizontal lines. Ultimately, you want everything to end up centered across the vertical total length line. Instead of worrying about all that, just do half-width lines on one side, on which we will base our final outside lines. We can just do half of the outside and then copy an paste it to the other side, using the center line to be sure the total width is correct. Make sense?
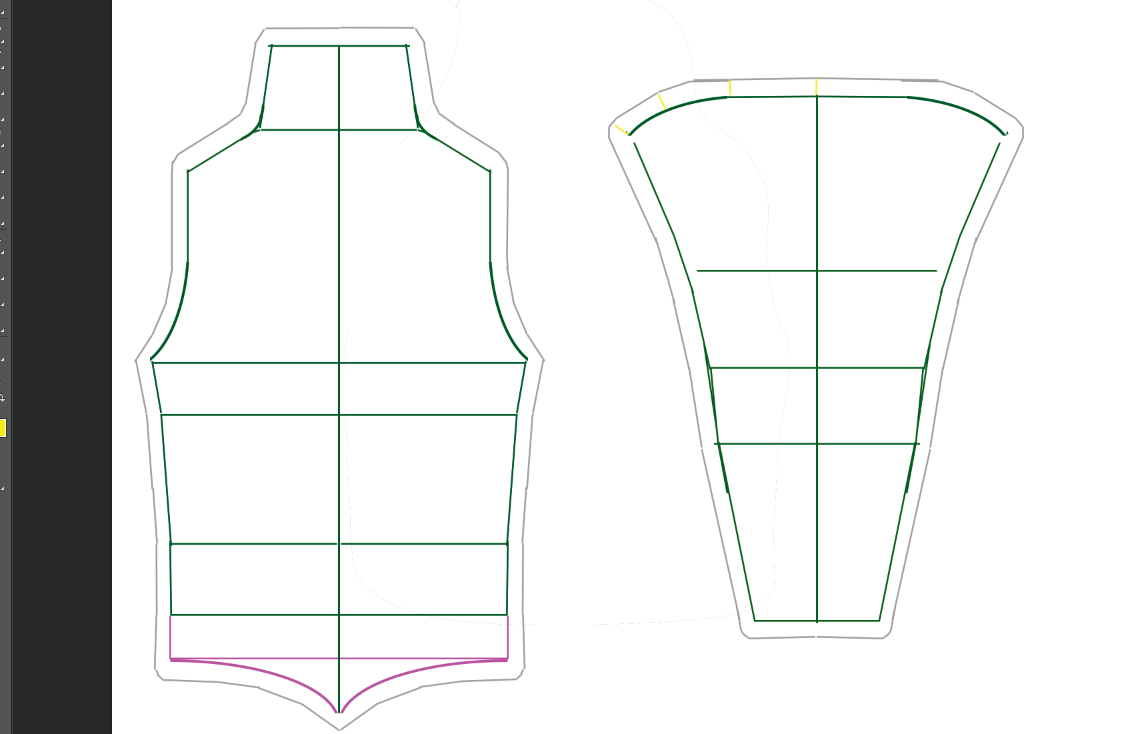
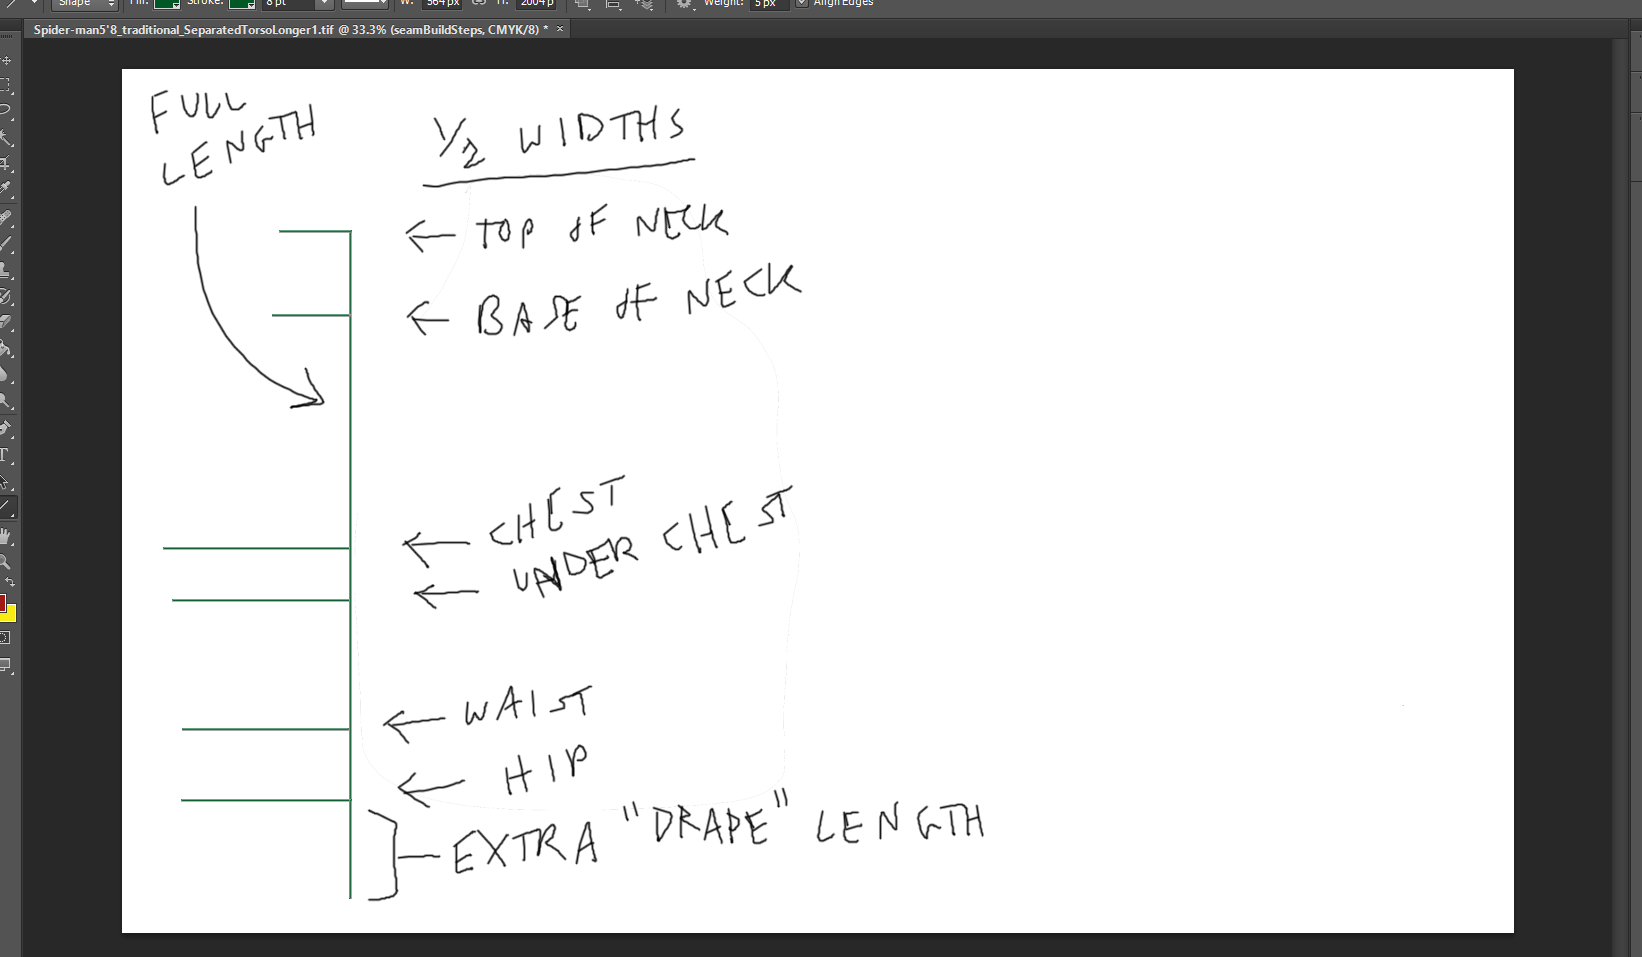
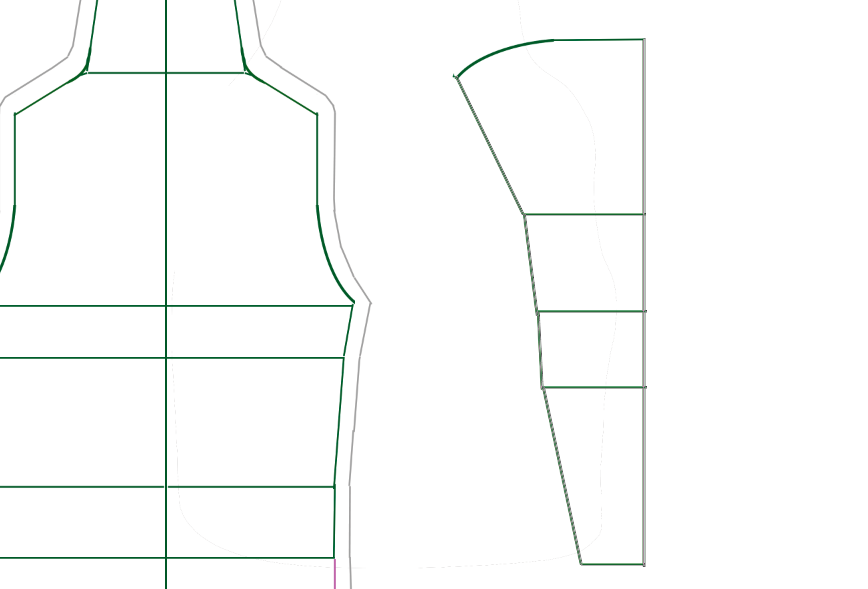
Step 8: Now you should have something that looks like one half of a weird, old-fashioned TV antenna of some sort.
Here’s an image of what you should roughly have, minus the handy/distracting notes that label each line:

NOTE: See how I didn’t draw a horizontal line for the “Extra Drape” portion? Well, if you’re doing a Spider-Man costume shirt destined to bear the traditional red and blue design, you will need to incorporate the “point” at the bottom of the shirt. I am saving all that for later steps.
The next thing you’ll want to do is connect most of the horizontal measurements with more straight lines. (Don’t connect the chest and neck base horizontal lines yet, as pictured below.)
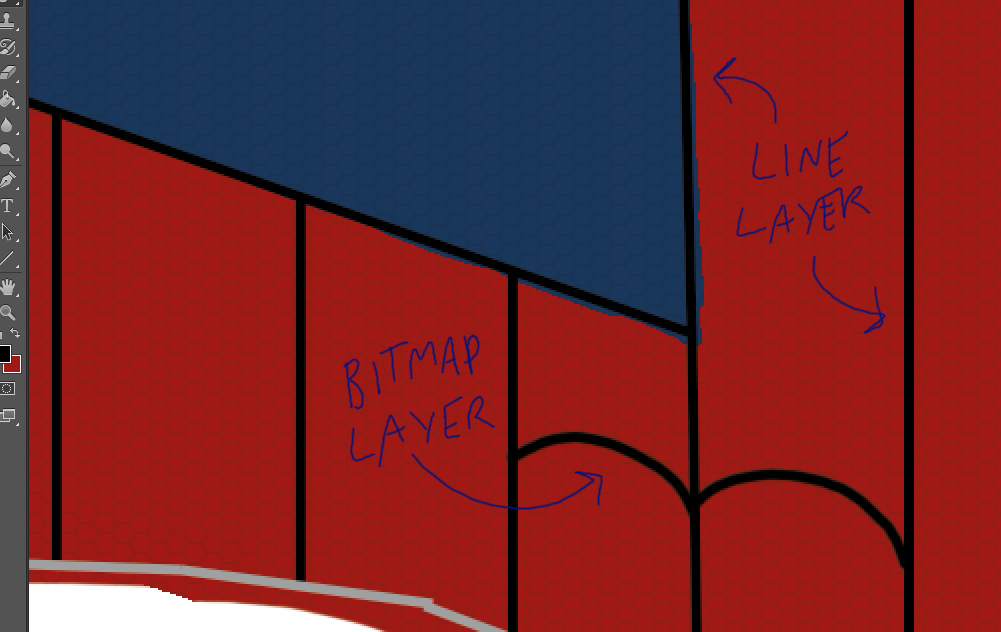
Depending on how dramatic the differences are between each measurement, you might end up with steeply angled lines. If these lines are extremely angled, I might recommend using the brush tool on a separate layer to eyeball a curve based on a rough average of the angle, and later merge it all into one layer if you want.
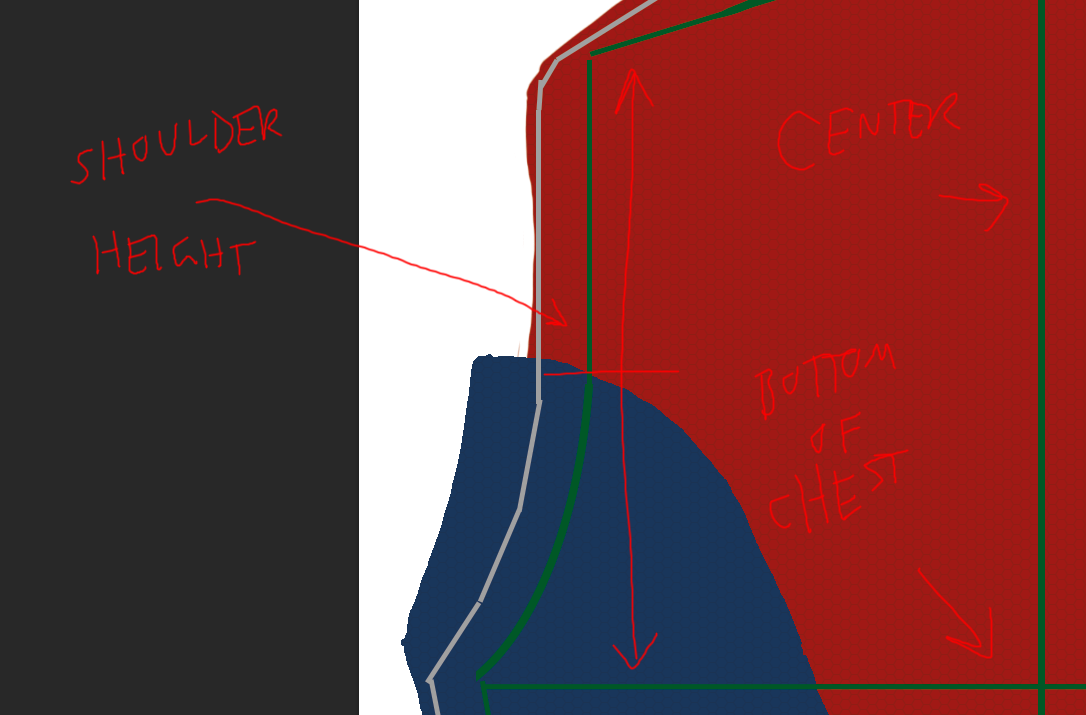
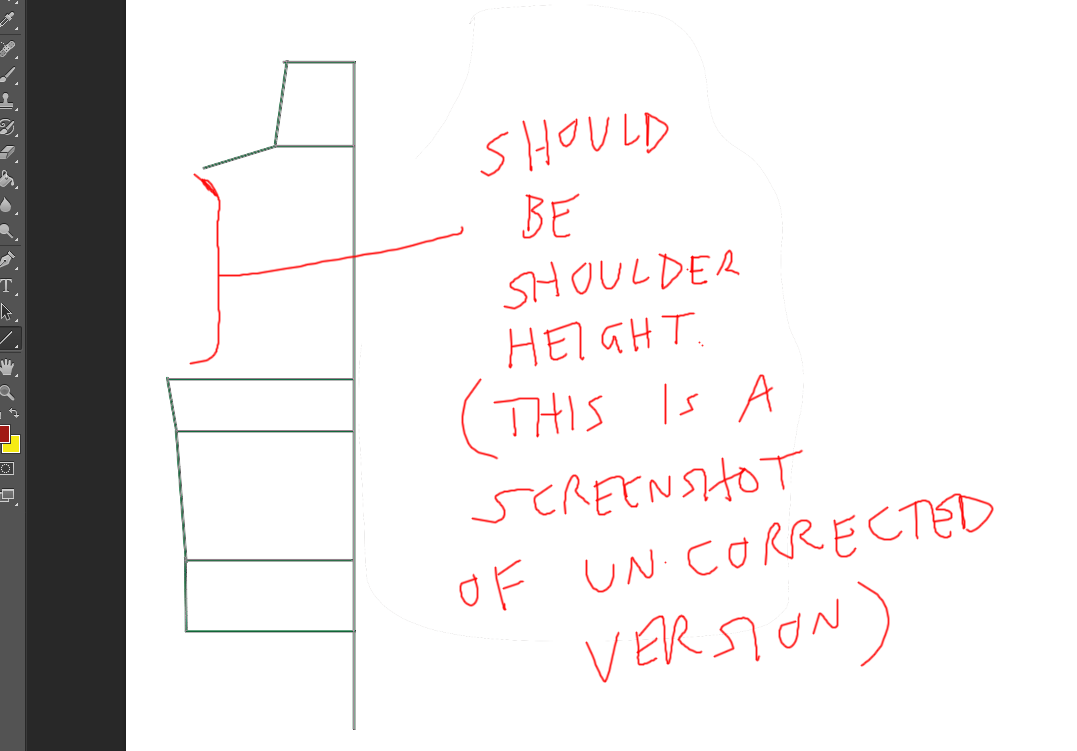
NOTE: Below you see that I have added a line from neck base toward the shoulder area. I initially neglected to use the shoulder height measurement from above, and have since corrected it. The corrected image will start showing up below, around the time I start the instructions for the arm portion (which is when I realized what I had done).
Just be sure that the distance between the chest horizontal measurement and the end of the shoulder width line matches the shoulder height measurement, as notated below:

Step 9: Now, for the space between the chest measurement and the neck base… That is, as you might imagine, where the sleeve connects and the shoulder slopes into the neck. We want to close that gap with a gentle half-curve.
Here is where we do some quasi-calculated guesswork with a dash of artistic math. (If you want more accurate measurement techniques, I again refer you to Stretchy.org, where you can find measurement techniques so precise your head will explode.)
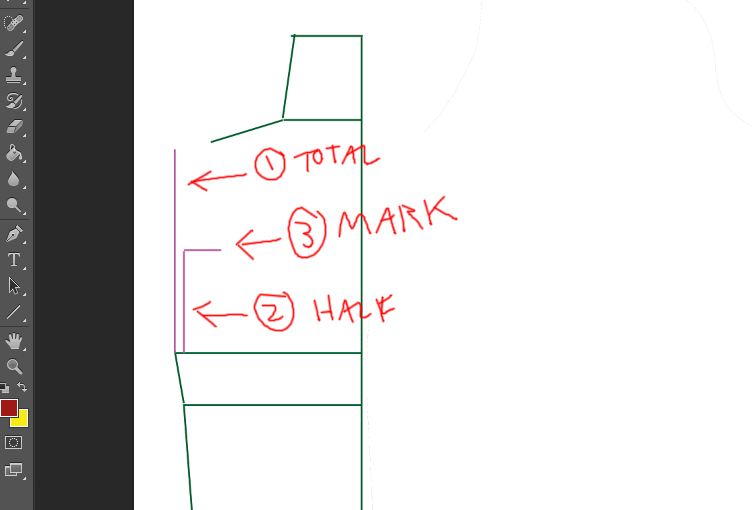
First, we’ll guesstimate the halfway point of the gap. Draw a vertical line that matches the shoulder height measurement from our list to span the gap. Calculate half that length, then draw a second line just to one side of the first to that half-length. Then make a small horizontal line to mark the halfway point:

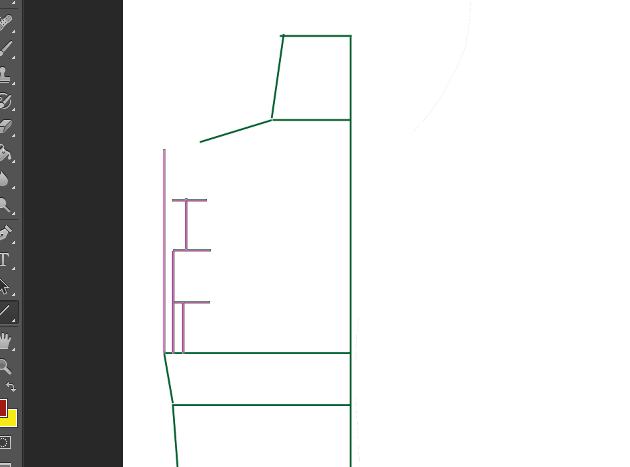
Do quarter width marks by doing half heights of the half-heights:

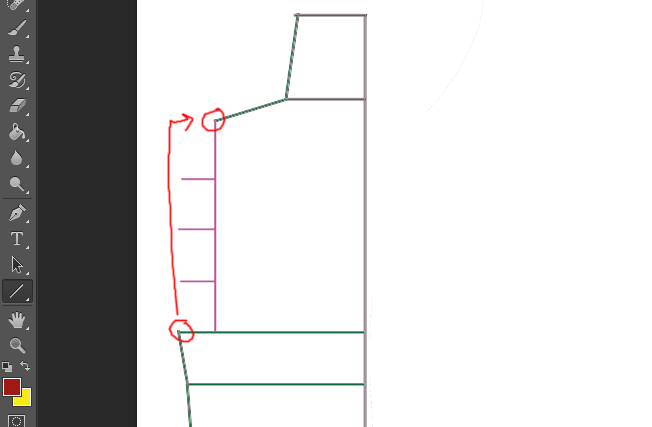
Now, delete those vertical lines, and add one that lines up with the end of the shoulder-width line at the top. (Your shoulder width line will–and probably should–be a little further in than the armpit, as indicated below.) Line up the inside edges of the horizontal marks with that line, like so:

Now, here we come to one of those “Choose Your Own Path” moments…
We need a curved path. There are a few ways to make curved paths in Photoshop:
- A precise sort of person probably uses the [vector] Path tool, which makes mathematical-type curves based on points. I suck at getting those the way I want.
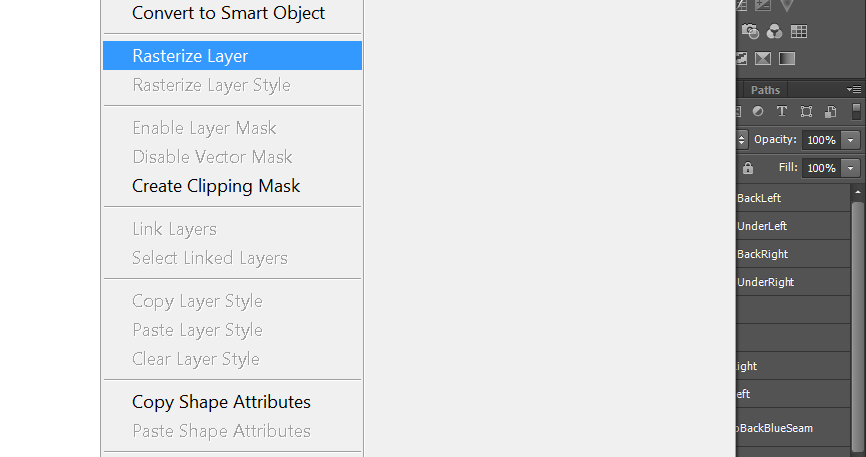
- You can also make a path via making a circle using the Ellipse tool. You then resize and tweak one part of it to fit the curve you want, “rasterize” it (flatten it to a bitmap rather than a vector shape), then erase the parts you don’t need, leaving the curve. Usually, it takes more than one circle, or a circle combined with a line or two to get the curve, depending on the shape of it.
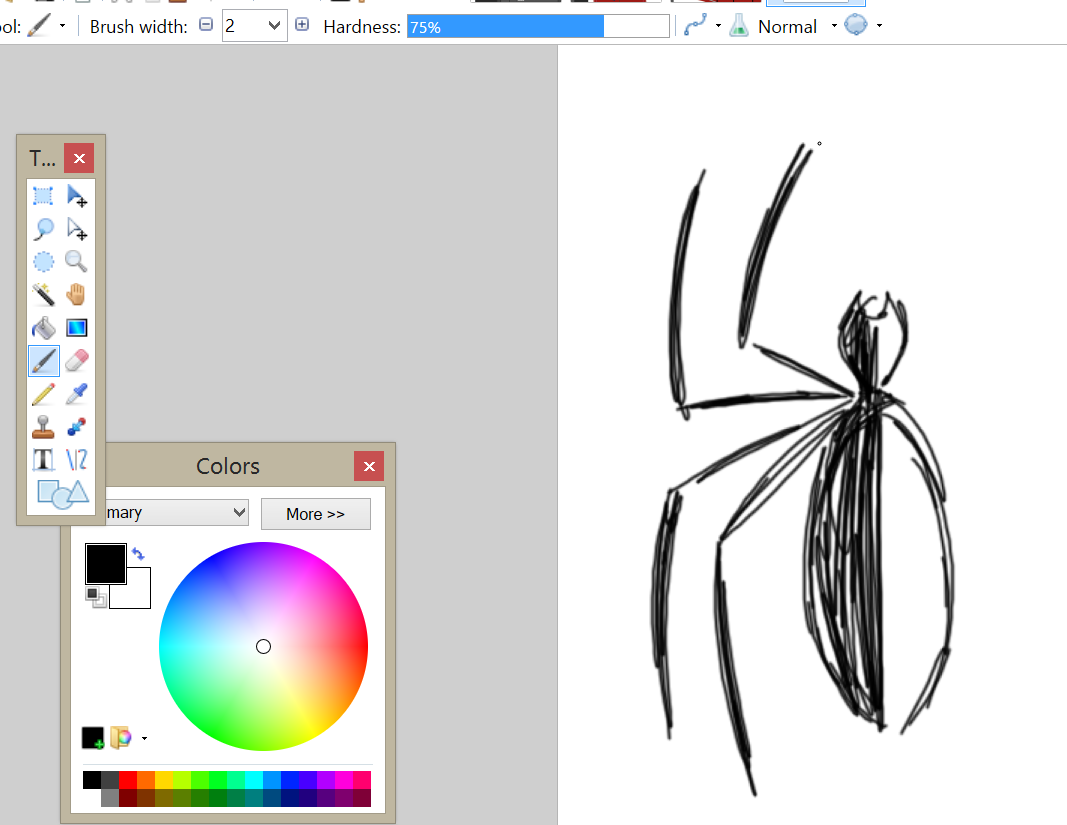
- If you are skilled at drawing with a mouse, or have a graphics tablet or a Tablet PC that allows the use of a Digitizer Pen, you can use the Brush tool to draw the curving line like you would on paper. You might even want to rough out the curve like this, and then string together a number of short straight lines to get a choppy curve, which is totally acceptable for this purpose.
I personally tend to use the ellipse->rasterize method above.
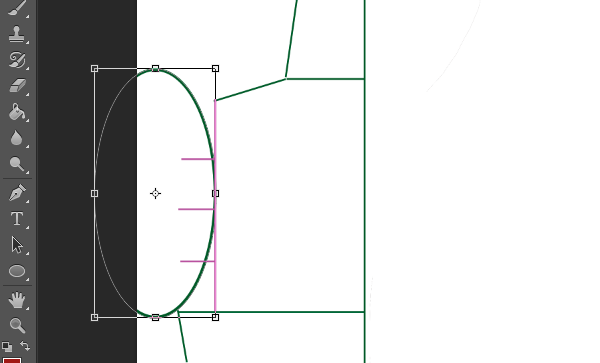
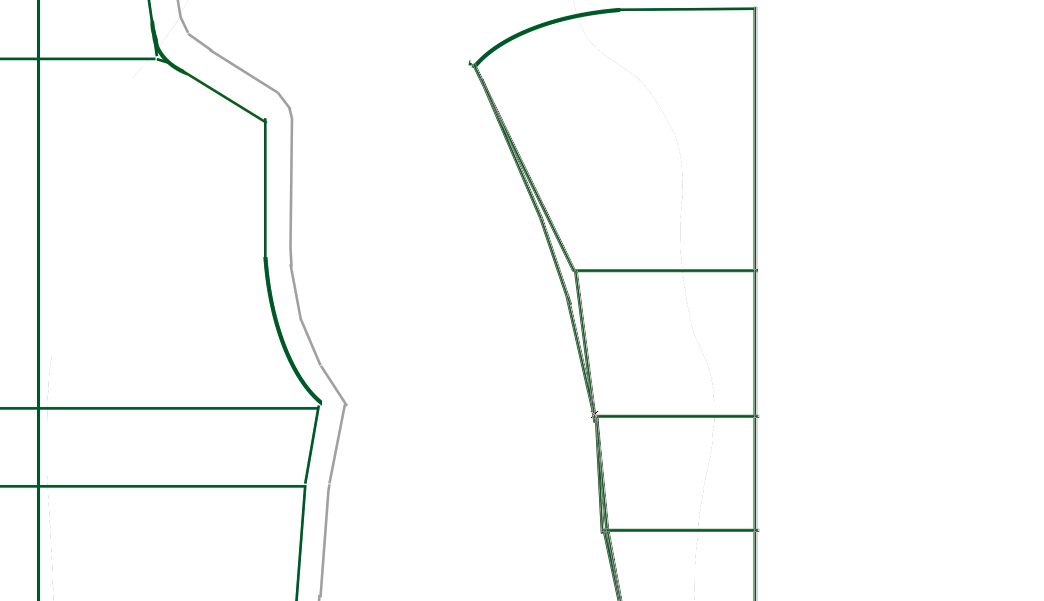
Make a circle. Aim to have the circle intersect about halfway across the first quarter width mark and then line up with the shoulder roughly halfway up. Roughly. (I did mention this is all somewhat imprecise, right?)

Rasterize the ellipse layer:

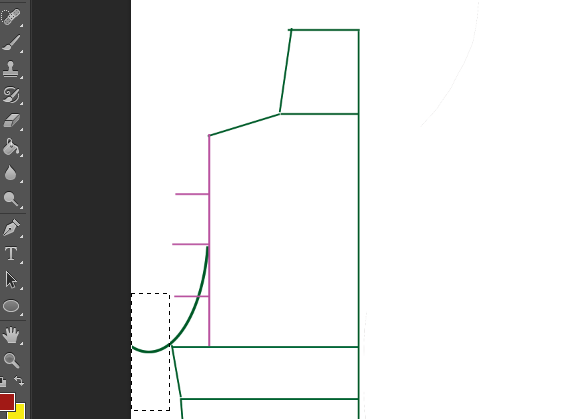
Erase the top and side of the circle:

Add a line or lines to connect the bottom part of the curve to the shoulder, and erase the guide lines (the purple ones in my images):

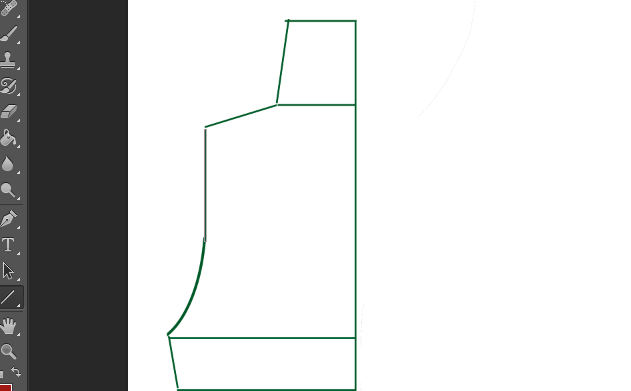
Use that method to do something similar for the shoulder/neck curve:

You may want to rework the original lines of the neck and shoulder. Ultimately, you should have something like this:

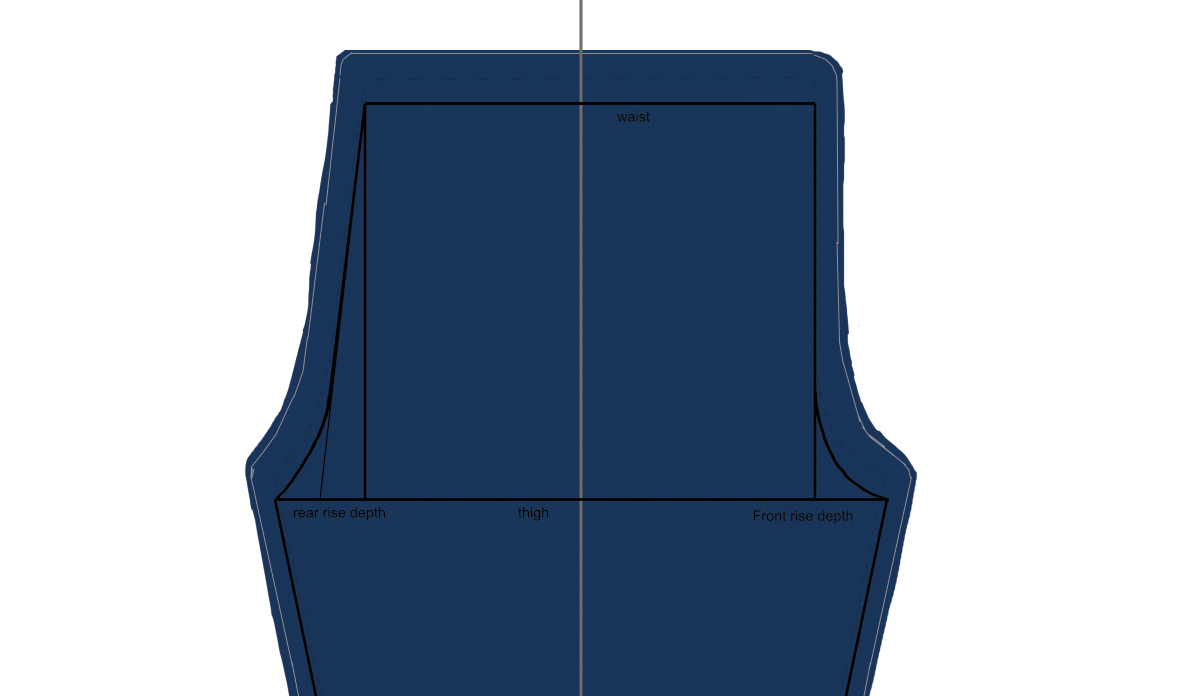
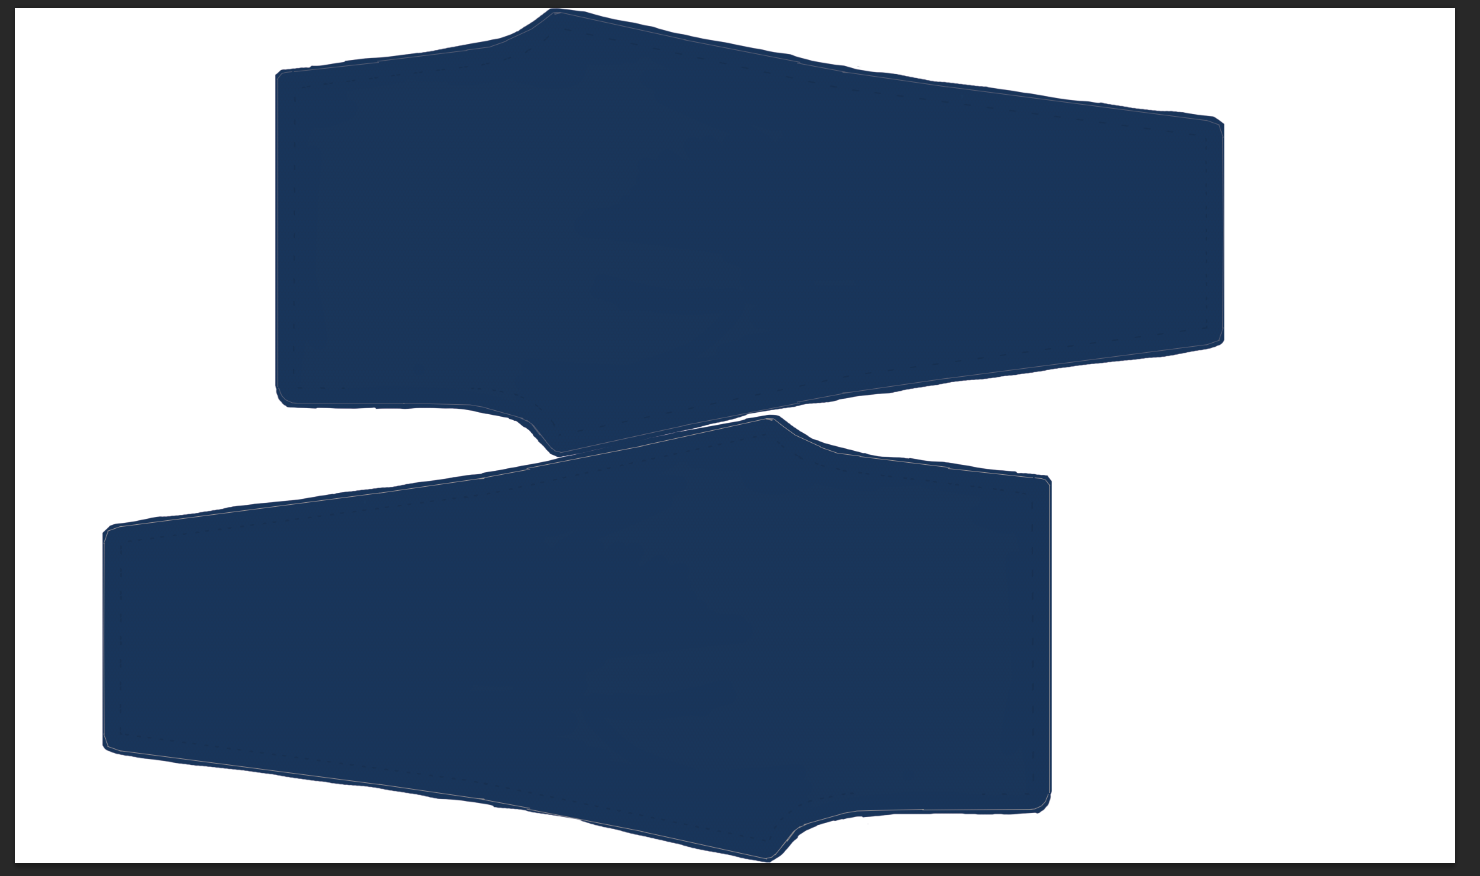
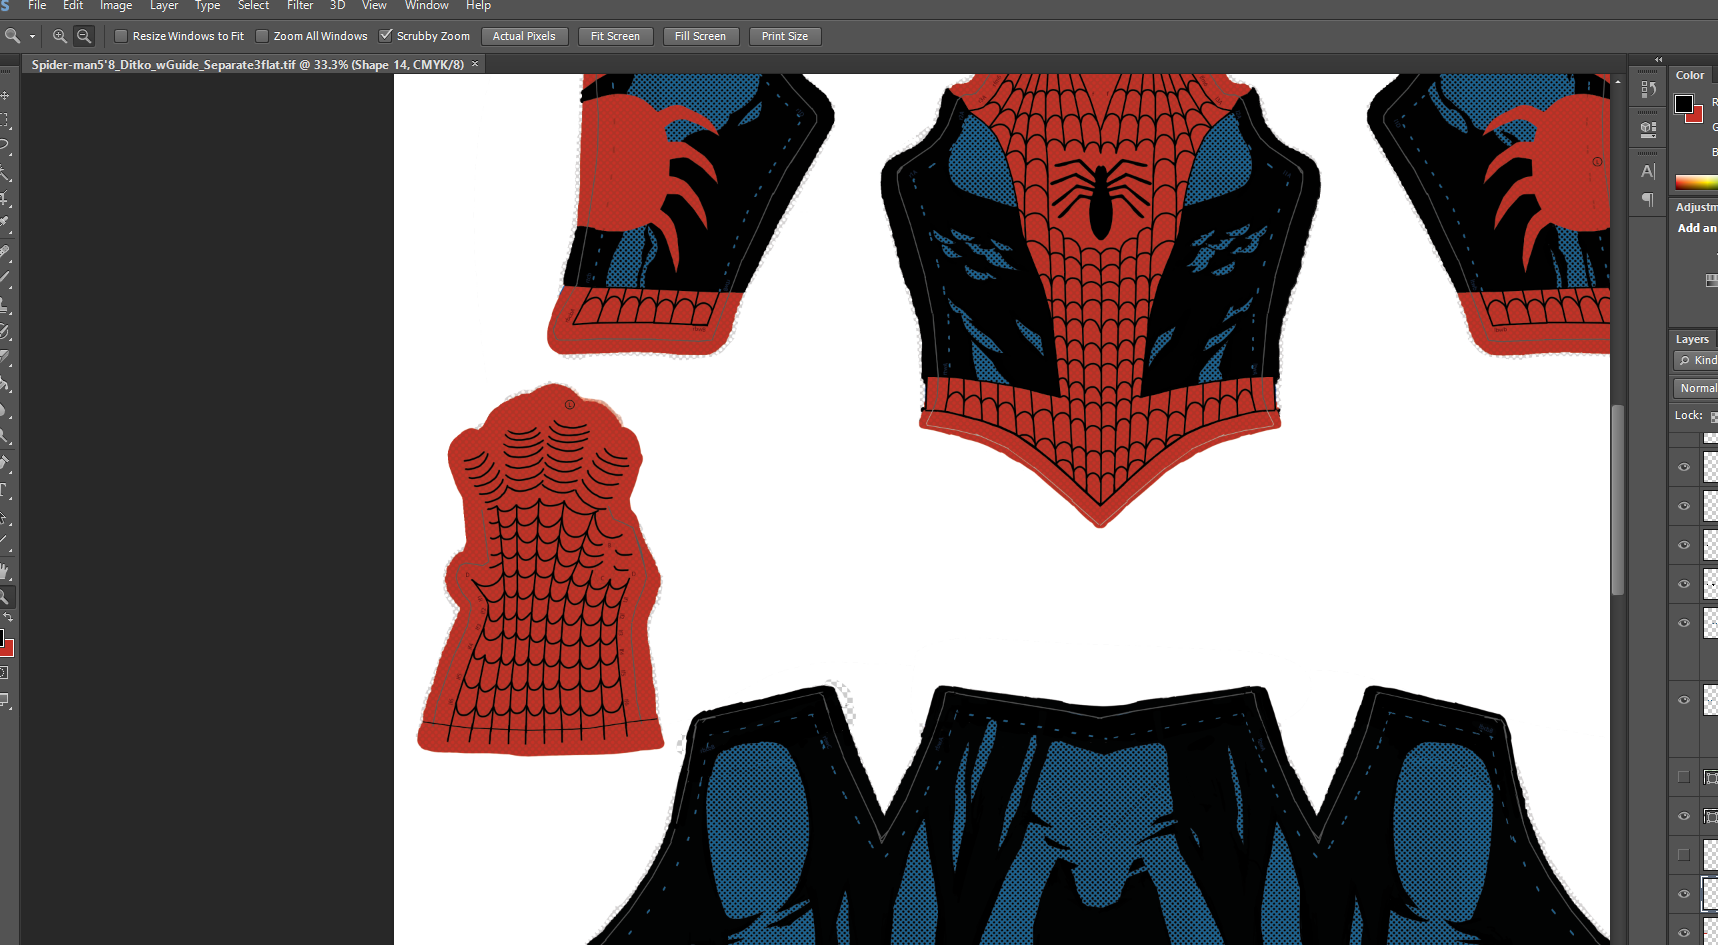
Step 10: Now, before we go too much further, let’s think about the bottom of the shirt, specifically the distance between the hip measurement and the “extra drape” length.
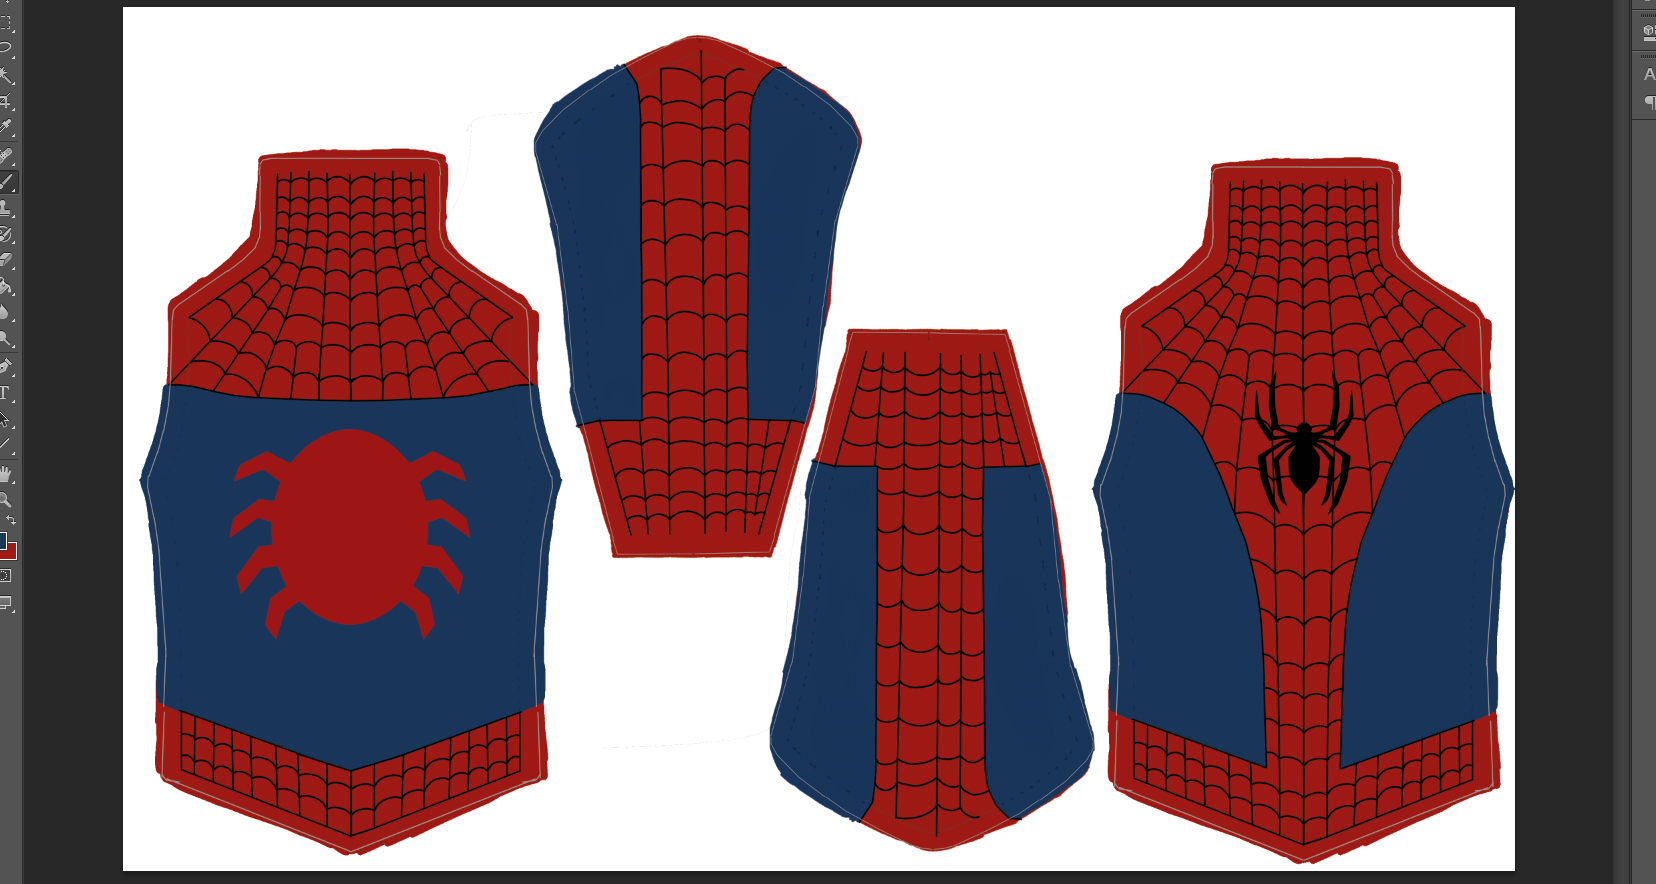
If you’re not doing a Spidey shirt, then you can just finish out the bottom with another vertical line on the side and a horizontal line across the bottom. But if you are doing a Spidey shirt, with a point at the bottom, it’s time to consider that aspect. But we’re also going to want to plan ahead for the back of the shirt too.
Even in the “traditional” red and blue costume design, there are a few variations on the “belt” portion of the shirt. How thick the red is below the blue on the sides of the shirt, how many rows of webbing and so on. But for this portion of the pattern, we need to decide on two things. (A) The curvature of the lines running from the point at the bottom to the sides of the waist and (B) whether the “belt” at the back is straight across–like in the comics–or pointed downward similar to the front, like some of the movie versions.

For the purposes of making the pattern, it is in some ways easier to make the back and front bottoms match. On my latest one, I did that. But it’s not hard to do a straight back either. It’s just good to go ahead and plan for how you do the back.
If you’re going to make them match, just do your point on the half we’ve got, and carry on, with plans to copy and paste the final front outline to use for the back. But if you want to do the back bottom differently, then we’ll double up on our design. I’ll use that approach for the demo.
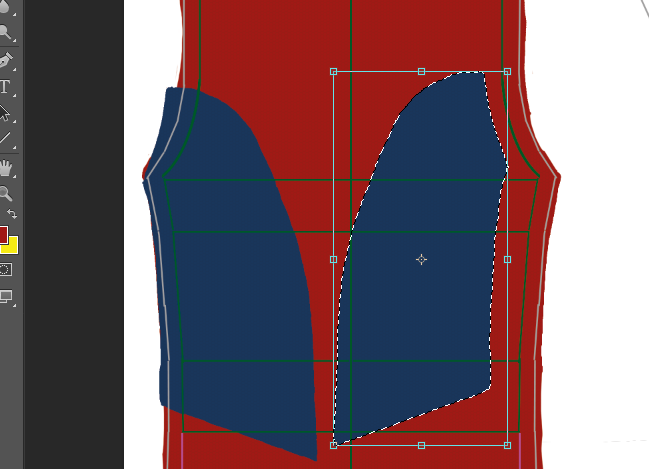
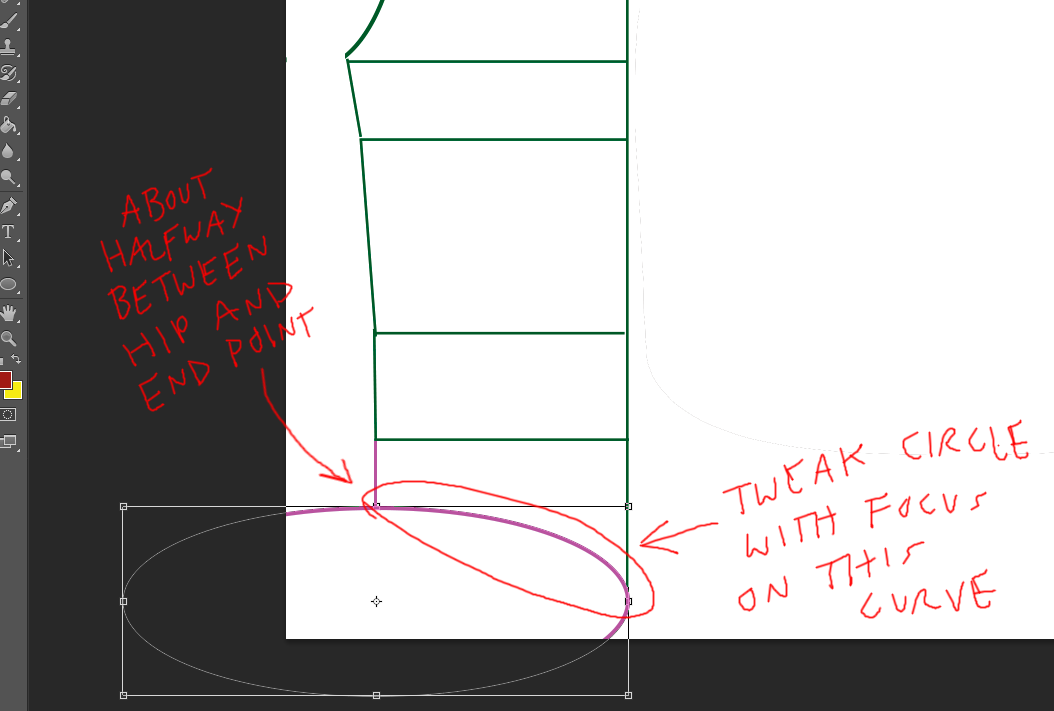
10A) First, we’ll do the front bottom lines that will form the point. From the hip measurement on the side, add a line that extends down about half the distance of the total length line. Then, make an ellipse and tweak it to form a smooth, gentle curve between the side and the point. (You can also just do a straight diagonal line, as I have done for my most recent version. It’s a matter of preference, mostly.)

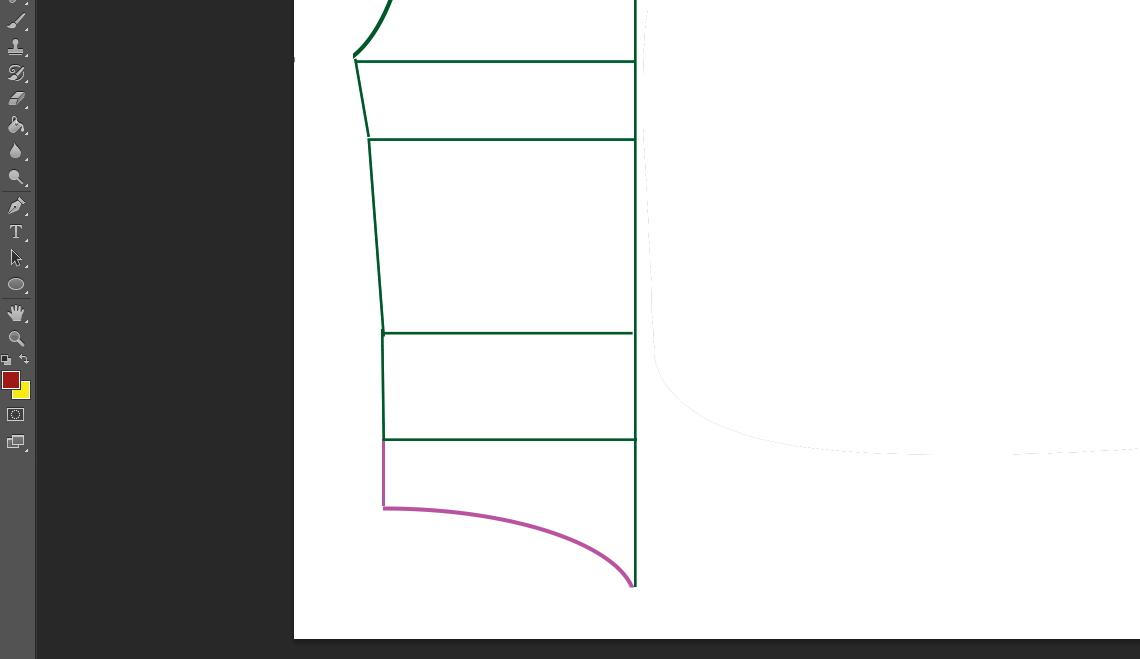
Rasterize the ellipse and trim off what you don’t need:

10B) Maybe the simplest step yet: add a straight line from the point where the curve meets the side to the center line:

Step 11: Next, a little cleanup before we continue.
11A) Identify any layers you don’t need–such as guides and marks–and delete them. (I am a bit of a “layer hoarder,” and will often hide such layers instead of deleting “just in case I need them later.” Sometimes I do. )
11B) Identify the layers that are part of your half-torso and select all of them (CTRL+click or select the first in line and then hold SHIFT + click the last in line).
To make all that easier to work with, merge those layers. You might want to rename it something that will make it easily identifiable, like “torsoDimensionsRight” or some such. NOTE: This will rasterize/flatten all the shapes and lines into one bitmap.

11C) Right click on the newly merged layer and select “Duplicate Layer.”
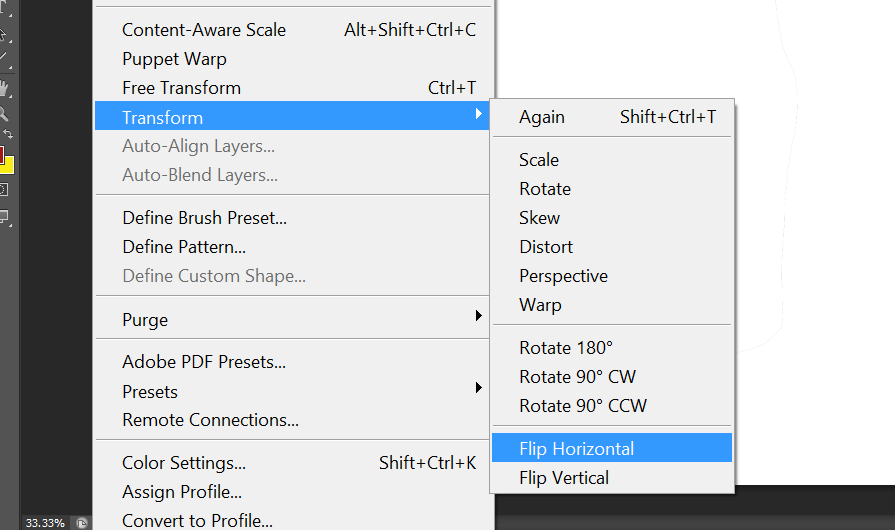
11D) With the duplicate layer selected, go to the Edit menu, and then Transform->Flip Horizontal:

11E) Move and adjust the mirrored layer to line it up as the other half of the torso dimensions. You might reveal some stray ellipse portions that were invisible off screen. You can erase those, of course:

Step 12:
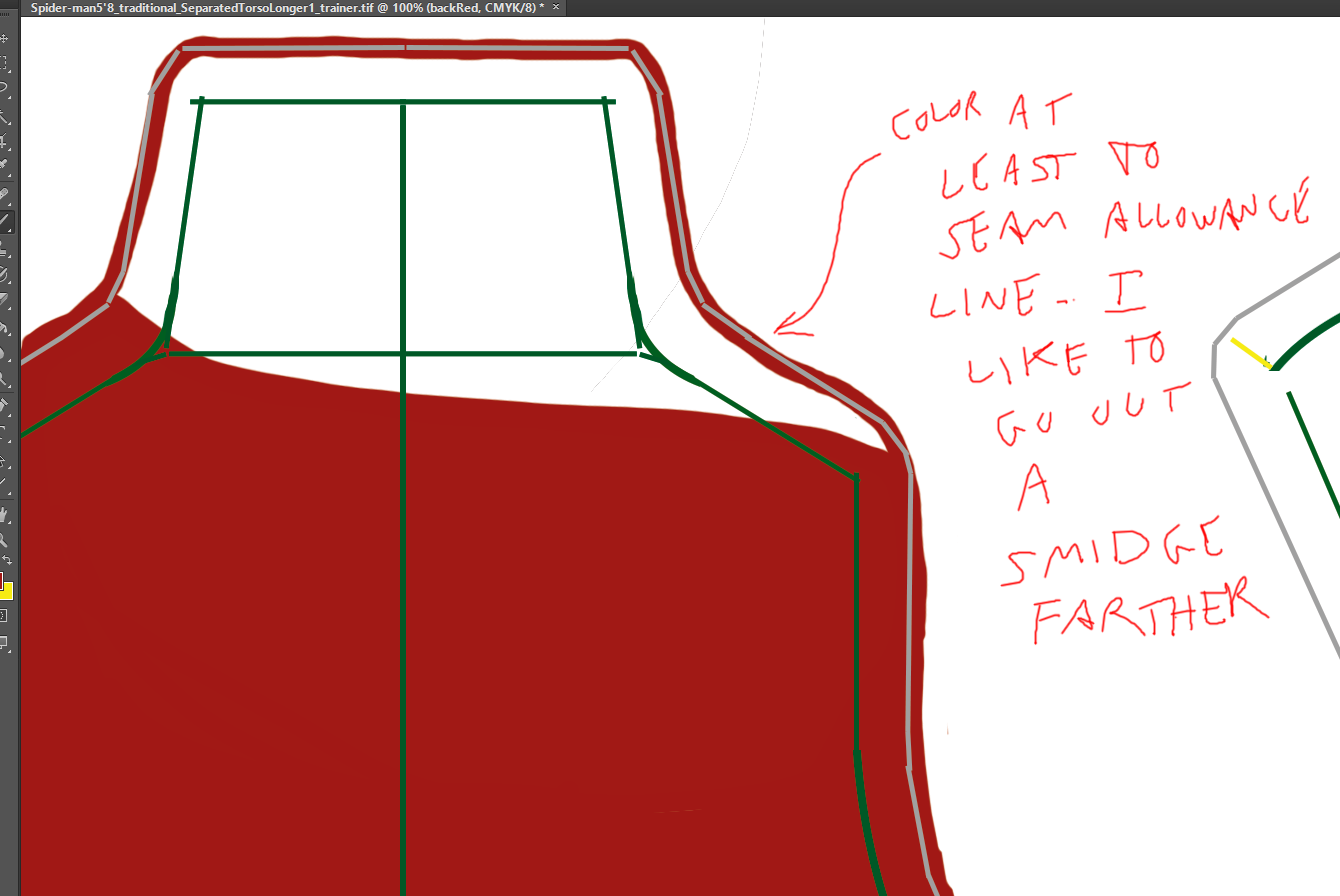
Now, you have your torso base dimensions. But now we need to do one more thine before we are ready to start the fun part with colors and textures and web patterns. Since this is destined to become screen printed fabric that we can sew into a garment, it needs a Seam Allowance.
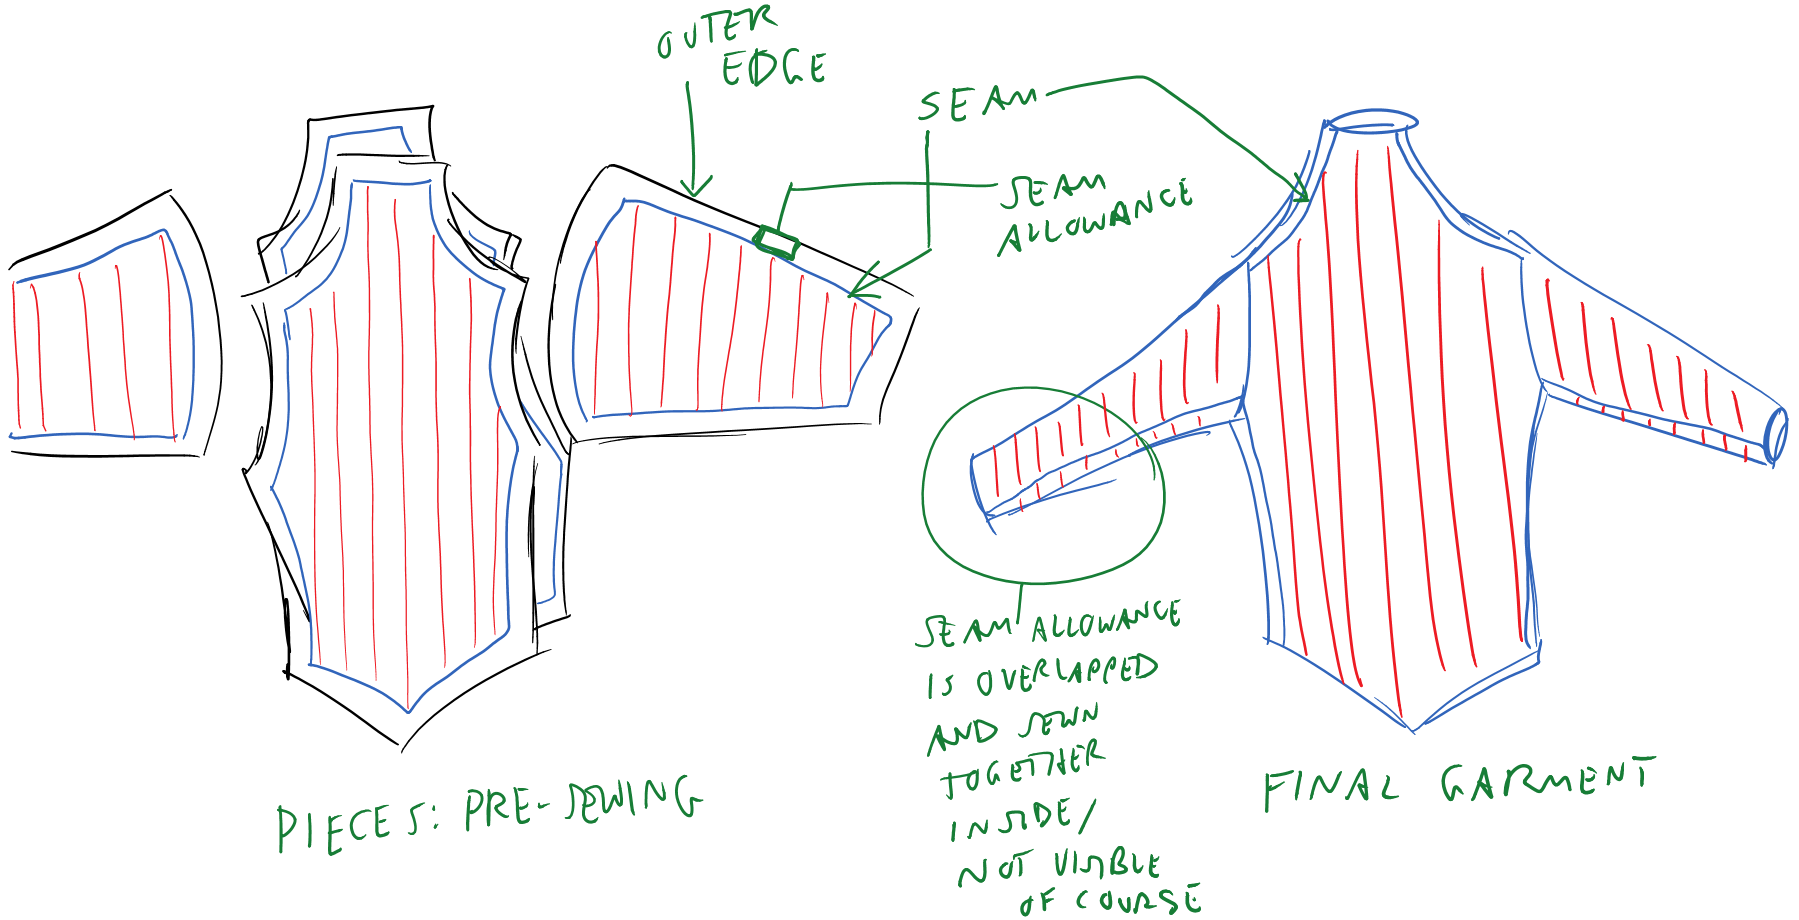
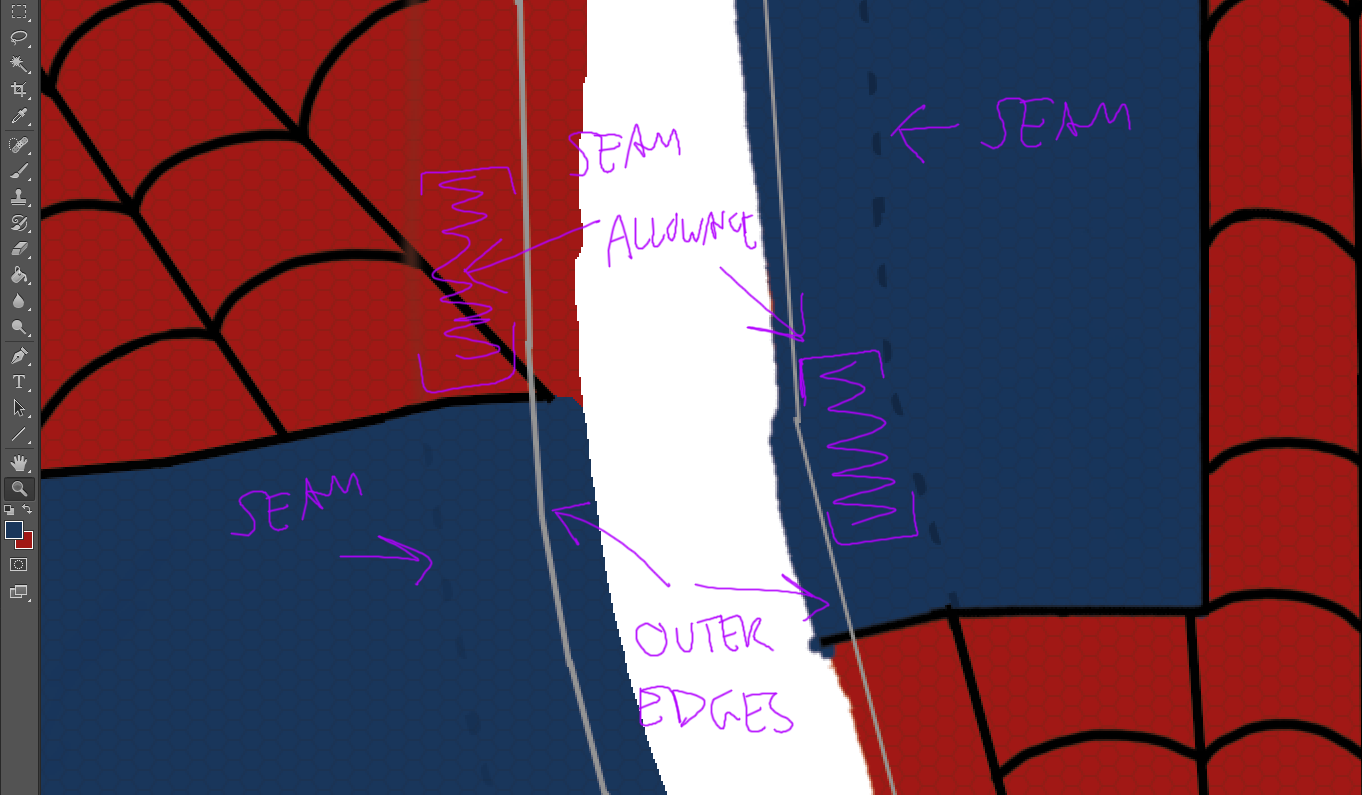
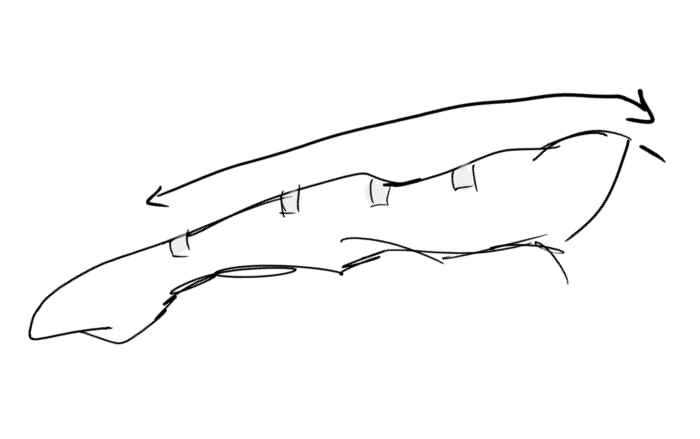
If you are not familiar with seam allowance, it is basically the “extra” fabric along the edges of a garment that overlaps to be sewn together, and is hiding on the underside of the seams of your clothing:
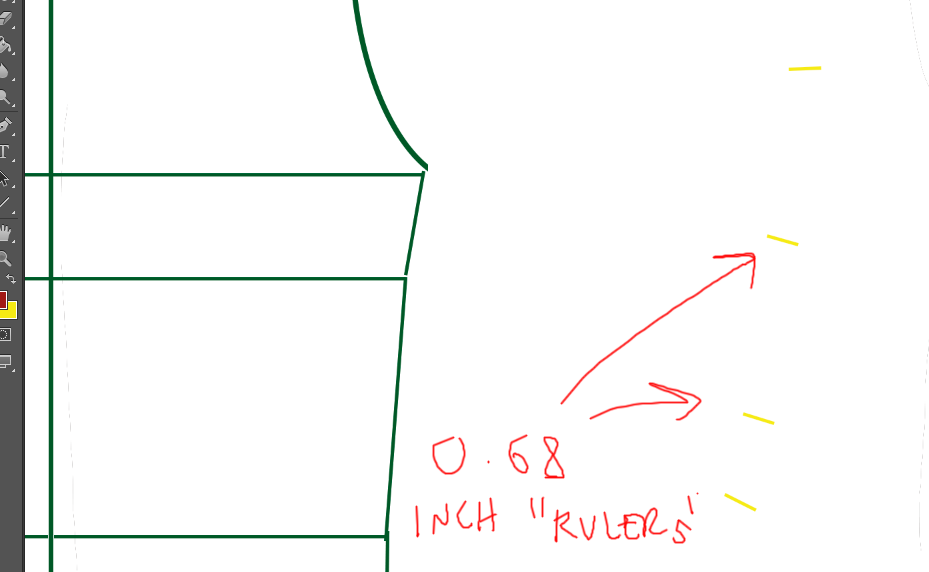
Don’t worry too much about the sewing lesson for now, though. For our purposes, we just want to create a simpler outline around our base torso dimensions. We are going to create a seam allowance of 5/8 of an inch, which is roughly 0.68 inches. If you are using metric, I will let you do your own conversion, so that I don’t mess it up.
You might be smart enough to figure out a better way than mine to add this allowance around the edges, but simple copying and resizing did not seem to get the right outcome. So for what it’s worth, here’s my basic method:
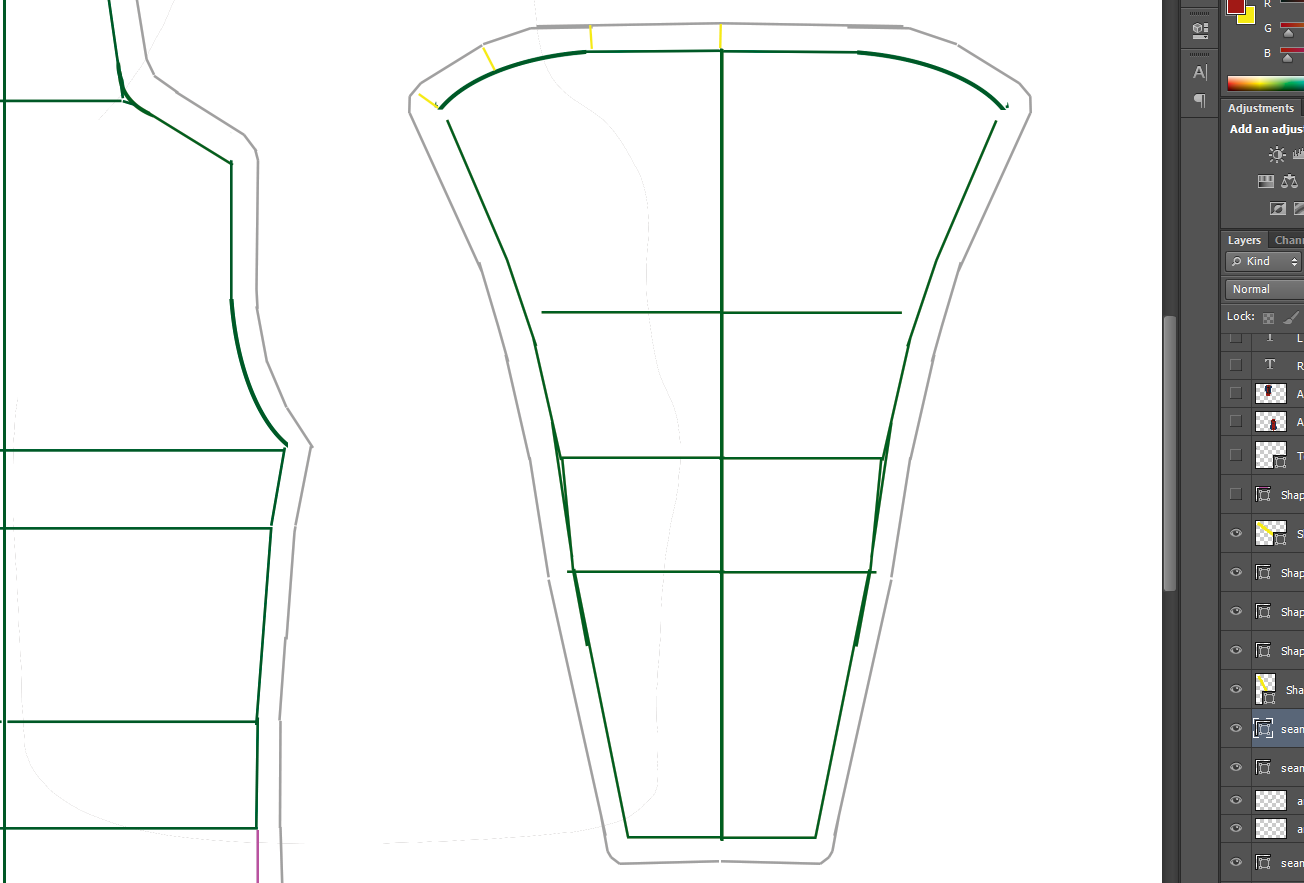
12A) Use the line tool to create a line that is 0.68 inches long. Use a bright color that is distinct from your other line colors. I use yellow. Duplicate that layer multiple times:

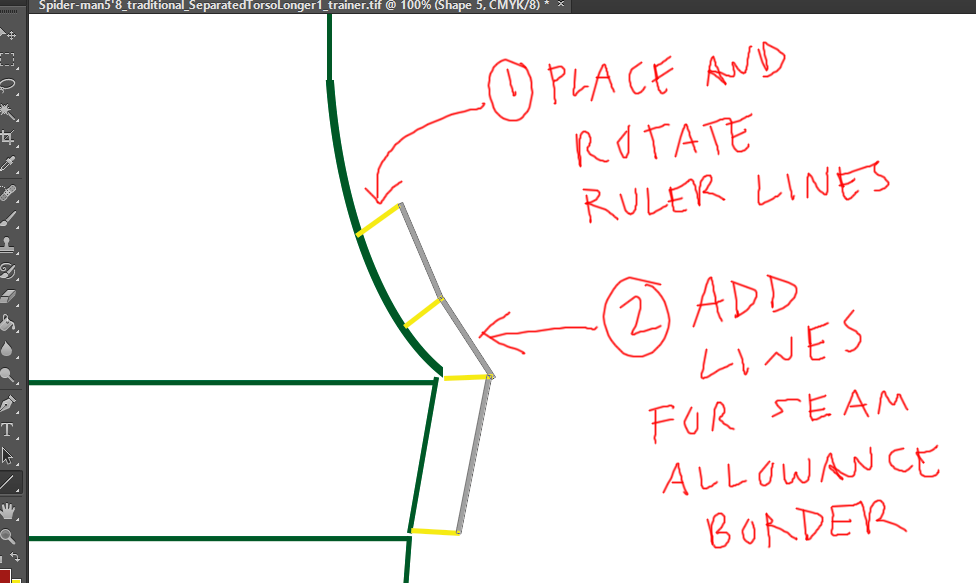
12B) Position the rulers around the edges of your torso dimension shape, angling them to roughly correspond with the changing angles of the and curves. Start a new layer of lines that will be the Seam Allowance Border:

I just create a handful of the ruler lines and move/adjust them as I work my way around the torso dimensions. You could, if you wanted, create enough to do it all at once. Either way, remember that you only have to do one half of the seam allowance border, and then you can copy and past to the other side!
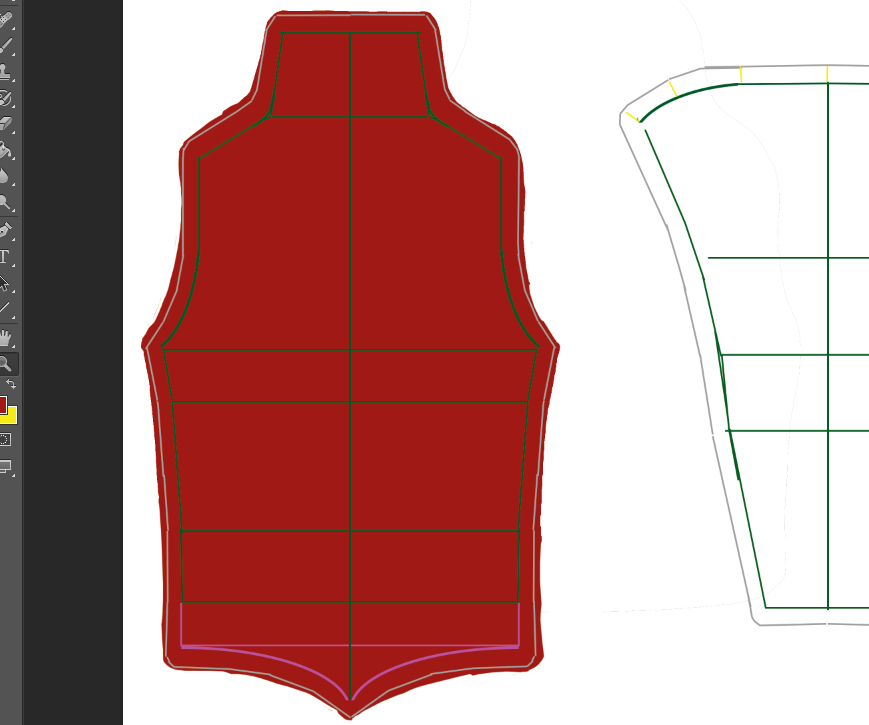
12C) After finishing half of the seam allowance border, duplicate the layer (you did remember to keep your line shapes Combined, right? If not, Merge Shapes for those layers), Flip it Horizontal, and position it as the other half of your Seam Allowance.

And there you go. Seam Allowance.
Now, hide–do not delete–the little ruler lines. Those actually will be needed for future seam allowance purposes.
That takes care of the Torso portion of the shirt. Now we need to make the arm[s]. But since you are now familiar with the basic techniques, we should be able to speed through that a little faster.
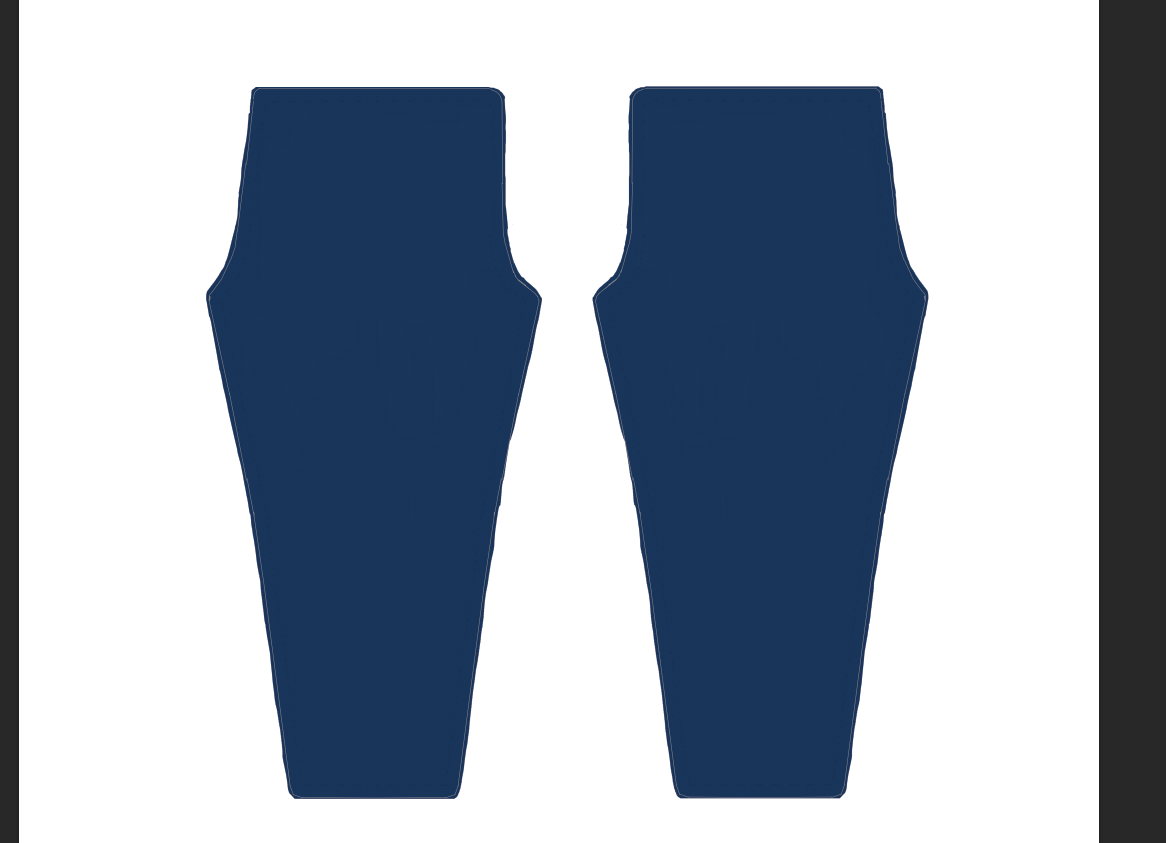
The Arm[s]
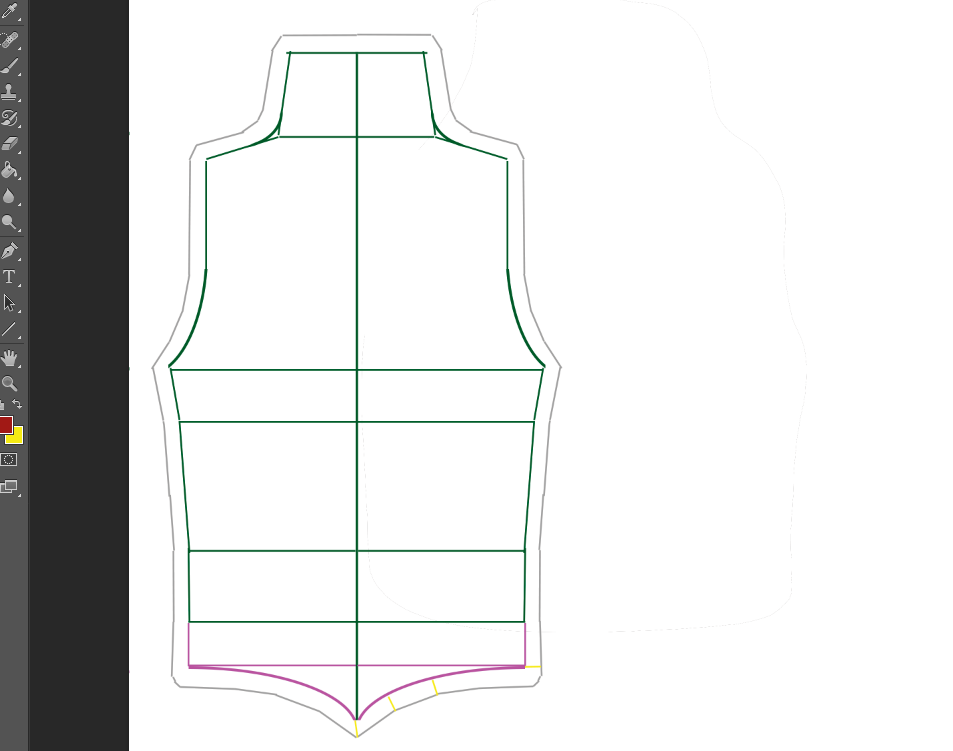
Start with the same basic technique from above and do the vertical line matching the total length of the arm, and add the horizontal lines at the proper heights based on the vertical measurements between:

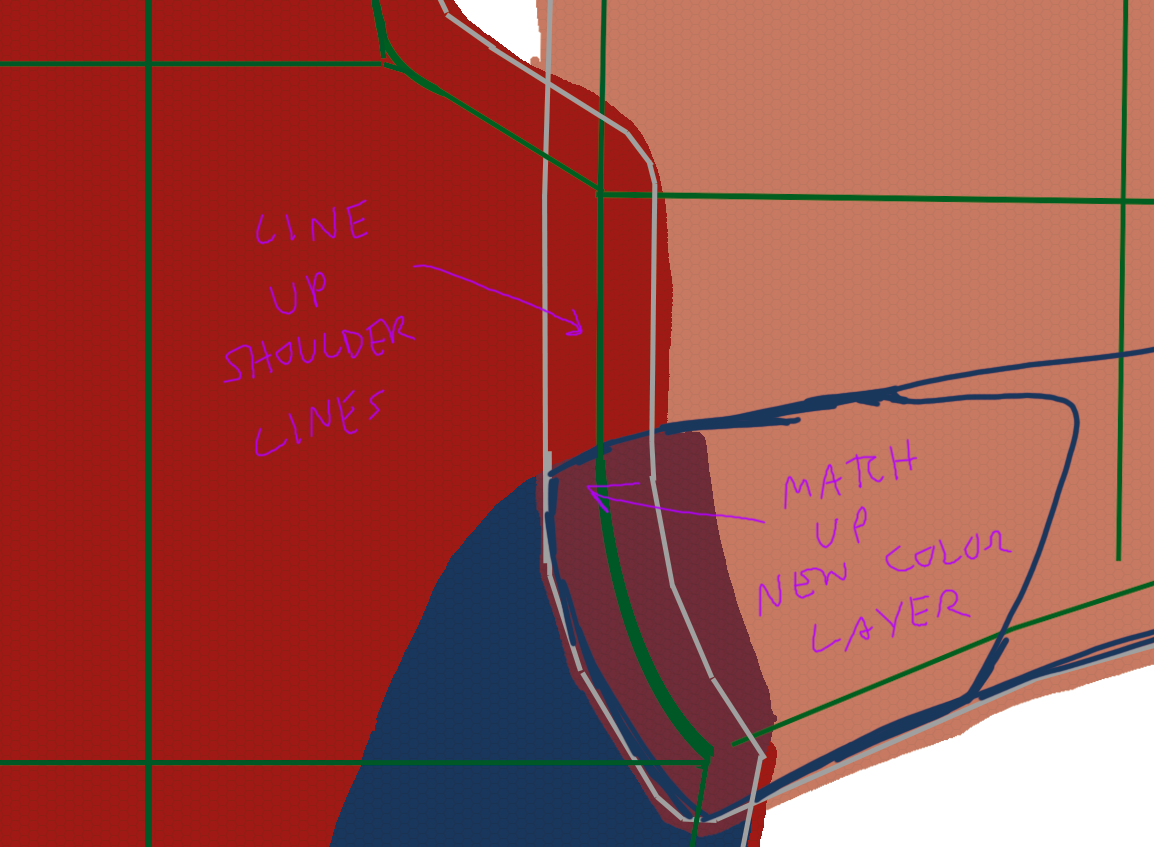
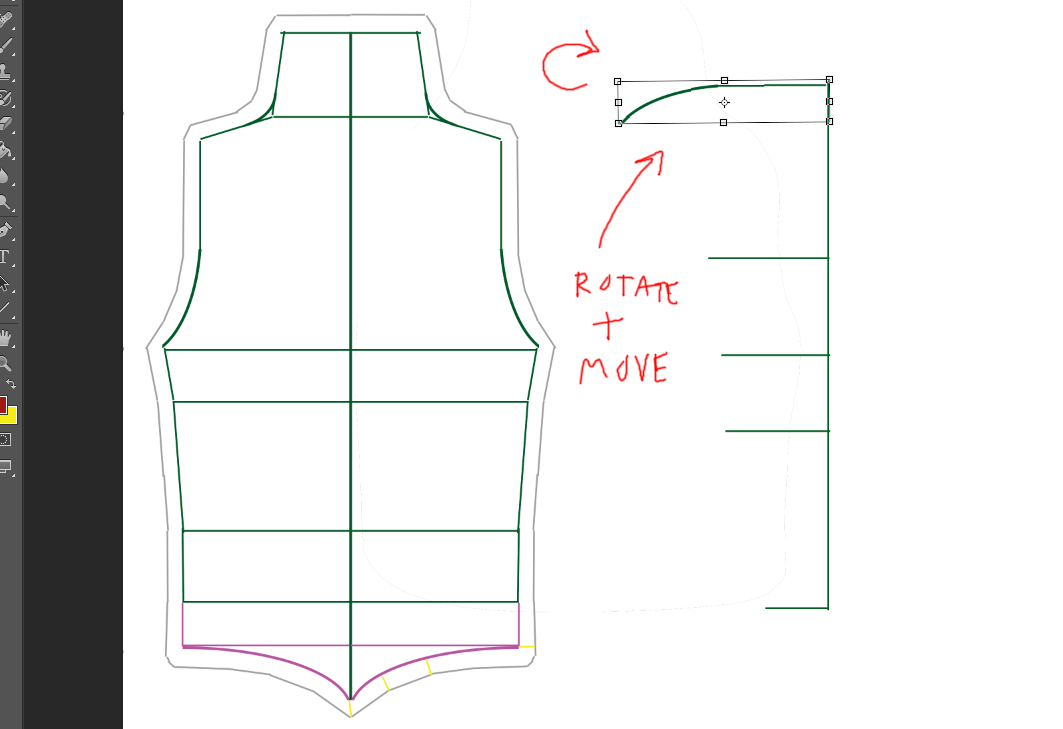
Copy and past the shoulder curve:

Rotate and position the shoulder curve, with the straight part against the center line of the arm:

NOTE: This is somewhere around where I figured out that I didn’t use the Shoulder Height measurement and I had to fix things, so if the screenshots seem to show a slightly different torso, that’s why. 🙂 But as long as you’ve been following the method instructions with your measurements, you’re golden.
Connect the horizontals:

And now smooth out those angles a bit (I used multiple short lines in this case):


It doesn’t have to be perfect. The general outline is what’s important.
Copy and paste to make it two halves of a whole:

Using your “mini-ruler” lines, add the Seam Allowance border to one half, then copy and paste it over:

And now we have the arm pattern!
Finishing Notes for the Pattern re: Next Steps
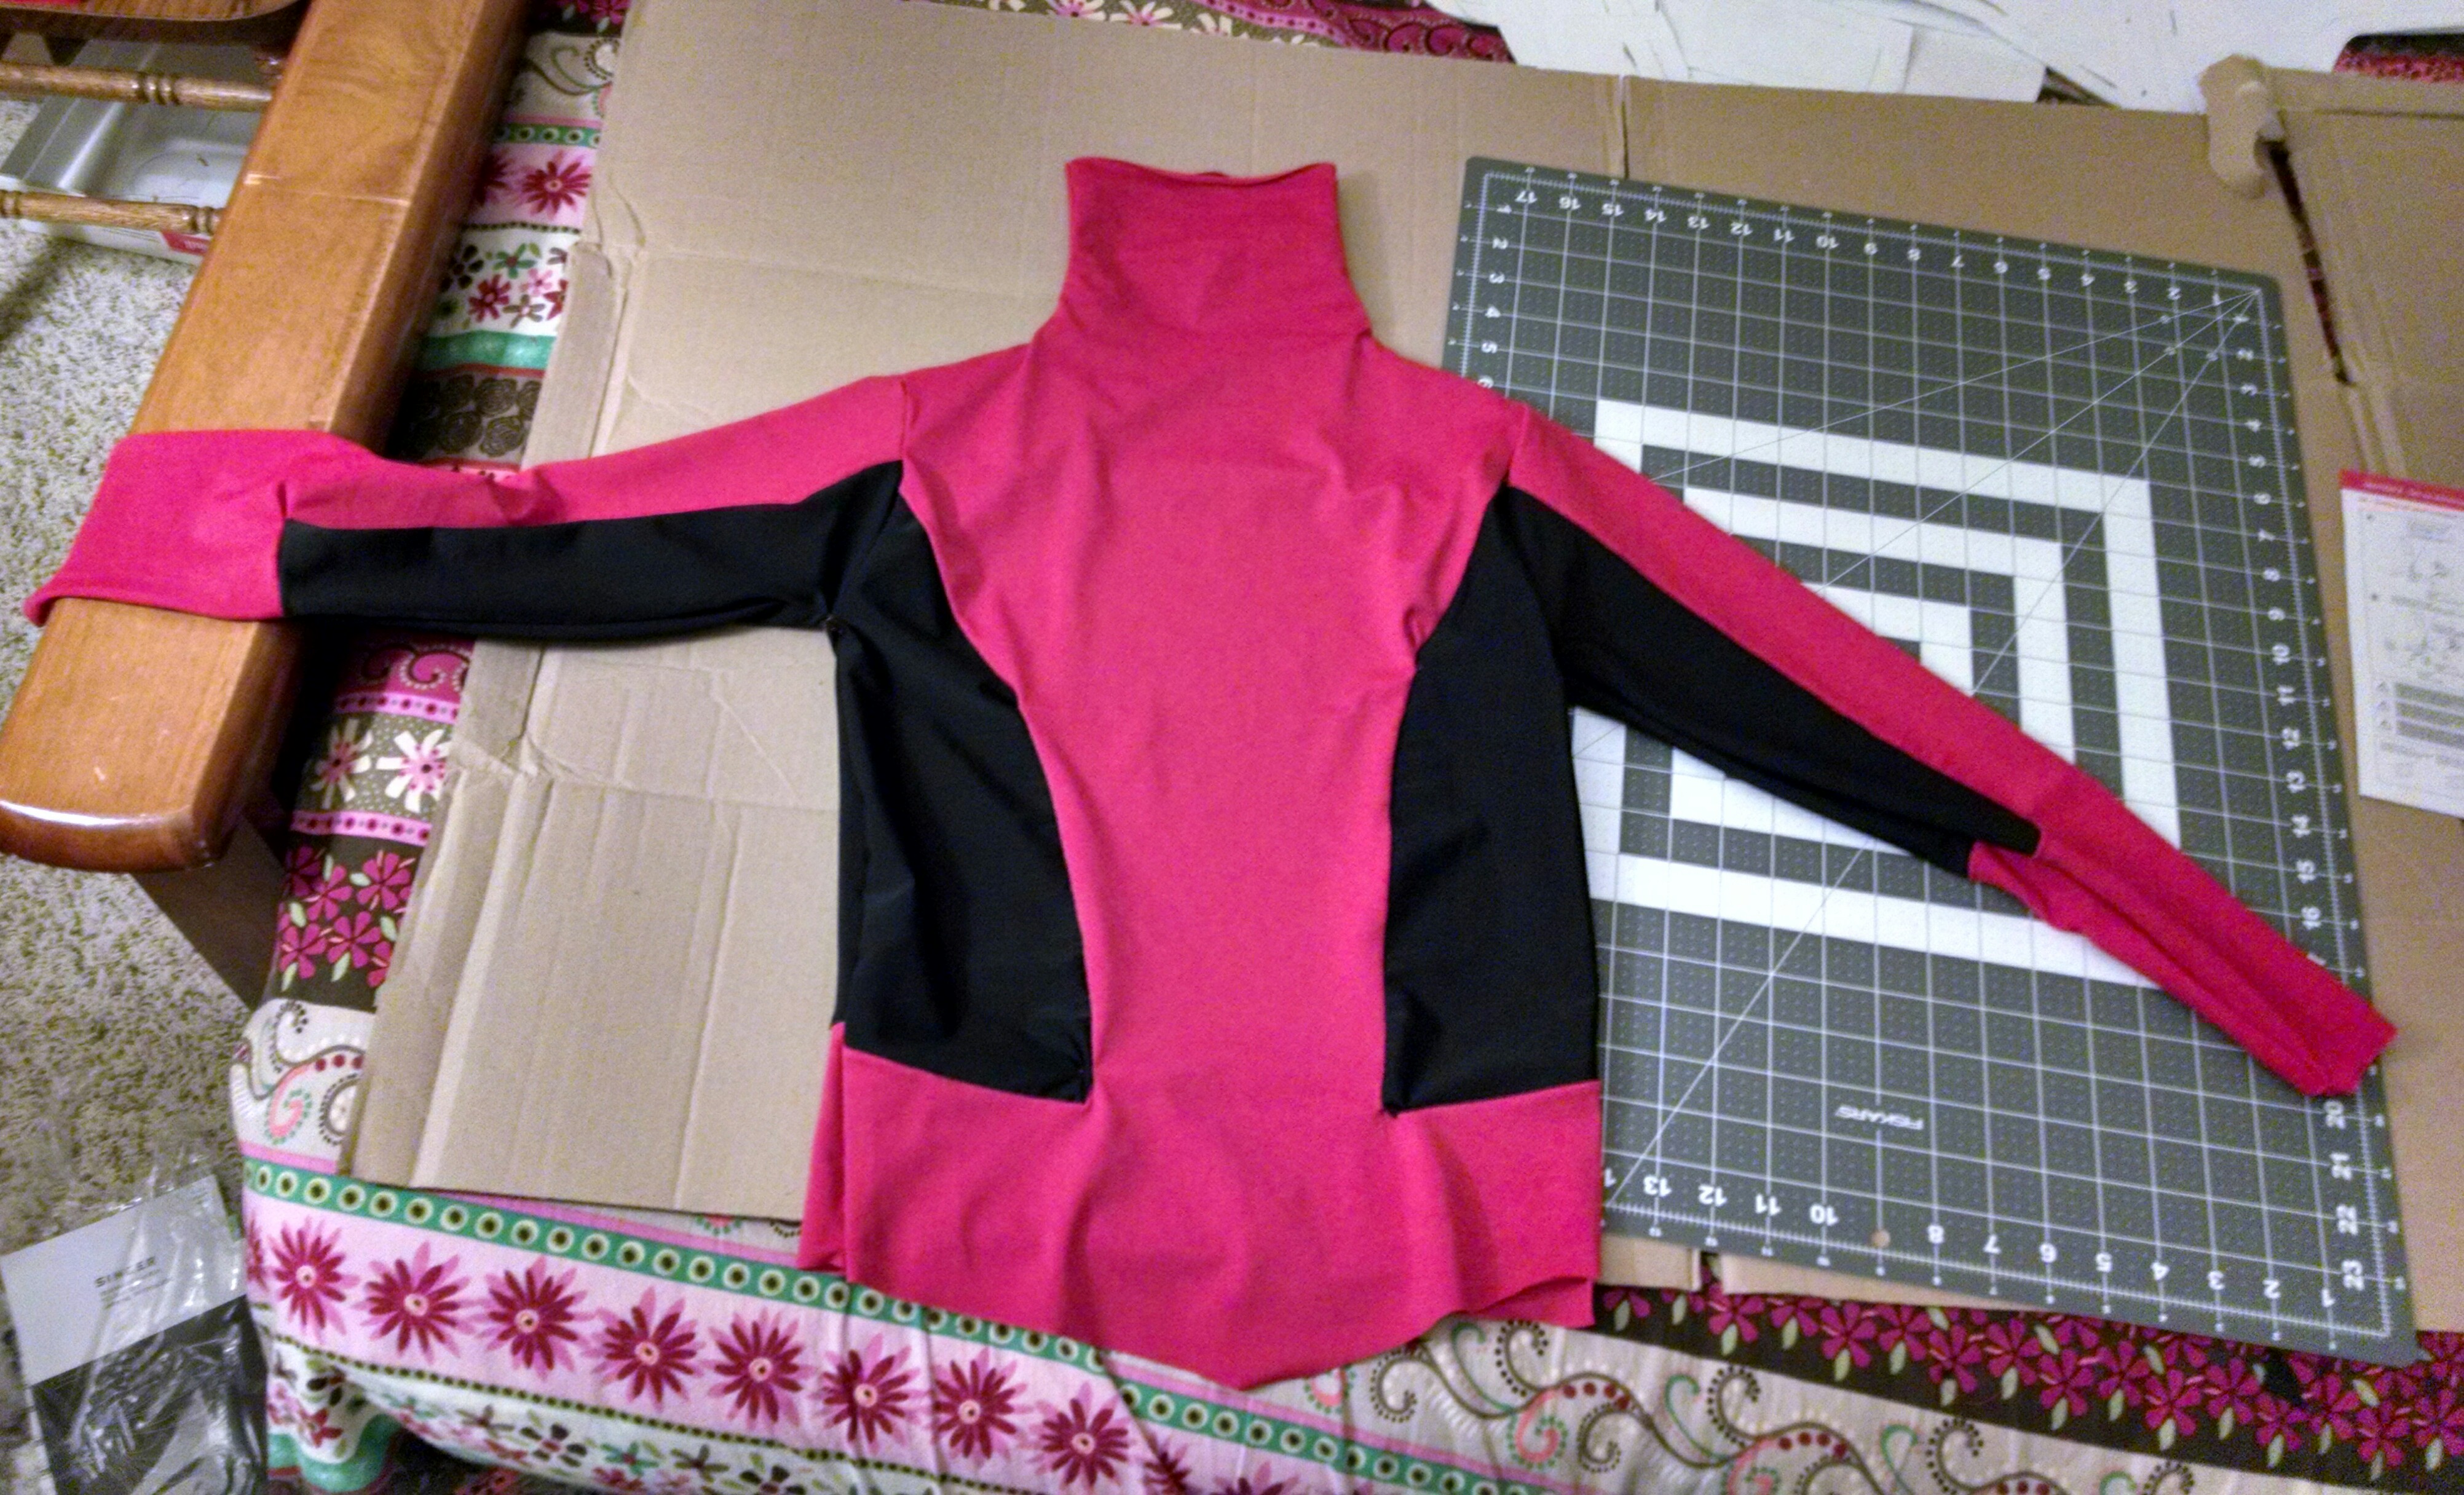
We now have completed the Pattern portion of the Spidey (or other hero) Costume Shirt Tutorial.
“But we only have one half of the torso and one arm!”
Yes, but there’s no sense copying and pasting and then having to repeat the colors and web patterns and such for both halves. So we’ll see how all that works in Part 2!
Thanks for your patience everyone! Hopefully part 2 of the Shirt Tutorial won’t take as long as Part 1, but I can’t make any promises. 🙂
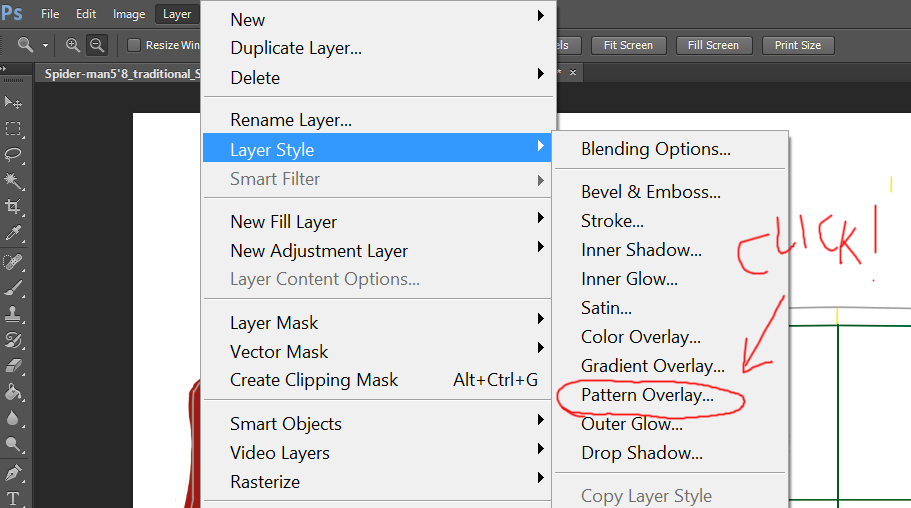
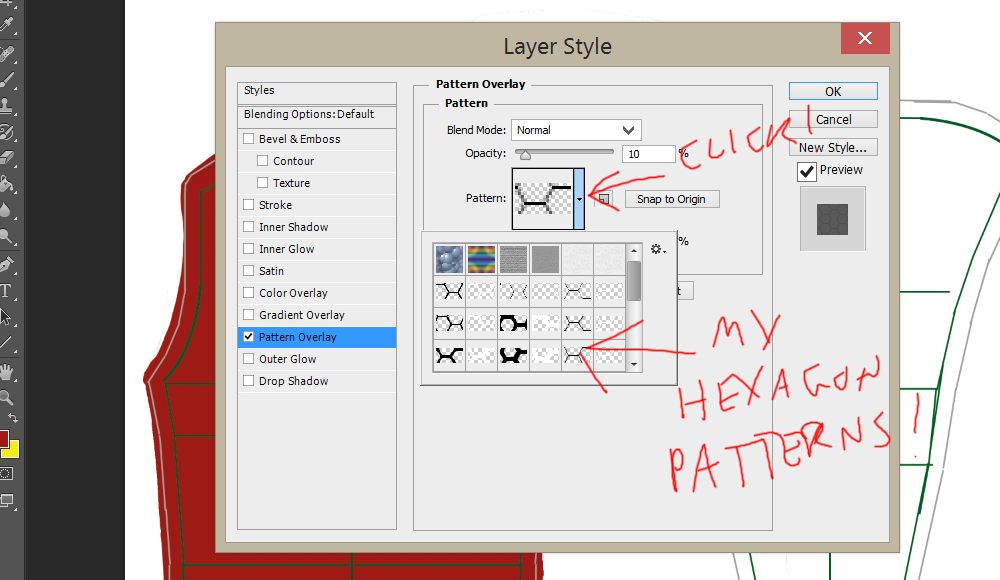
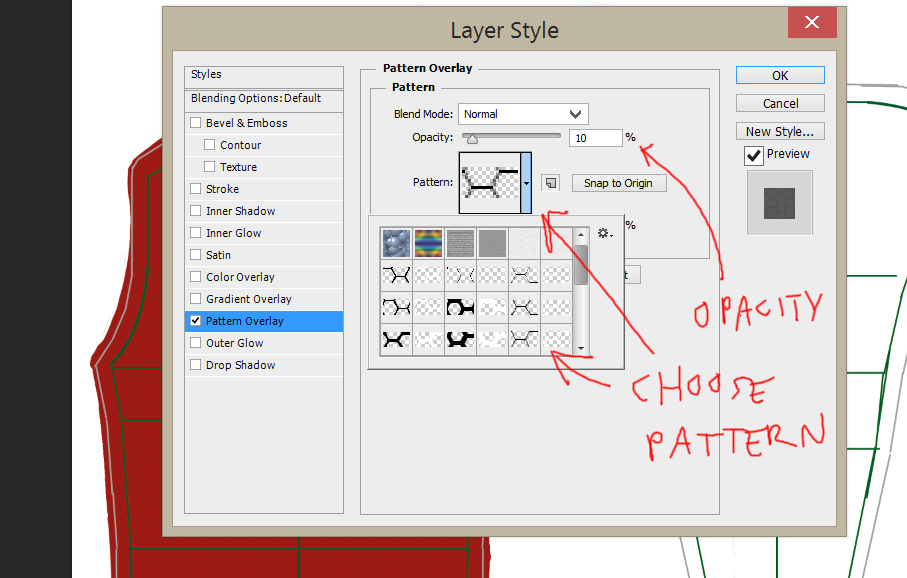
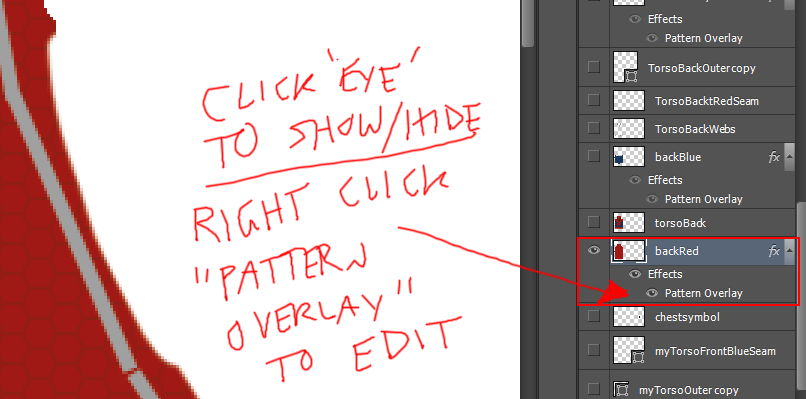
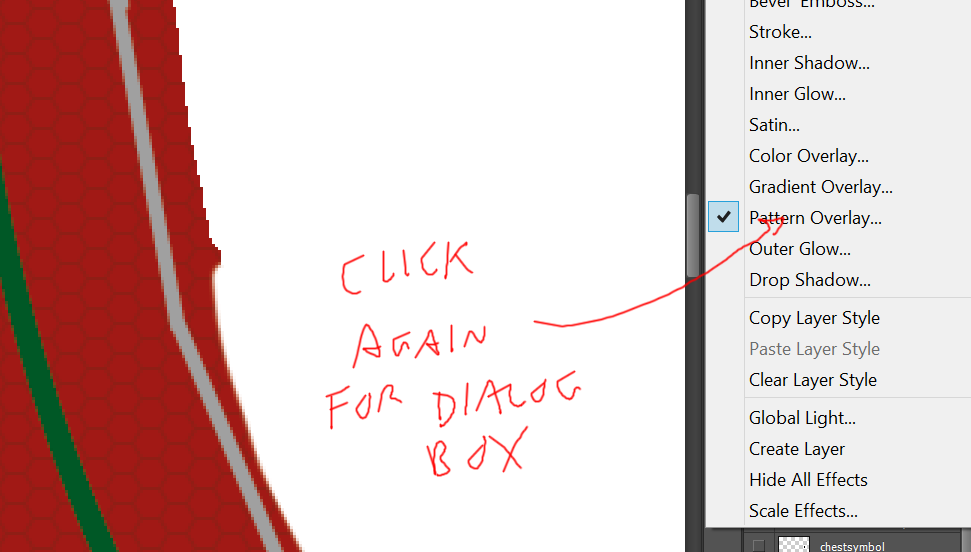
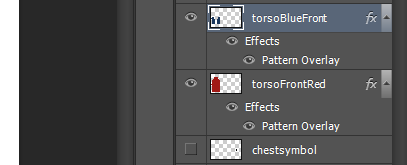
Up Next: EARLY Guides Part 2B: The Spidey Shirt Design