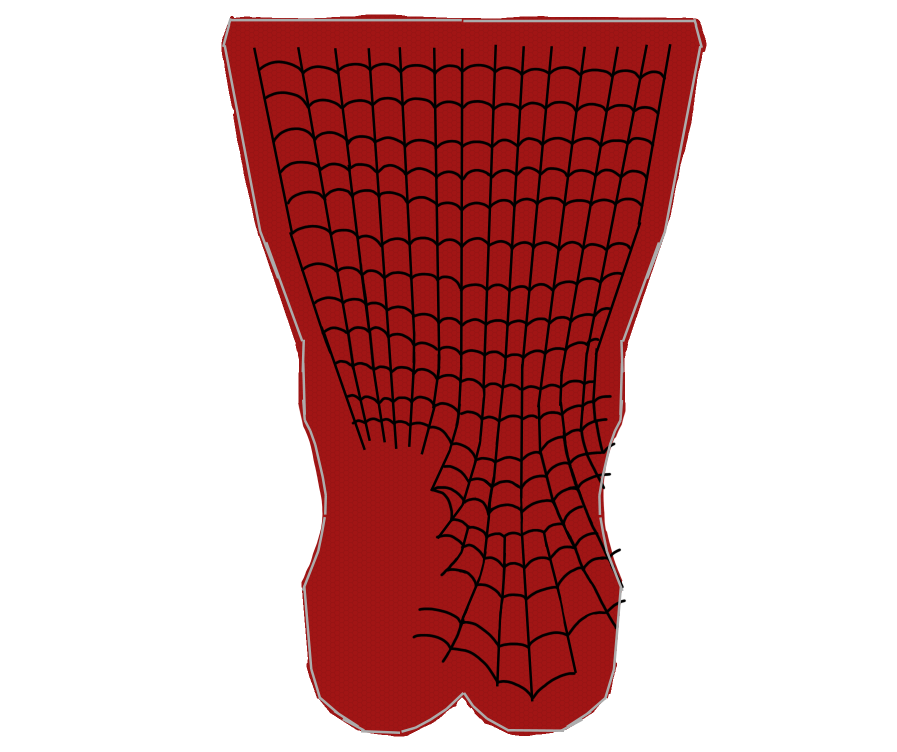
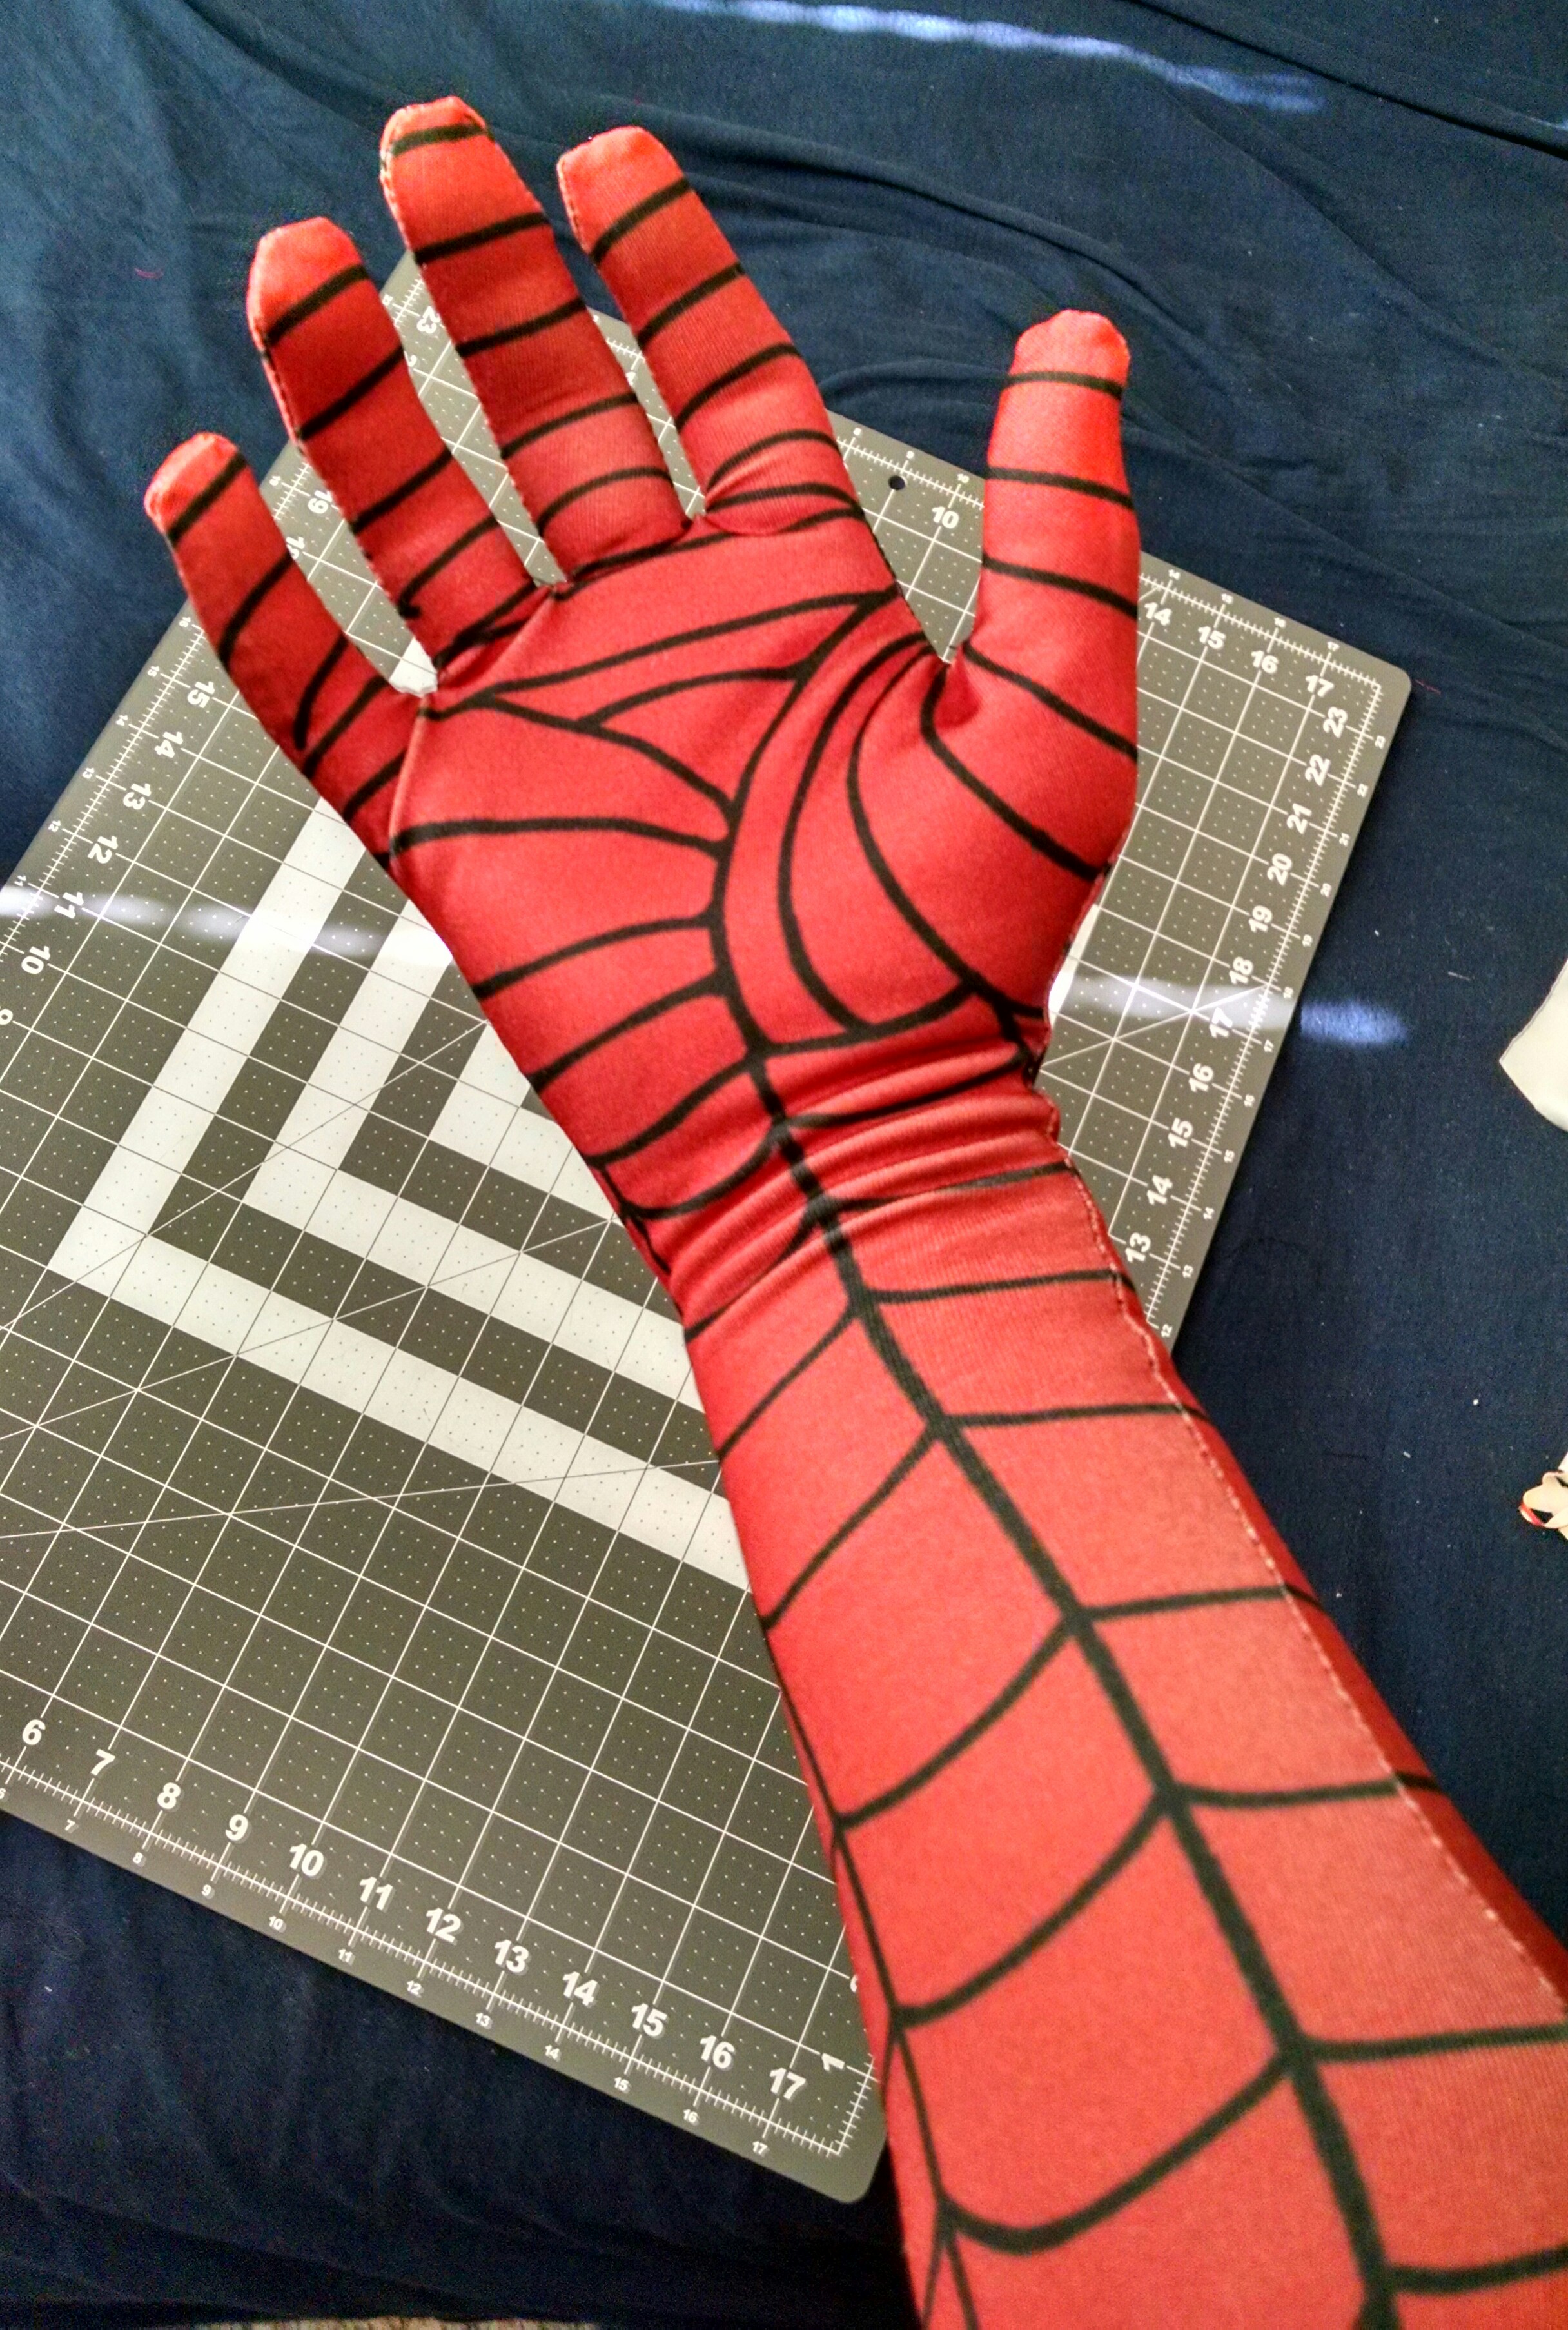
Decided it was time to revisit my favorite among the designs I came up with, the Ditko style costume. And this time, I decided to hem the base, sleeves and collar. Not too bad.

Decided it was time to revisit my favorite among the designs I came up with, the Ditko style costume. And this time, I decided to hem the base, sleeves and collar. Not too bad.

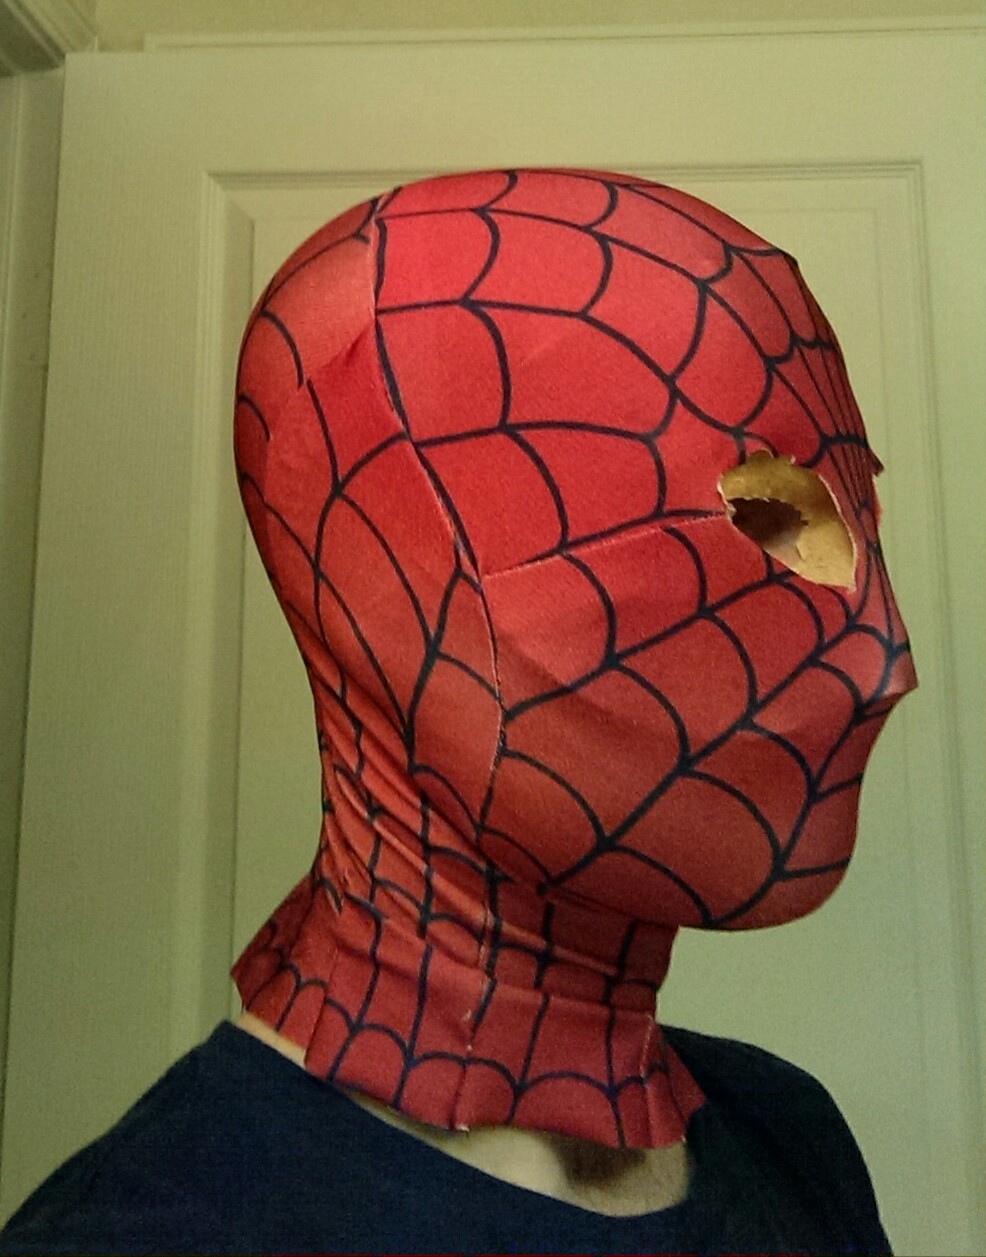
Through the finger pad and out the fingernail. Nice.
So, I just had to try the Spider-Man shirt one more time, didn’t I?
I’m guessing that getting a sewing needle in the finger is just a rite of passage in the dangerous world of sewing. It was bound to happen eventually, the way I am always sticking my finger under there to retrieve pins, not bothering to turn off the machine or even move my foot away from the pedal. But I didn’t think the needle would literally stab in one side of my finger and out the other, honestly. I have an entry wound AND an exit wound. This might as well be a gunshot wound like in those cop shows. (Me, exaggerate?)
The best part was that once the needle was all the way through, the machine jammed–naturally–and wouldn’t do anything, including raise the needle. There was probably something logical I could’ve done to raise it manually, but I just stood there cursing, talking to myself and my girlfriend who had come in to the room as I fumbled for the little screwdriver tool to try and remove something–anything–to get my finger out of there. It was kind of surreal–and mildly upsetting–to see my finger with a sewing machine needle stuck through it, the foot of the machine crushing my finger down in place. (That was probably a good thing, in retrospect, as it kept me from shifting my finger and thus worsening the wound.)
I eventually got the needle carriage (is that what it’s called?) up and out of my finger. Then I lay down on the floor for a bit. I’ve passed out with less cause, honestly, and didn’t care to do so today.
My GF brought me a cool washcloth and a paper towel, made me put antibacterial cream on the punctures and take some Ibuprofen. It was all very ridiculous.
But the good news is, the machine isn’t broken, and I went on to finish the shirt:

Like the last two, but longer-er.
I feel like this one is the best balance I can get between long-enough-not-to-ride-up, and not-a-dress. Looks like this is the size I will use when I get around to making the Ditko multi-piece costume.
So, all’s well that ends well. I literally suffered for my art(?) today. And learned a valuable lesson: Don’t jam a sewing machine needle through your finger. It does NOT feel good.
I guess I pretty much have a full Spidey costume now. Once I clean up the edges of this shirt, I’ll have to do a full trying-on of the whole thing.
Later, all!
Face Mold Man is…displeased.
When I wasn’t totally happy with the cheap plastic mask I was using, I thought, “Hey, I’ve got more of this Worbla stuff for molding things. I can make a mask/face shell thing myself.”
Now, the first plan was to heat up the material for pliability–’cause that’s how you do with Worbla–and then lay it on the face of the Spidey head model I use. But that thing funky shaped, not at all smooth.
Then I thought, “Well, I can just use my own face. I should probably cover it with fabric or something to be safe…”
But I only have a hair dryer for heating the Worbla (okay, it’s actually my GF’s hair dryer), and it gives a relatively brief “window of pliability.” So in the heat of the moment, as it were, I ended up just laying the warmed up Worbla on my face.
NOTE: I was not injured (it wasn’t *that* hot), and if there are any slow acting chemical effects, I guess I won’t know for a while. But…DON’T DO THAT! I mean, I’m fine, but I can’t in good conscience recommend it.
Anyway, it turned out not too bad. I will be making some adjustments to it later with trimming and judicious re-heating/re-molding in spots, but it needed a bit more up front work for testing as a mask/face-shell.
Yeah…it can get creepier looking, as it turns out.

The Mythbusters are totally right about Duct Tape.
A small serrated knife to cut out the eyes (and I only almost cut myself a couple of times, so s’all good), and some slits and elastic/Duct Tape combo on the sides to make it a wearable mask.
Then a little test with it under the Spidey mask.
Look! It’s Spider-Bird!
It’s not perfect, but I think if I spot-reheat and turn down/trim some edges, I can make it much less visible and improve the profile.
And then a little manual test of the eye frames/lenses:

This is how fancy people hold Spider-Man eye frames: pinky extended.
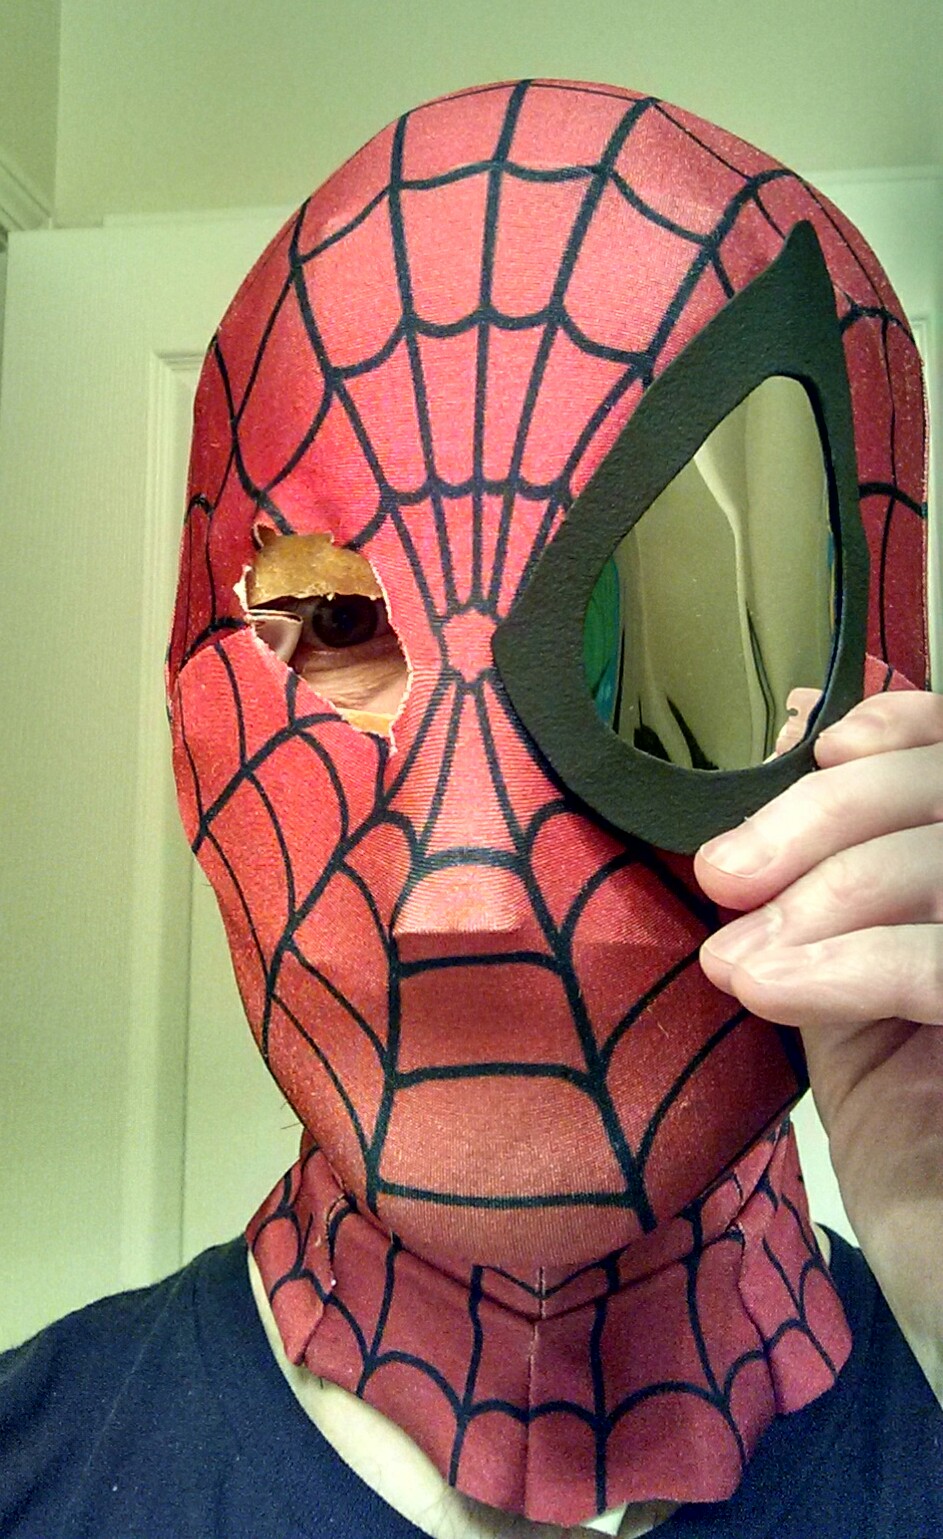
“Now cover your left eye and read as many lines as you can.”
So…I think we have some potential here. I will want to–as I said before–make adjustments to reduce the visibility of those pesky mask-shell lines. Then, I will need to very carefully figure out where to attach the magnets, both on the frames and the mask/shell, so that they are oriented properly both to match one another and cover the mildly out of control eye holes I cut in the Spidey mask.
That’s all for now. Might not be much more until the weekend. The next couple of evenings after work will involve watching the latest episodes of the Flash, Agent Carter, Supernatural, and Arrow. There is way too much good, geek-friendly TV available these days. Really cutting into my other geek activities.
Hi everyone: (Anyone still there?)
It’s been around 2 months? 3? What can I say? Life happened. I took a management job at work right around the time of my trip to Tokyo, so hit the ground running as soon as I came back home. I did manage to squeeze out those “Guide” posts (heh, guideposts) and then just kind of got stuck on the last, say, 5% of my costume progress, which is to say a good method of attaching the eye frames/lenses to the mask. So, between being busy and not having much good progress to blog about, I set it all aside for a bit. (Albeit a longer bit than planned.)
I’ve done a little work on the frames lately, and I think I’m getting somewhere.
I’m still working from the common concept many Spider-Man cosplayers use for frames that can be attached and removed. Basically, you need some kind of base shell around the eyes under the Spidey mask with magnets on it, and then magnets on the back of the eye frames themselves, so that the frames can be attached separately, the magnets of the shell and the frame clinging to each other through the fabric of the mask.
You can purchase kits that include the shell and the frames and magnets and everything. You can also be a couple hundred (or more) dollars poorer after doing so. I’ll admit that in the midst of my efforts to do the frames “on the cheap” I have almost broken down and shelled out the money a couple of times, but I have already spent something like half a million dollars in my trial and error costume saga, so I am sticking to my guns on this part.
The Latest Eye Frame Plan: Attempt 1:
The ingredients:
To see how I made the eye frames, you can start at this post. You might need to go a couple of posts back and forward from there to get all the details.
I’ve been pretty happy with the frames, but getting them attached, as I mentioned, has been the tricky part. After playing with some direct attachment ideas, I went back to the original face shell/magnet combo and started my experiment:

“Will this hide my identity? Is the second mask too much?”

These things are powerful!! Mask and magnets from Michael’s Arts & Crafts, BTW.

The pics should show the basic idea. Here a couple of things to note:
So, anyway. Here is the result of my first experiment. You will notice some rather glaring flaws (I mean, aside from the weird shape of my head):

So, the under-mask/magnet thing worked fairly well, and I like the look of the frame and lens. But back when I cut the eye holes for the mask, I got a little carried away. Part of that hole is showing, obviously. I am hoping to solve that issue without sewing a new mask (I hope!). In addition, the under-mask I am using is not ideal. The edges show through clearly, but I don’t want to trim more at the top and top-sides as it is barely big enough for the eye frame corners to attach as it is.
Also, I really will need to shave my beard before ever actually wearing this thing for any events or gatherings or whatever. But that’s a whole other issue.
Getting Started on the Latest Eye Frame Plan: Attempt 2:
So, my genius plan for taking care of the overlarge eye hole: a bigger pair of eye frames.
I have stated before that I am generally not a fan of Spidey versions with huge eye frames. I like the smaller, somewhat more squinty/glaring style of Spidey eyes. But hey, I am nothing if not adaptable. Plus, I really don’t want to sew another mask for this costume version if I can help it!
So, I made some new eye frames:

And I have gotten started on what I hope is a better alternative for the under-mask as well.
But all of that is still somewhat in progress, so I will save it for next time. Which I hope is sooner than 2-3 months from now!
Next: Latest Eye Frame Attempt Part 2
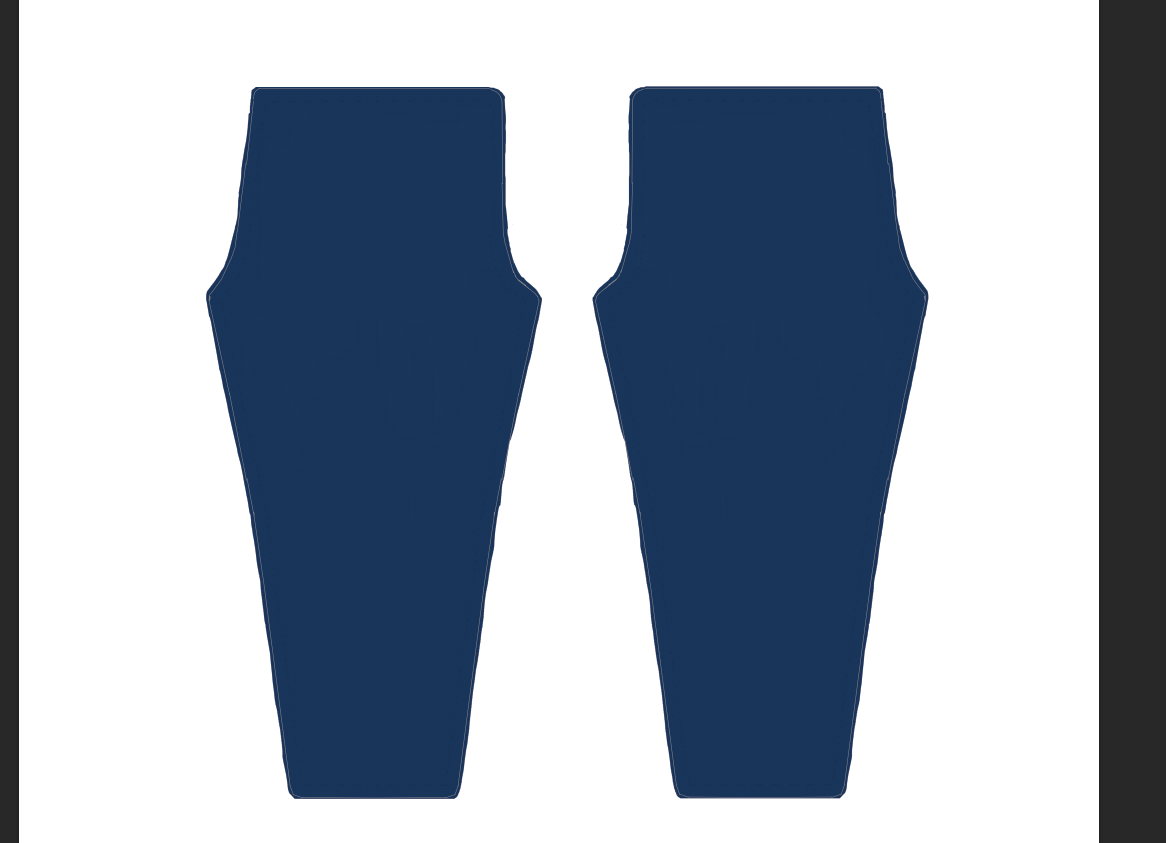
Okay. We’ve covered the gloves, the shirt, and the leggings. But we can’t have Spidey running around barefoot, so let’s see about those boots.
A Little History and Disclosure on My Spidey Boot Pattern
We’re going to use a boot pattern that I actually came up with myself. But you should know a few things:
1) My current fabric printings and costumes in progress use the boot pattern that is separated out from the bodysuit template I originally bought from Gun Head Designs.
I feel that I cannot share that pattern, both because it is not mine to share and because I don’t have a a method for telling you how to create it from scratch based on your measurements since I did not myself create it.
2) The boot-socks I have sewn from my pattern are 95% okay, but I will be adding a minor tweak that I have–honestly–partially tested in “real life.” So I strongly suggest trying this out with some test spandex first. And markers (see previous post).
So…yeah, this is kind of a guinea pig situation. You’ve been warned.
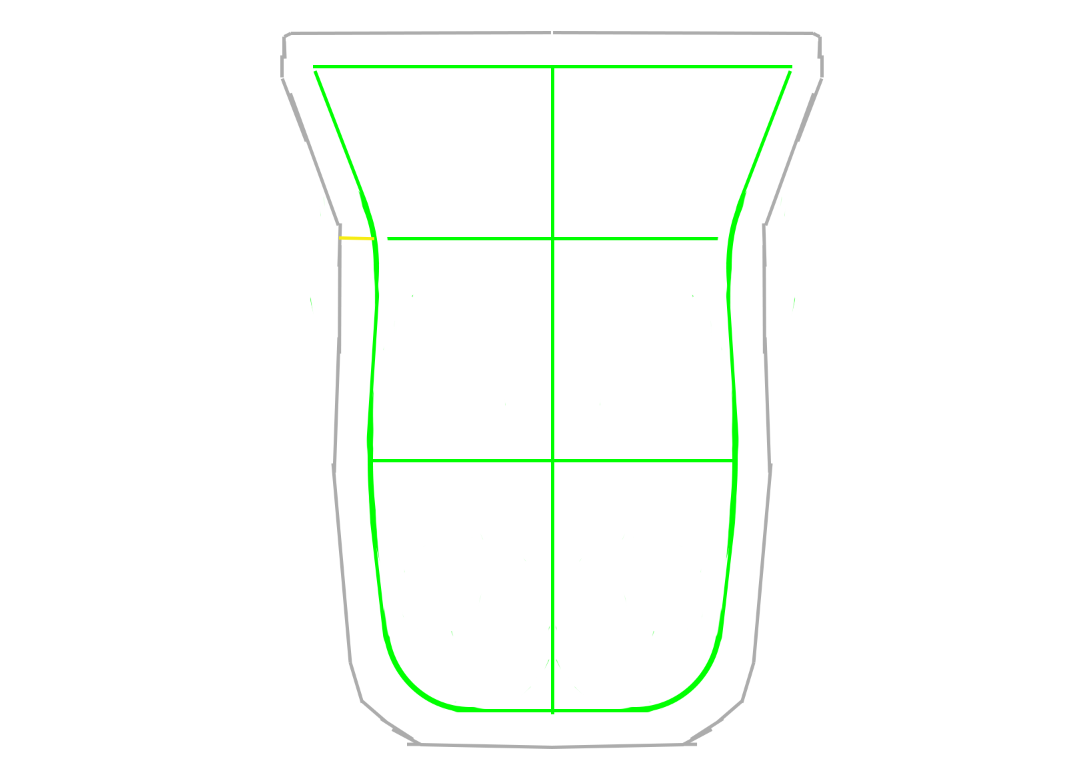
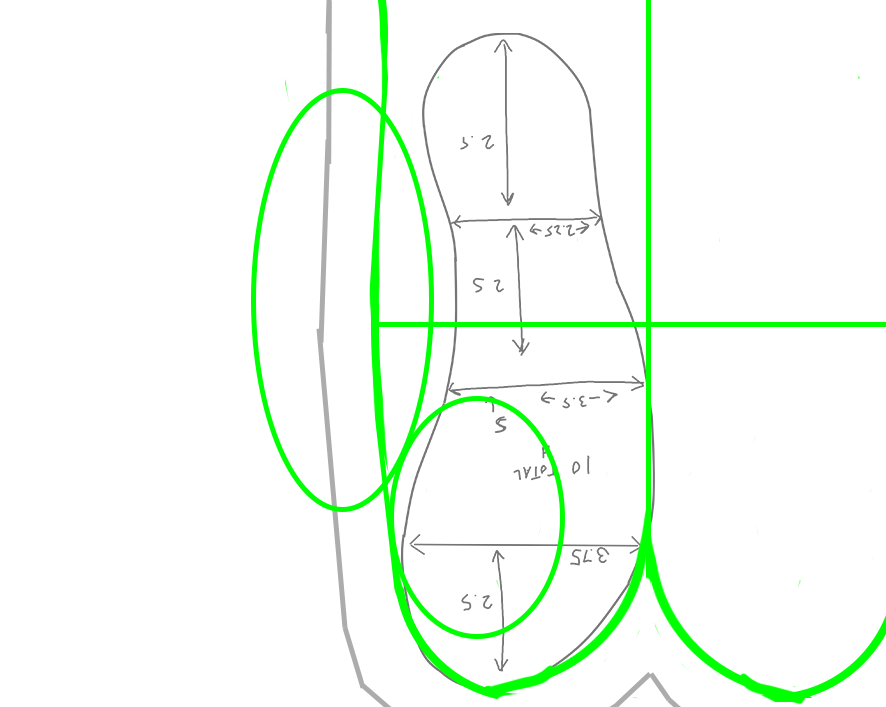
The Measurements
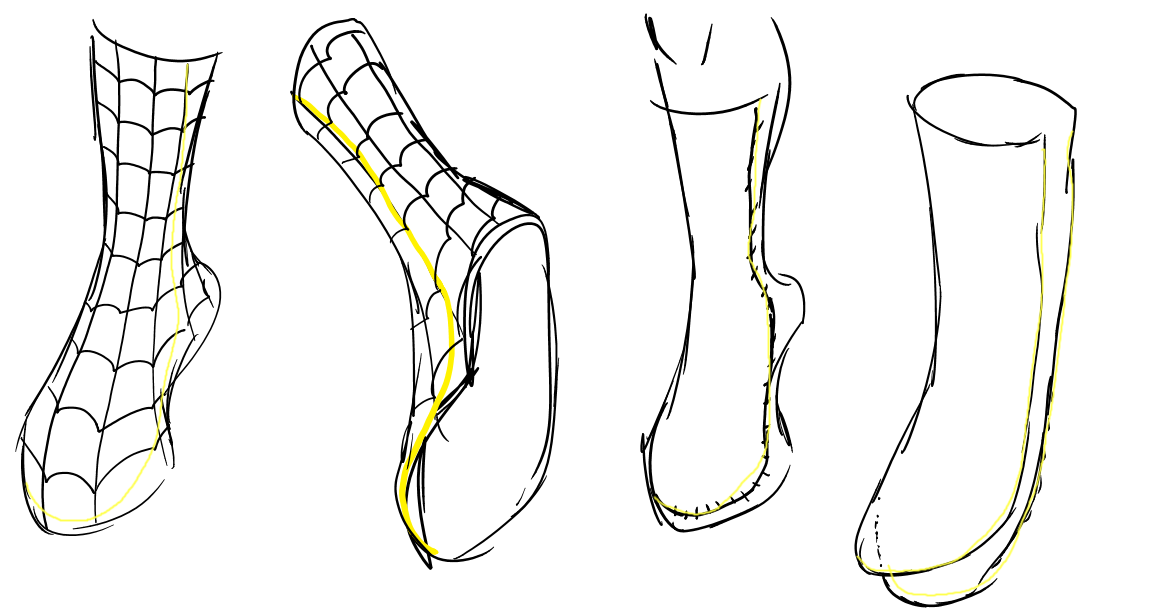
1) First, decide how tall you want your boots to be. If you pay attention to different iterations of Spidey, comic and movie versions, you may notice that his boots sometimes reach to just the base of his calf, and other times to mid-calf or a smidge higher.

Tall boots. Source: [https://liveforfilms.files.wordpress.com/2010/03/spider-man-av.jpg]
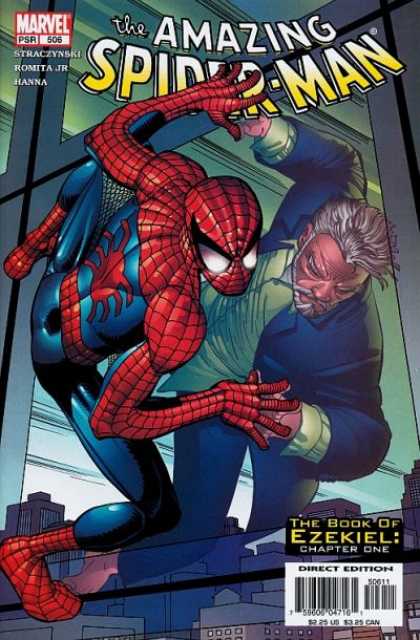
Short boots. Source [http://www.coverbrowser.com/image/amazing-spider-man/506-1.jpg]
UPDATE/NOTE/EDIT: You’ll see later on that I decide to change up late in the game and go with a taller boot measurement. This is a result of a shorter test boot not staying up very well. Just FYI.
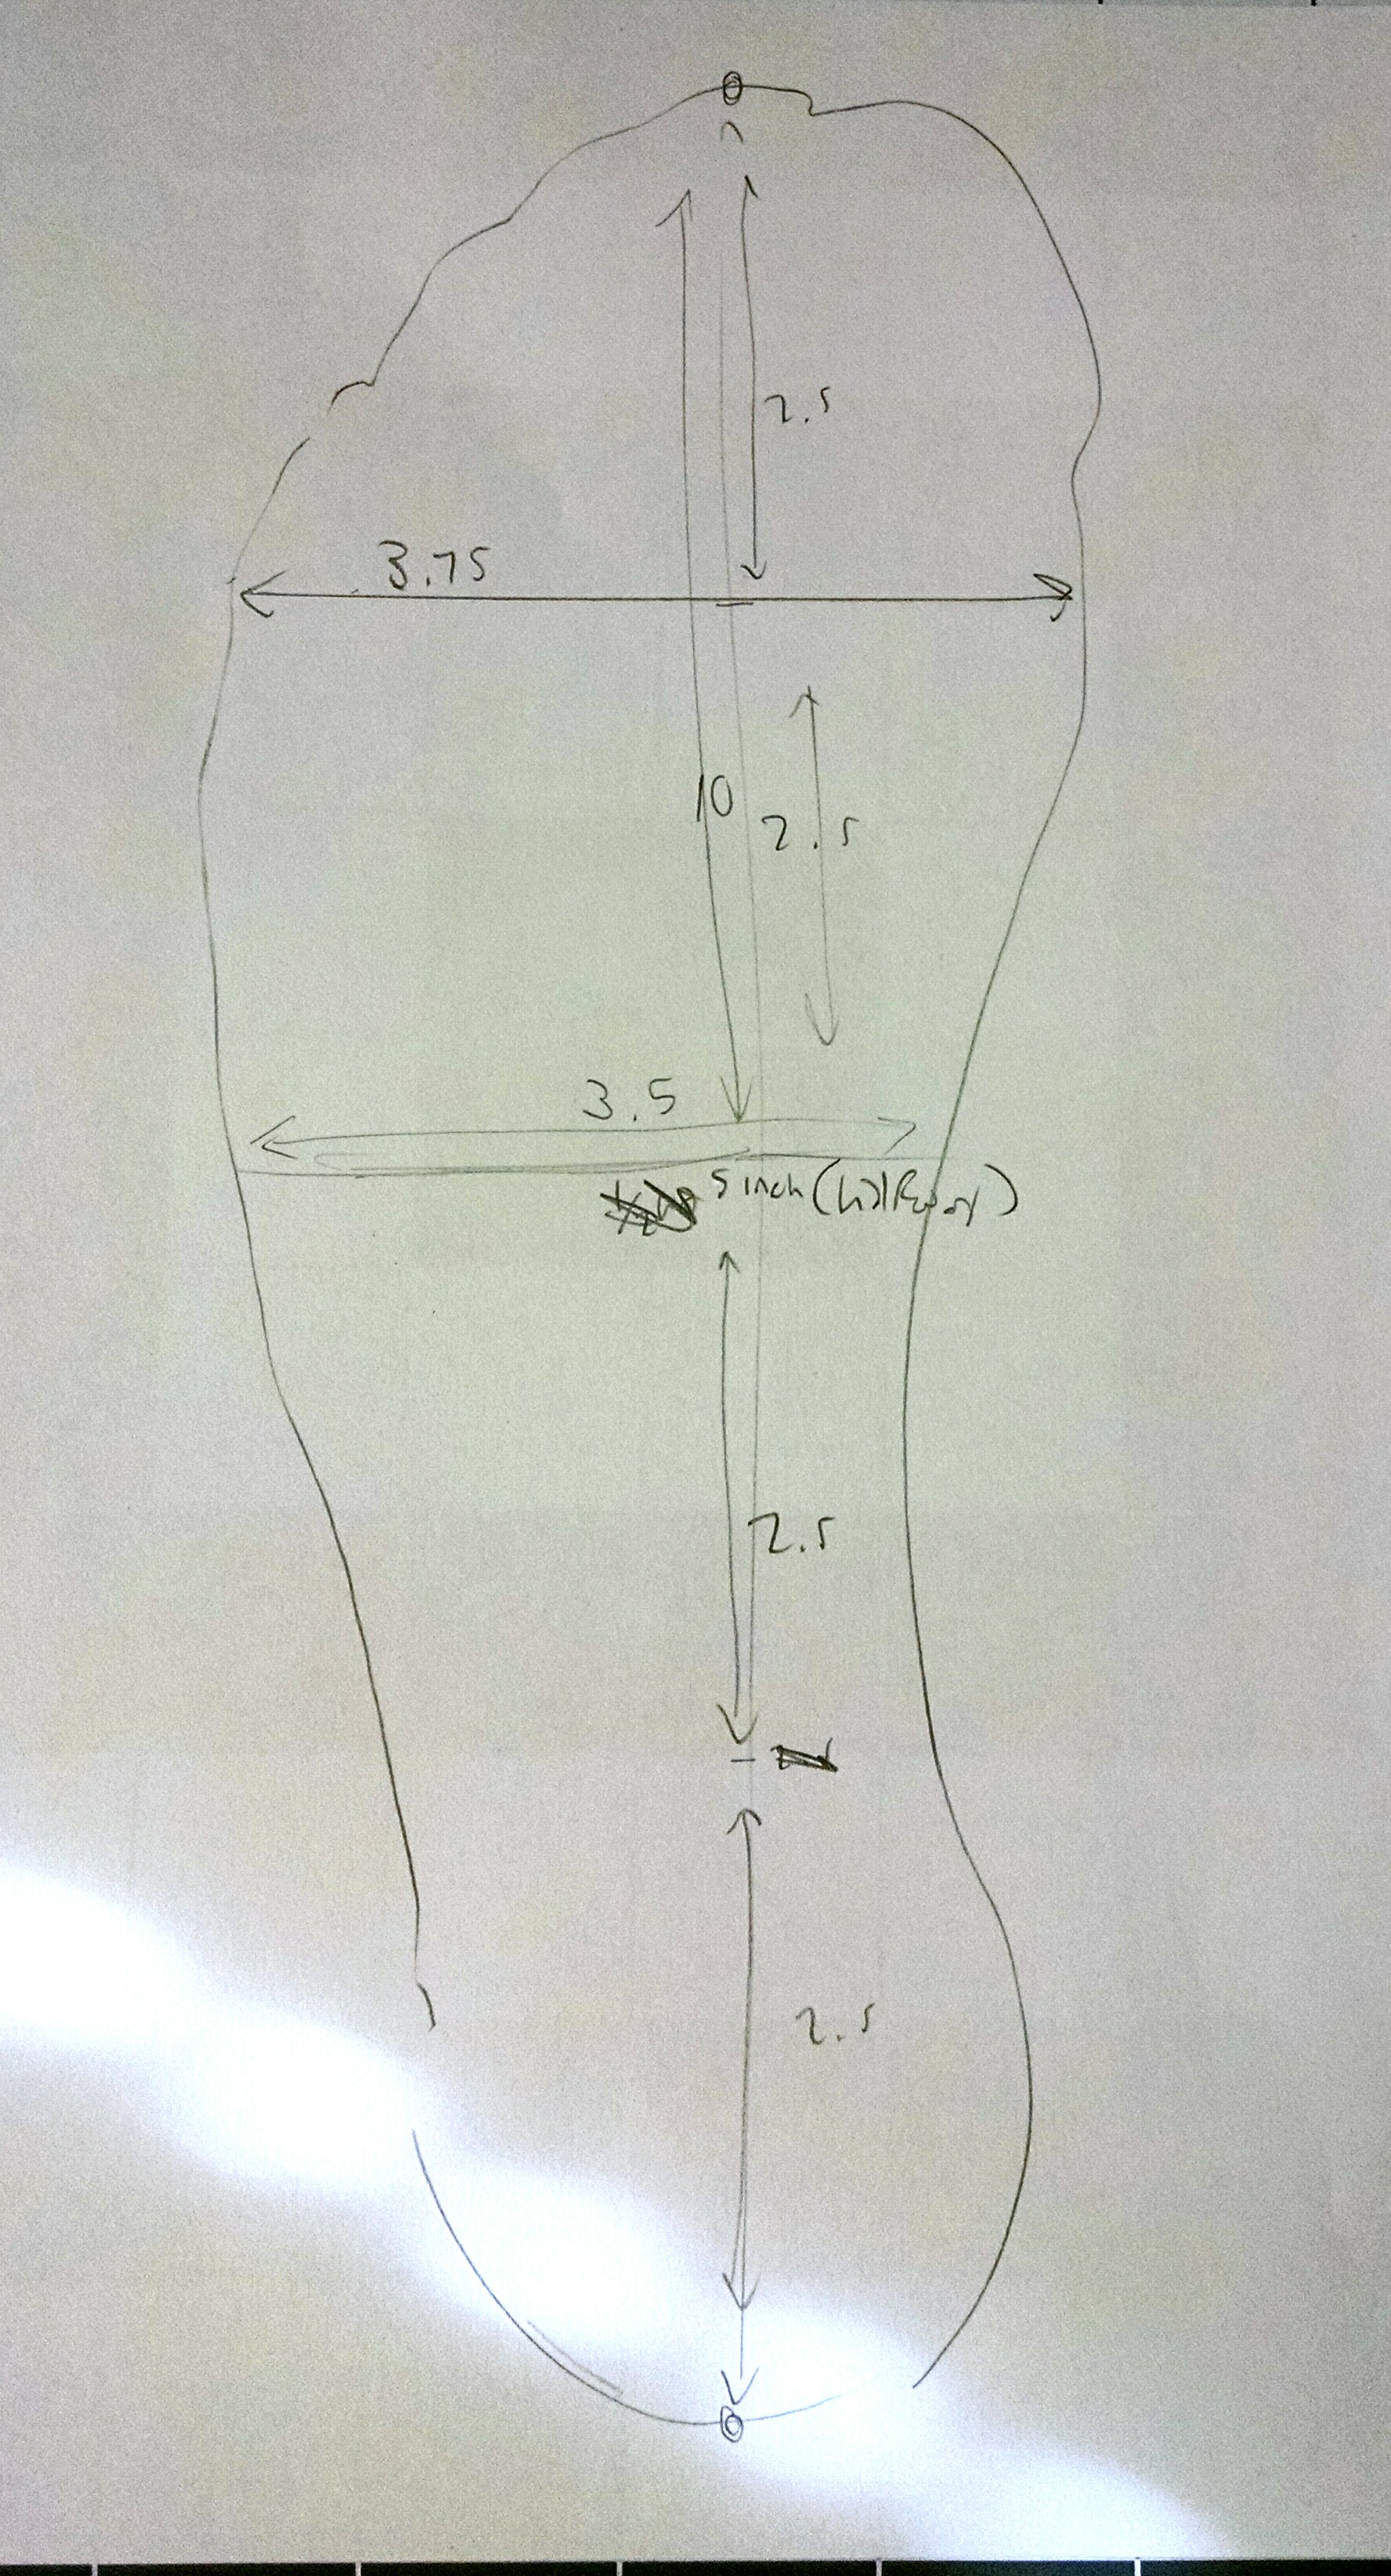
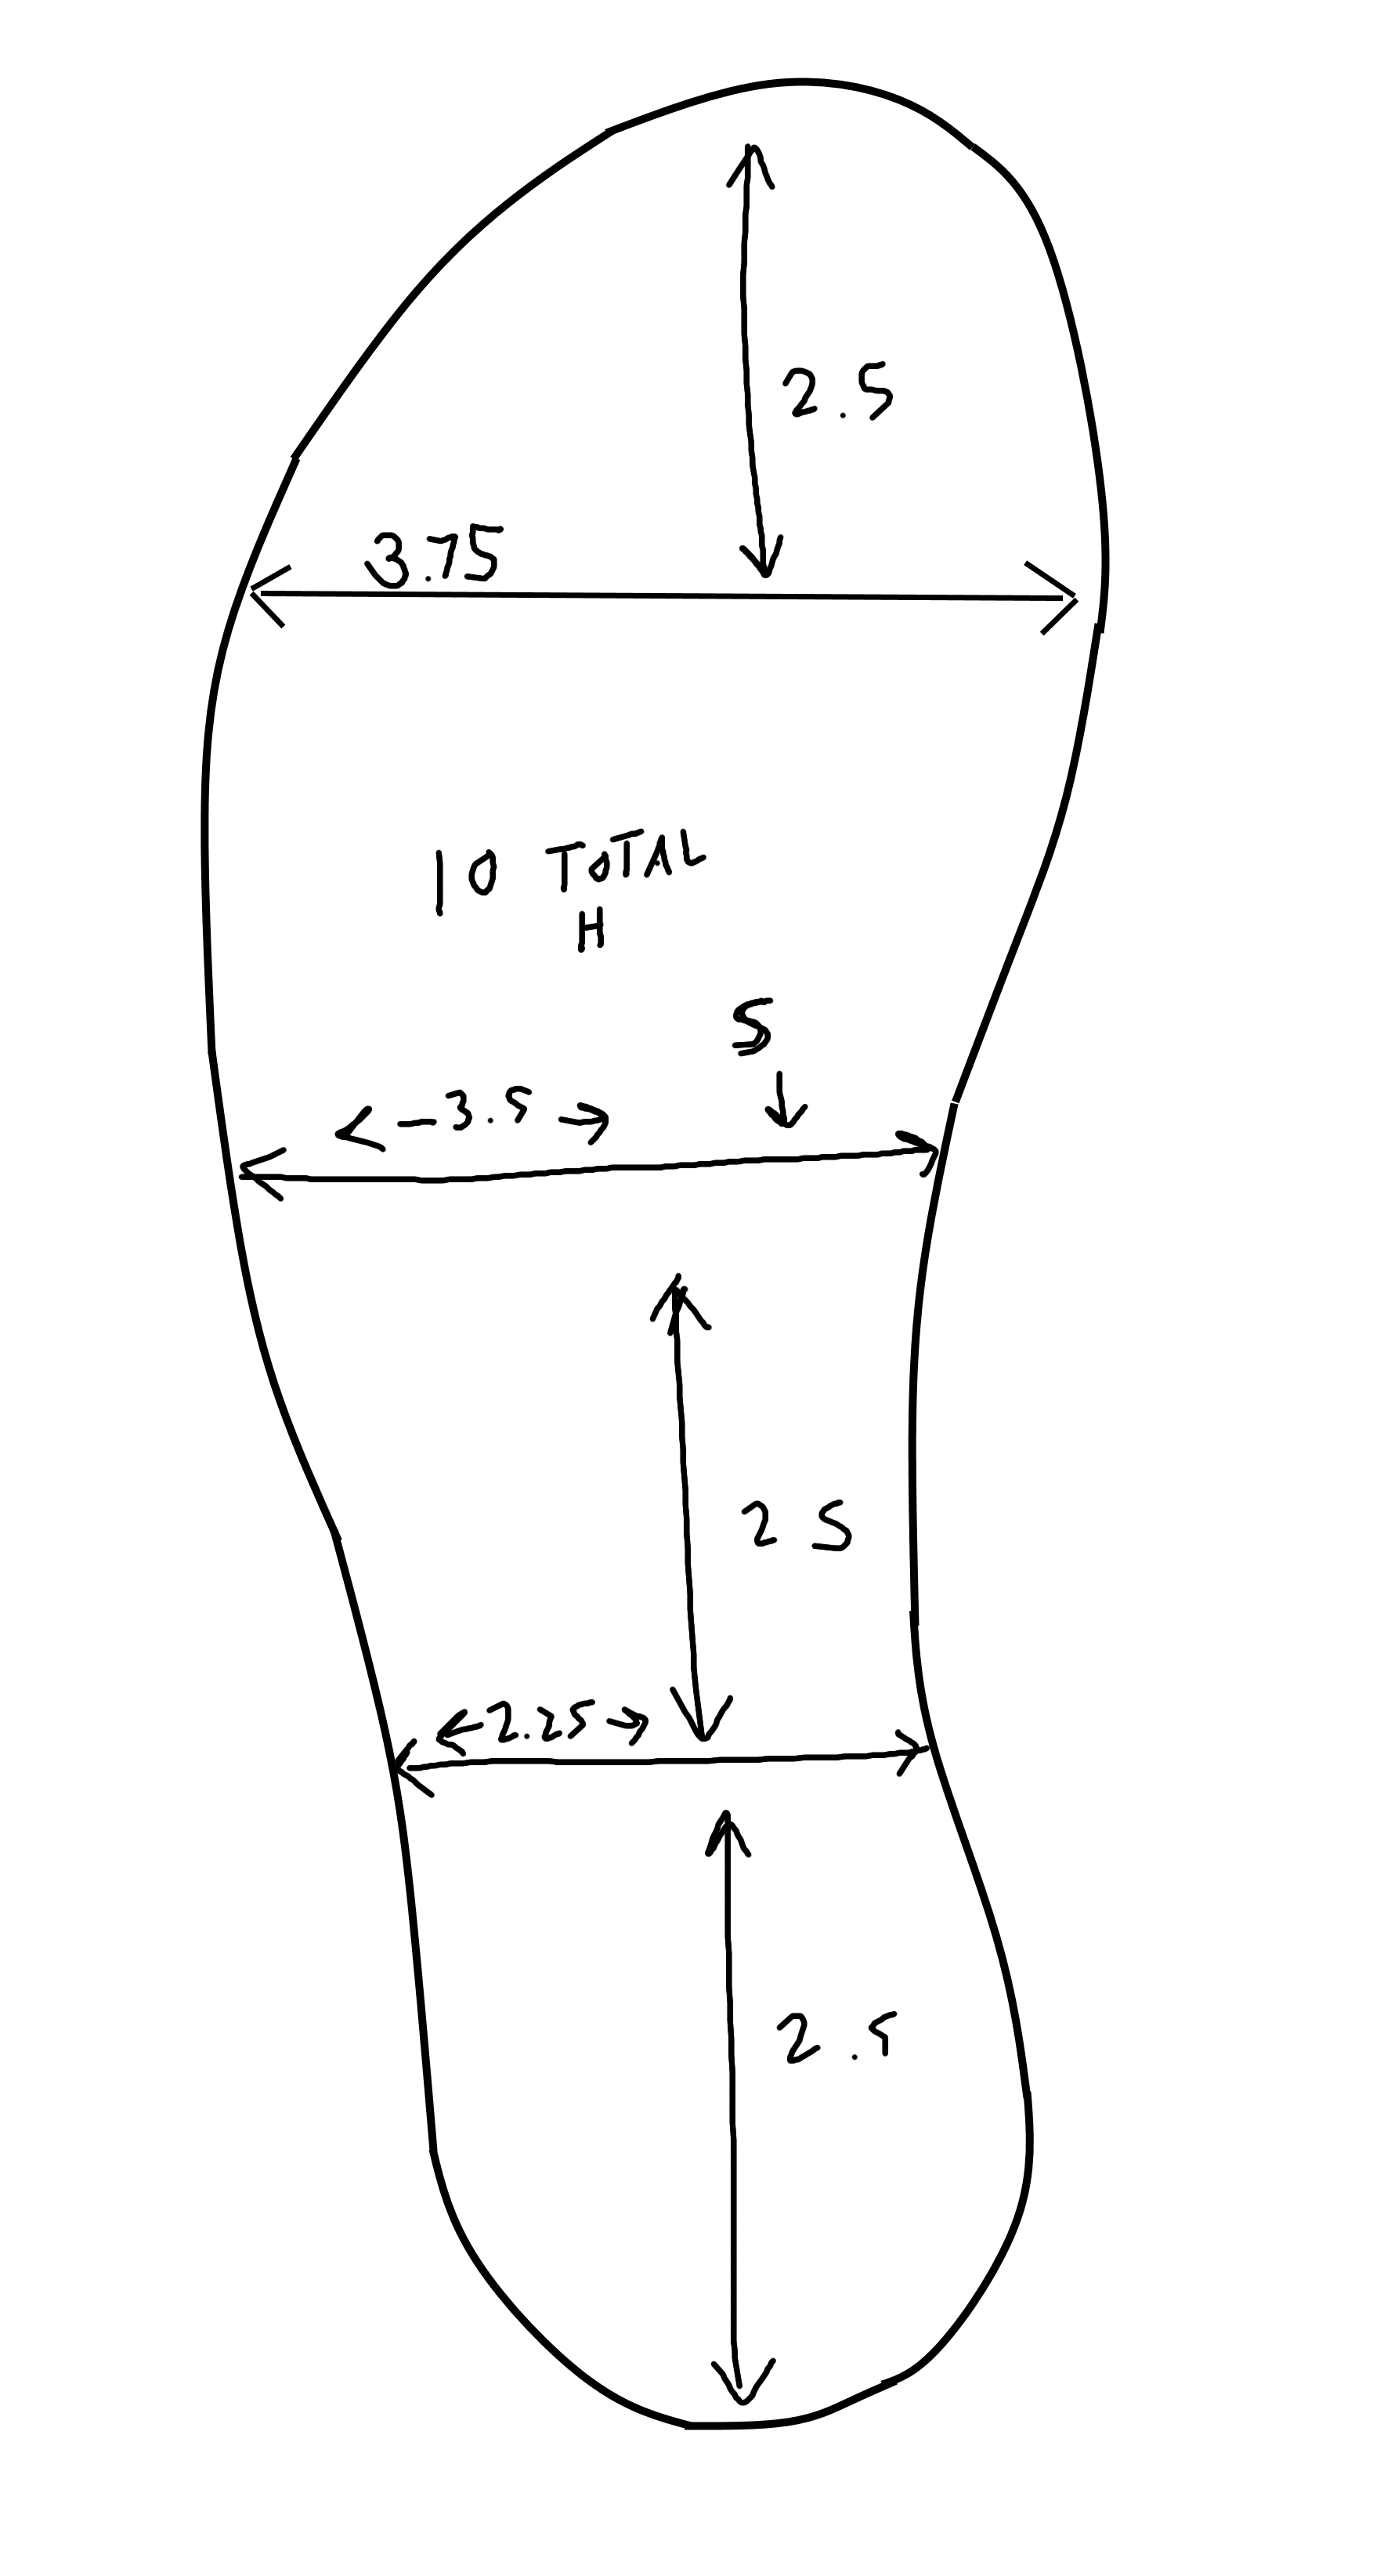
2) Take the following measurements. See the following illustration for clarity:
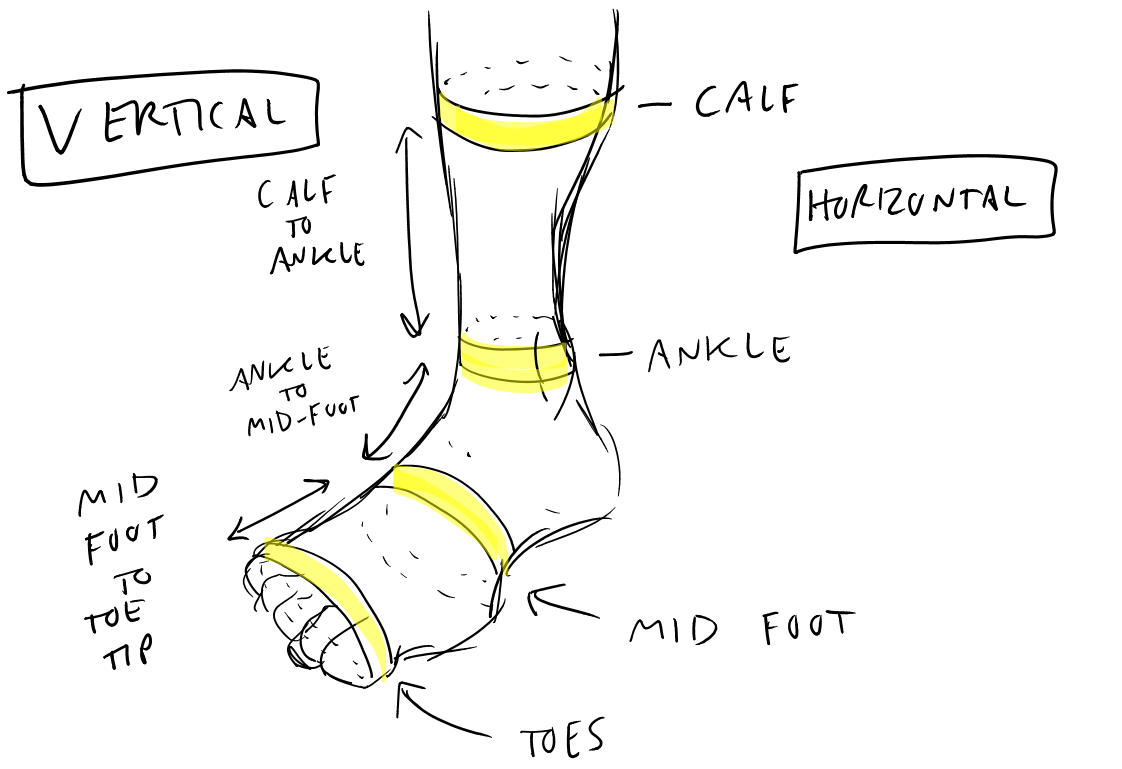
3) Now, do your 90-95% calculation on the horizontal measurements. You are, of course, recording all of this on a spreadsheet that you can set up to do the calculations for you (I didn’t, but you’re smarter than I am.)
Add up the vertical measurements to get a good idea of the total length and record that as well.
This Boot Pattern’s Got No Sole
This next step will involve taking off some clothes. But just your shoes and socks. On one foot, at least.
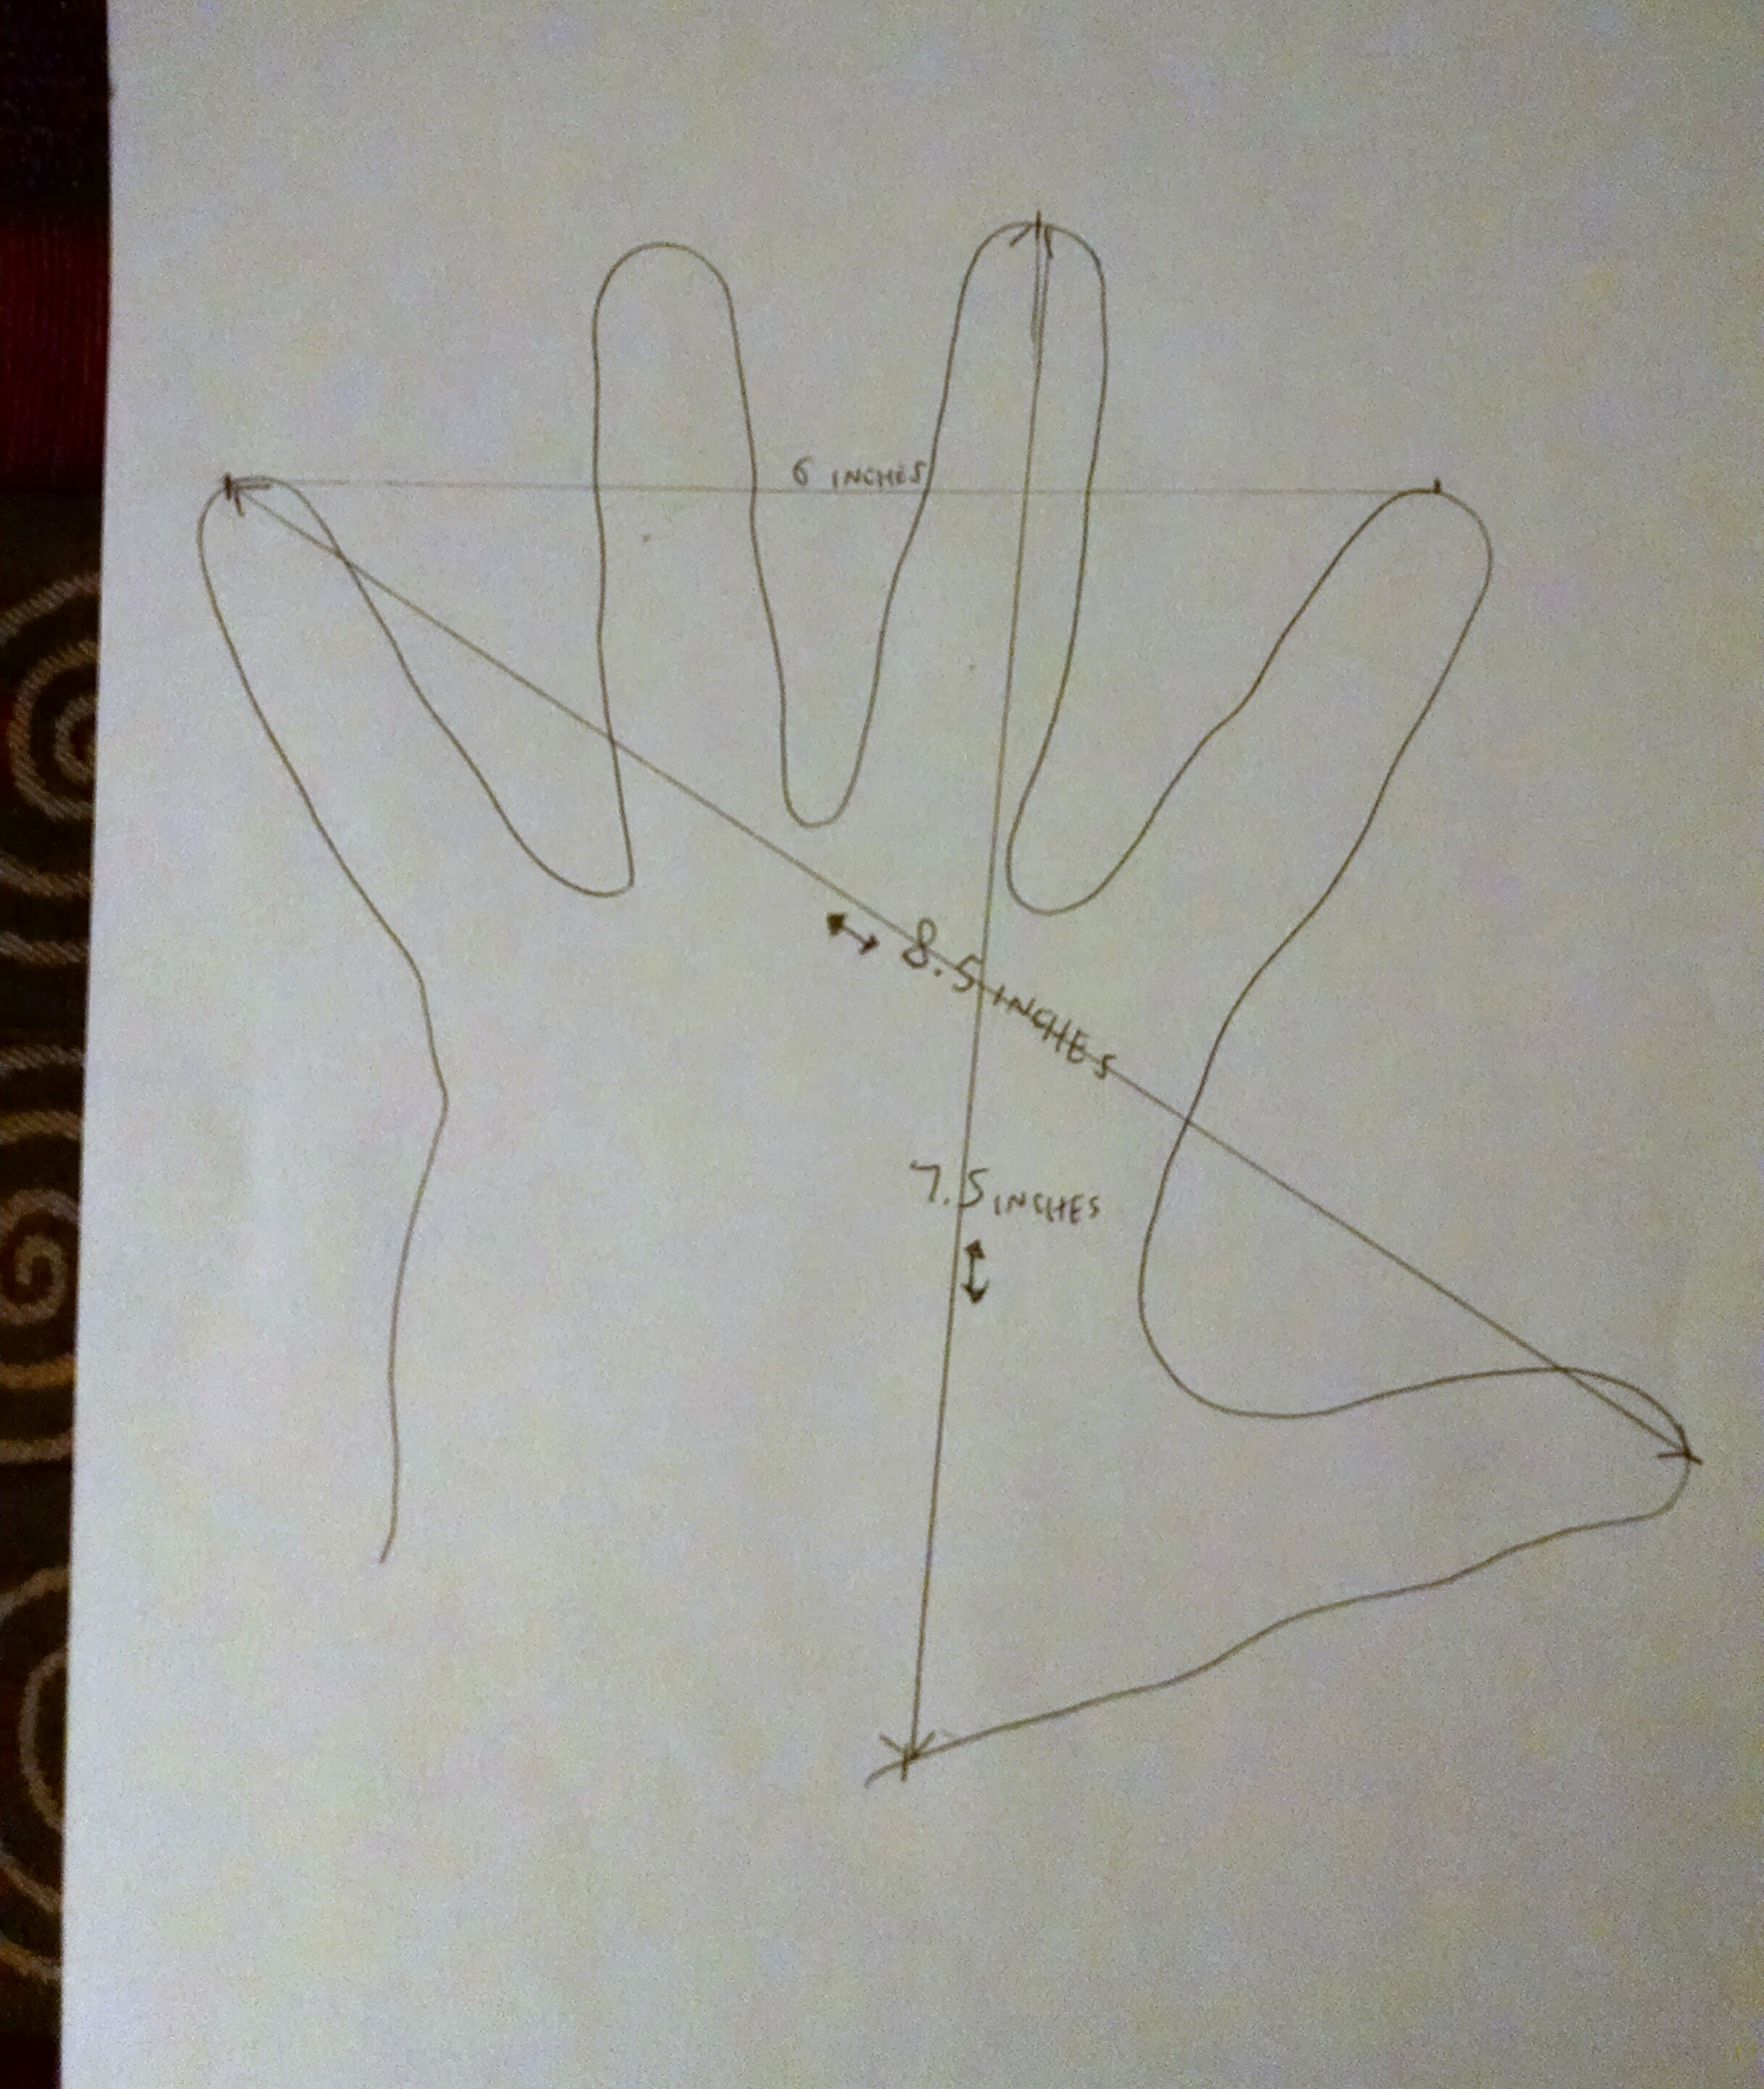
1) Get a piece of white paper and a pencil, set the paper on a smooth, firm surface, and trace one of your bare feet. Doesn’t matter which one. I traced my left because I am right-handed. Maybe you’re ambidextrous and have more of a choice. Doesn’t have to be especially exact or fancy.
2) Get out the ruler and draw a straight line on the tracing from the toes to the heel, roughly in the middle, and mark how long it is. At the halfway point vertically, draw a horizontal line and mark how wide it is there. I also did other measurements, but that was really completely unnecessary. (I knowingly overdo things sometimes because I’m neurotic, but not in a particularly useful kind of way.)
Now you should have something like this:
Now you have no excuse for not ordering me some custom-fitted shoes for Christmas.
4) Take a smartphone pic or scan (I always say scanning is ideal, even though I usually take a smartphone pic). Put the pic into an image editor and do a trace layer to come up with a cleaner version (and let me reiterate that really the total height and midway width are the only truly useful measurements):
Digitizing the Pattern
1) Photoshop File: min. 72 dpi, 58″ wide, 36″ tall, tiff format. You might very well be adding this to one of your existing Spider-Costume Files.
2) You know the drill. Use the line tool to make a line matching the total vertical length. Then add the horizontal half-circumference lines down one side of that vertical line.
3) Get rid of any guidelines you used, and connect the horizontals:

4) Now, there’s a half-foot in here somewhere, so let’s do some curves to find it:
After getting the curves on there, clean up the lines to flow together and we end up with a good half-foot dimensions layer.
5) Now, we copy and paste, flip and move. Then use our 5/8″ ruler lines to add a Seam Allowance border: (You can wait on adding the Seam Allowance Border. I’m retroactively working in some further tweaking I did without re-doing all the screenshots.)
6) This would work, but let’s do some refining for a better fit, and to guide us in adding the design.
We’re going to “place” the clean foot-trace we made earlier into our Photoshop boot file. After you place it, reduce the size by 90-95% to match the overall measurements.
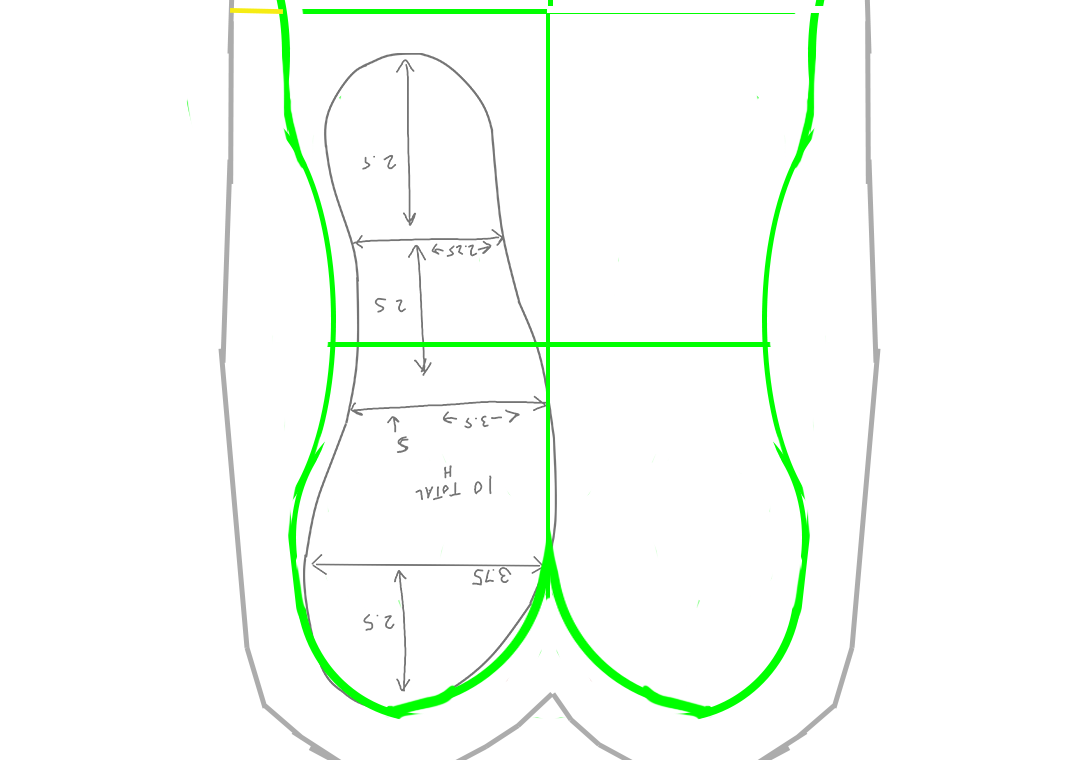
This is a good time to examine the anatomy of the foot pattern for the purposes of understanding what falls where when it’s all put together.
Below you can see I’ve added the foot trace to the boot pattern. I have decided that this is the boot for the right foot (until we add the foot trace and web pattern, there is no difference between right and left). This being the right foot, that means the left half of the pattern represents the back of the calf and bottom of the foot, and the right half represents the front of the calf and top of the foot.
So, the bottom left half of the pattern represents the sole of the boot. Let’s stick the foot-trace there, and orient it as in the image below. That looks backward at first glance, but note that it will flip when the fabric is sewn, as my messy arrows do their best to indicate.
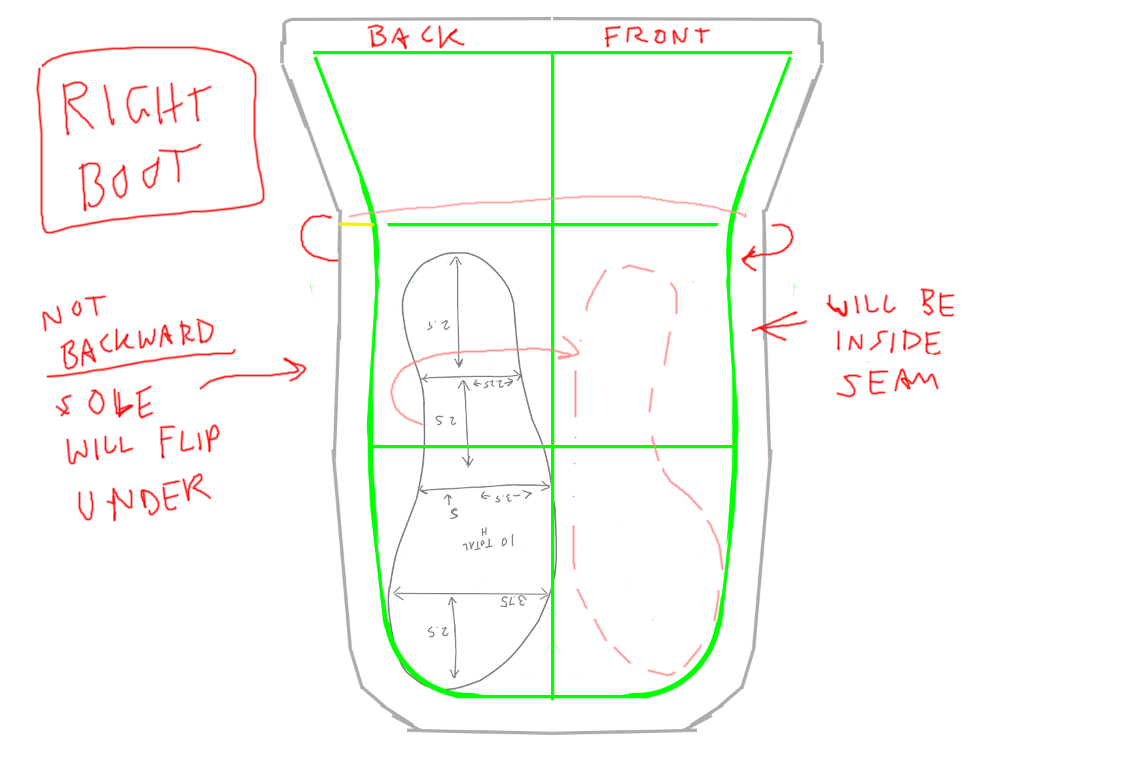
Let me be clear here: we are NOT going for exact sole shape and position here. The foot-trace is a very general orientation tool.
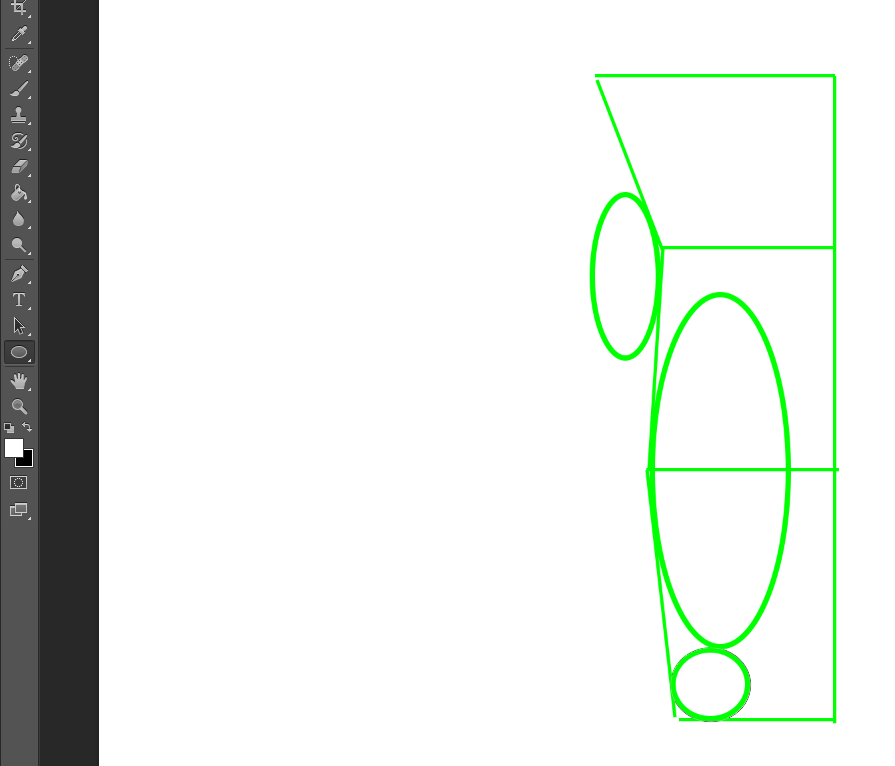
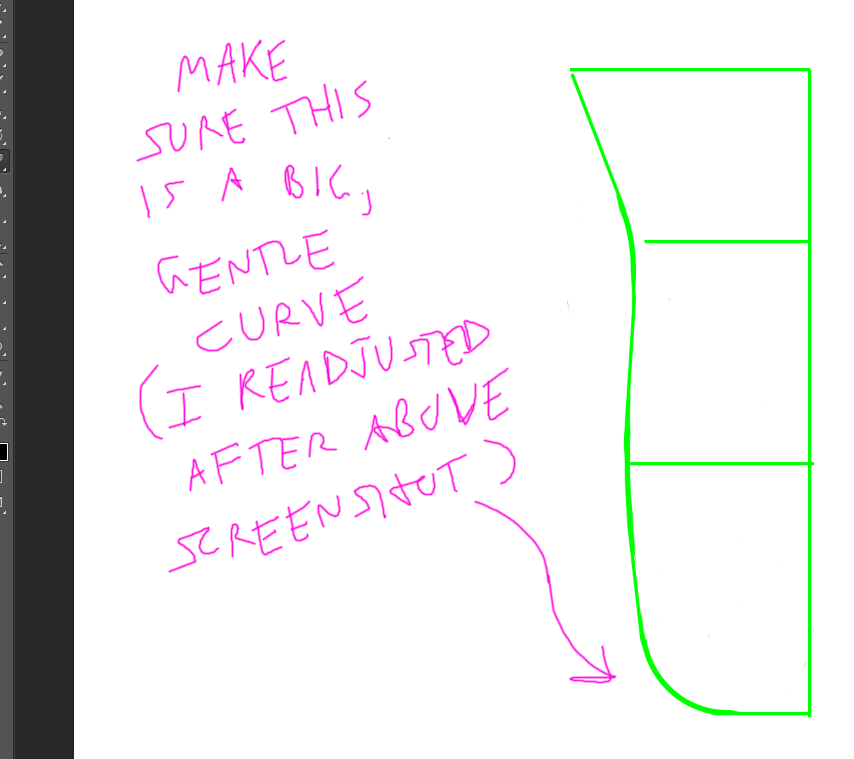
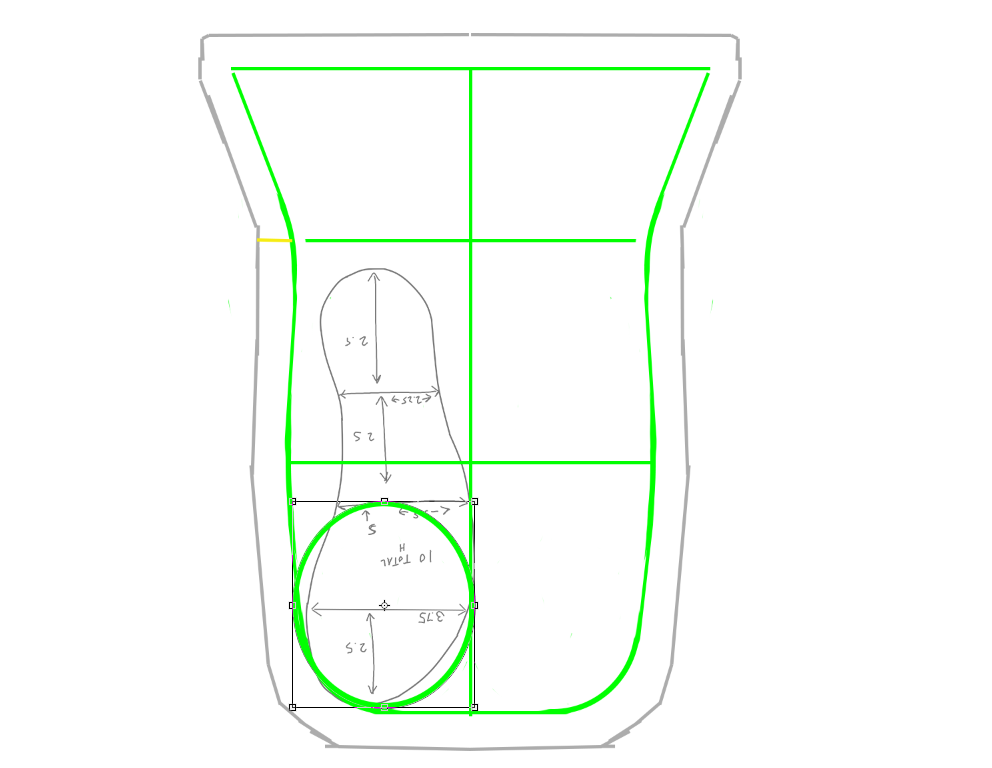
(A) Let’s adjust and add curves to “hug” the outside of the foot a bit better.
So, the outside curve turned out to match the foot close enough that it’s fine. But we lack inner curves, so let’s take care of that.
Use an ellipse to form the curve…
…then rasterize and clean up. Copy, mirror, paste, and move. Adjust the Seam Allowance border… (Again, you can wait on the Seam Allowance as there will be more adjustments coming in a sec.)
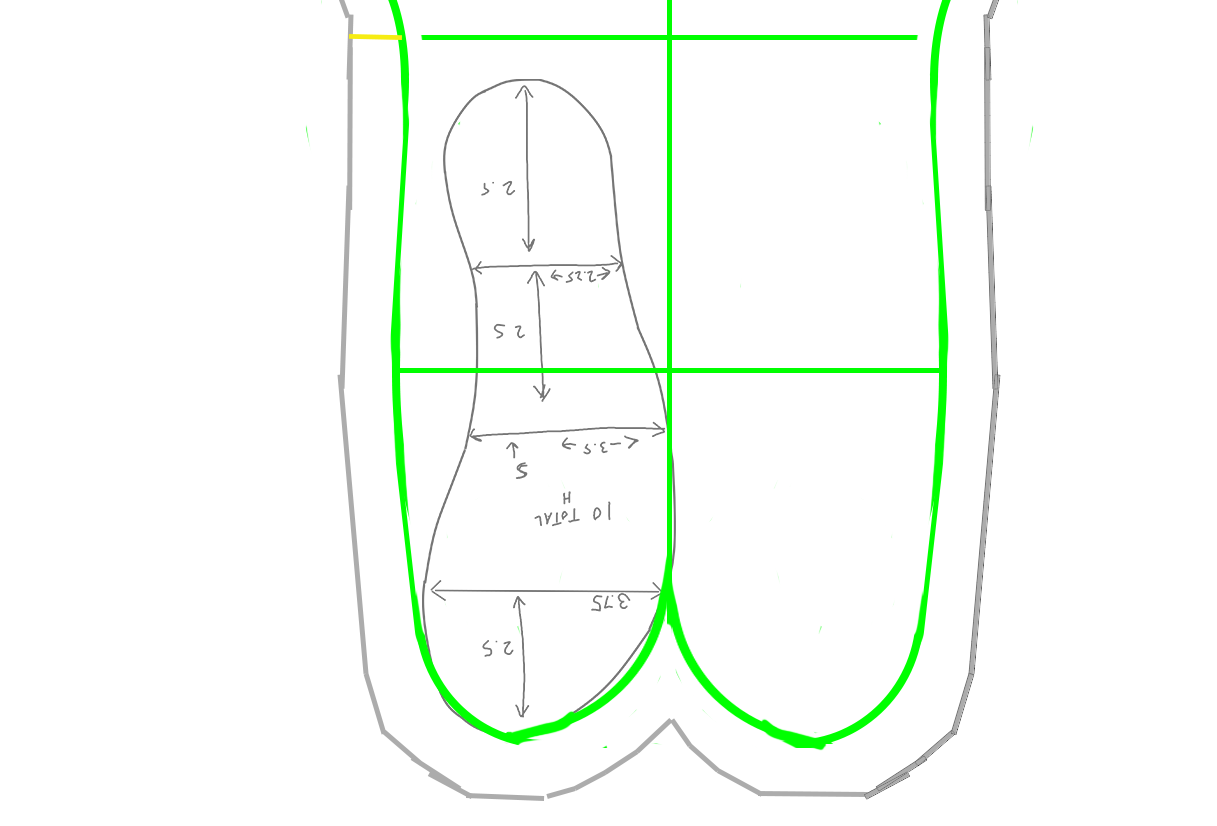
Now for the inner curve of the foot:
Note that we’re not putting those inner foot lines right up against the heel, but leaving a bit of room. In my test boot, it felt a smidge tight at the heel/ankle bend.
And now we can fix up those Seam Allowance Borders.
Adding the Color
Does this really need it’s own whole section anymore?
Add your color, and the pattern overlay if you’re using one.
UPDATE/EDIT: You might notice that I decided to add some length/height to the boot, due to issues with with my test boot not wanting to stay up.
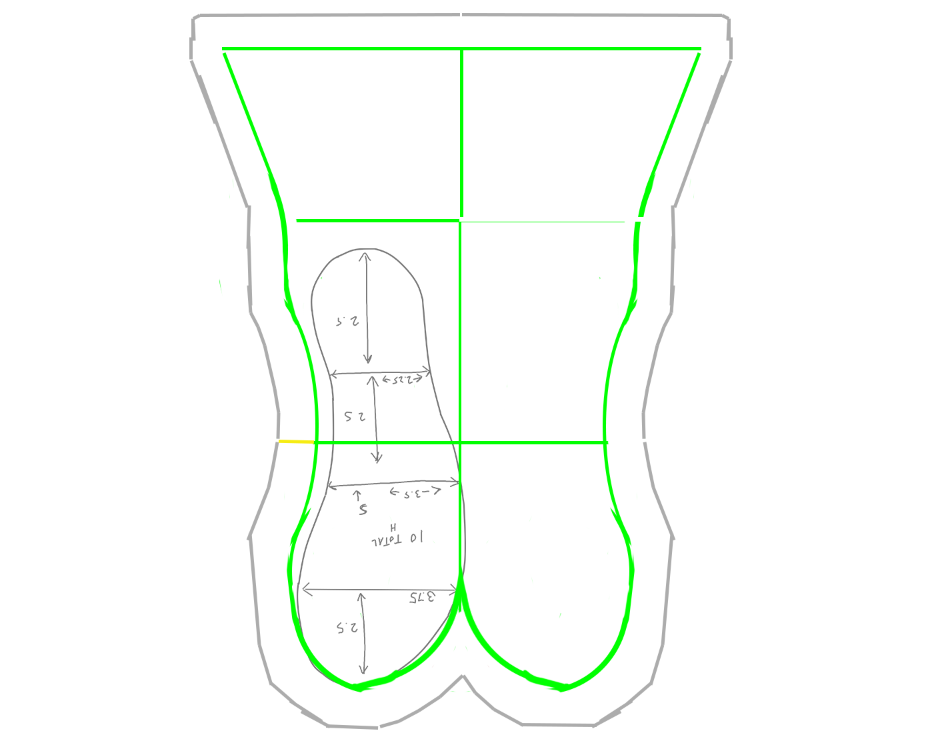
Adding the Webbing Pattern
So, now that we’ve got the layout set up pretty well, and the color laid down, let’s get a general idea how the webbing pattern will fit in here.
This illustration of Spidey’s boot shows the basic layout of the web lines as well as how the seam of our boot will fall (roughly). I’ve also shown the boot without webs, but with seam, and the basic fabric shape folded for sewing. This should give us a rough idea of how to start working in the web pattern.
Take a look at the pics of my boot test sewing in the previous post to see how this sort of translates in “real life.”
We see that the webs come down pretty straight on the calf/ankle portion, continue straight down the heel in the back, but fan out across the top and sides of the foot.
Start playing with your straight web lines on the boot pattern, but don’t commit to anything right away. Lay down some lines, think about how it plays into the final shape, erase and re-draw, move and shift, trial and error.
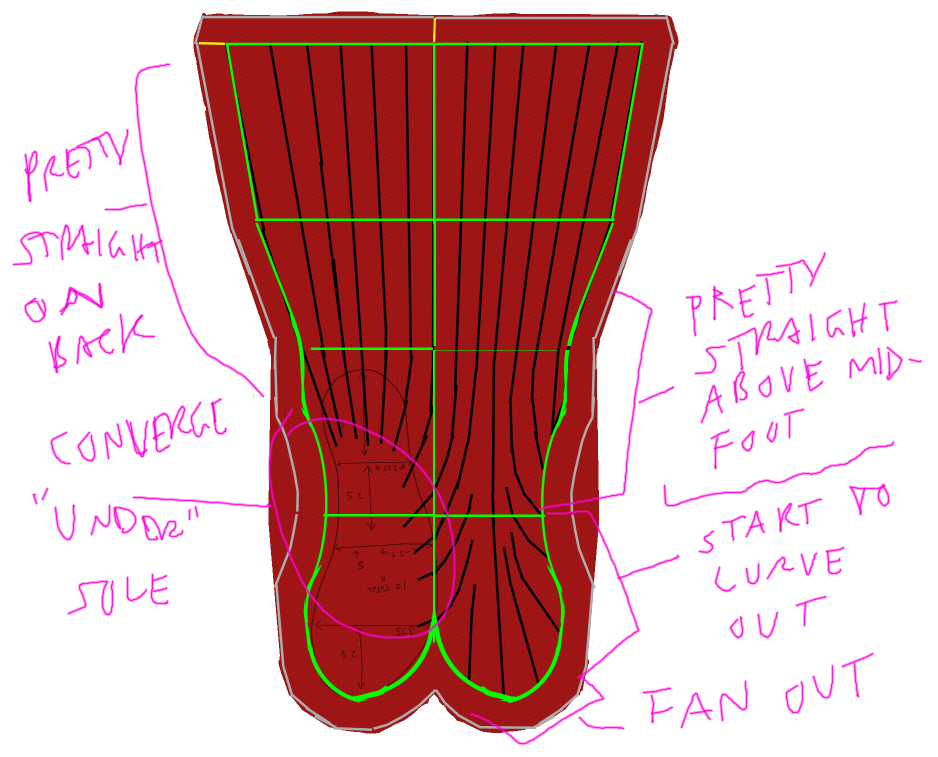
You’ll note that we’re drawing the web lines to converge at the bottom, at the middle of the sole. If you’re thinking that most of this won’t show in the end, you’re right. But since it’s hard to judge exactly where the sole will be when wearing the boots, the best strategy is to over-cover the territory so that we don’t guess wrong and end up with gaps. Plus, you’ll eventually be adding some kind of external sole to the boots, which will cover the bottoms of the sock-boots anyway.
Once you get the vertical lines how you like them, add the horizontal web lines layer and start playing around with those lines.
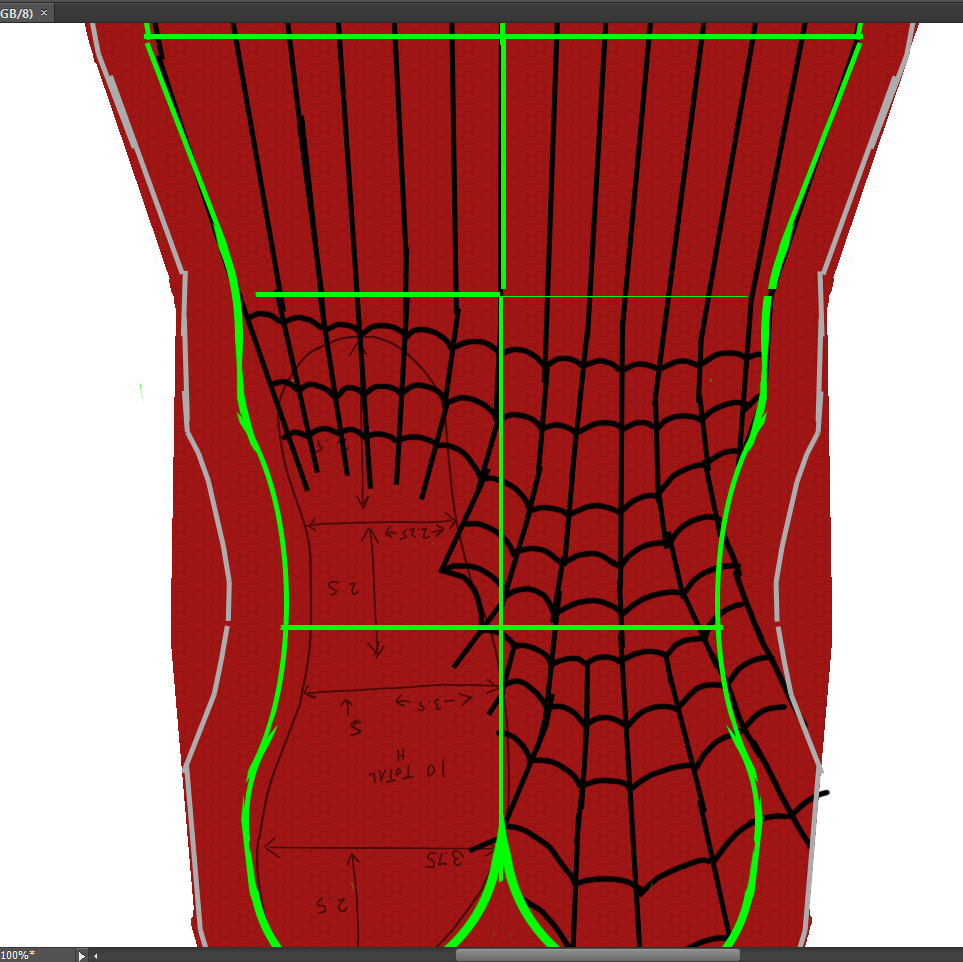
Keep messing around and cleaning up until you like them.
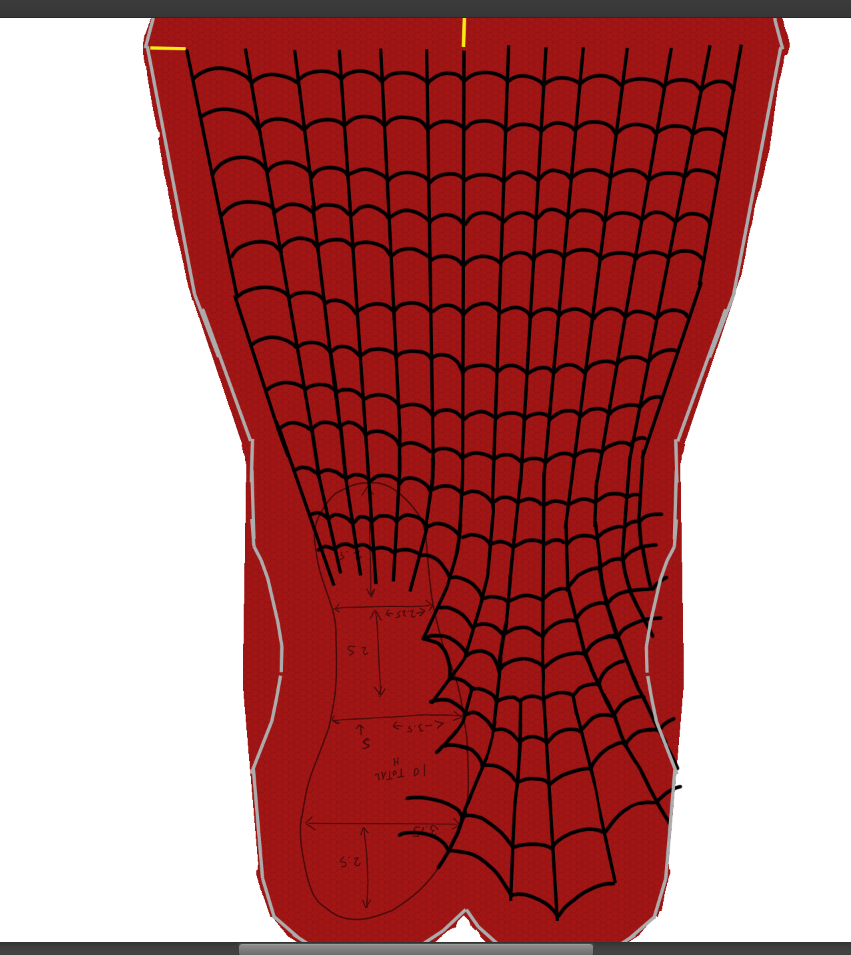
And then clean up a bit. Trim the color around the Seam Allowance (optional). Hide any layers that shouldn’t show (like thos bright yellow rulers and the sole trace).
Reiterations and Tips:
Sewing the boot
This is…well, pretty simple. If you’ve gotten the pattern right, and the design laid out on the pattern right, then you’ve done the hard part. Now you just have to sew one seam.
Fold the fabric along the center line with the backside (non-colored) side showing, matching up the toes and sides. Use chalk to mark the 5/8 inch seam allowance. Sew. Turn right side out. And there’s a sock-boot.
Unless I missed something, we have one piece of the actual costume left: the Mask.
That will be a bit tricky, in more ways than one, but we’ll get to that next time.

A costume. Well, most of a costume. That needs some detail work.
Well, all of a sudden, I am one glove and some finishing work away from a finished multi-piece costume. How about that?
I got the printed fabric for the leggings really fast, and so threw those together this morning. (That is such a fast pattern to sew!) I decided to go ahead and put together what I have, minus the mask.
I need to sew the other glove, hem the gloves, fix and hem the tops of the boots (I just cut these off of the ill-fated bodysuit I sewed a while back), finish the eyes for the mask, hem the top of the collar, finish off the hem of the shirt, and add Velcro to secure the shirt to pants and boots to pants (I think I can do without Velcro for the glove<–>sleeve connection). So–practically done, right? (Oh, I forgot I need soles for the sock-boots too…)
Speaking of sock-boots, don’t think that I have forgotten the tutorial! I was doing some tweaking and testing of my boot pattern today. I just wasn’t feeling to confident about my instructions, partly because I have never sewn from them in their exact form (again, the boots above are from the bodysuit pattern, while the ones in the tutorial are my own pattern).
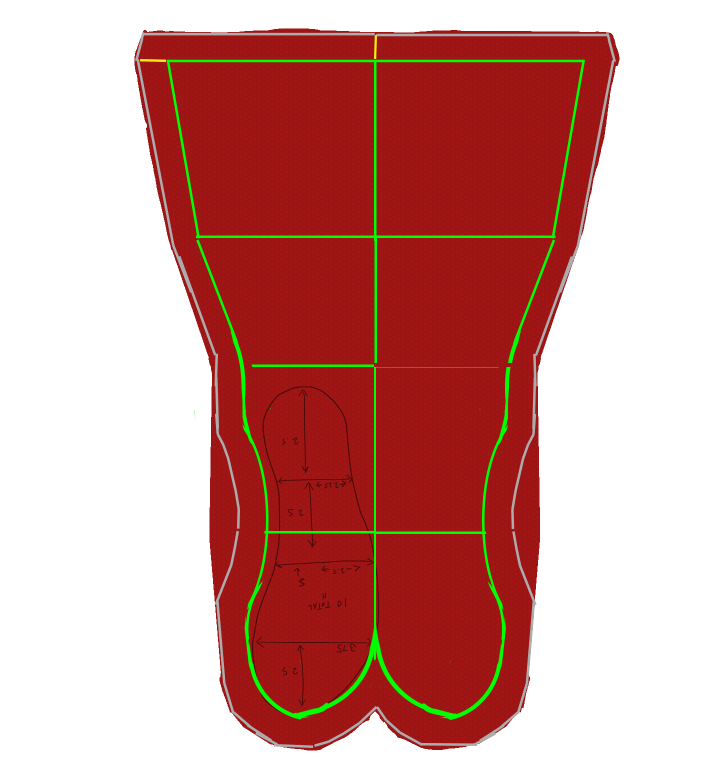
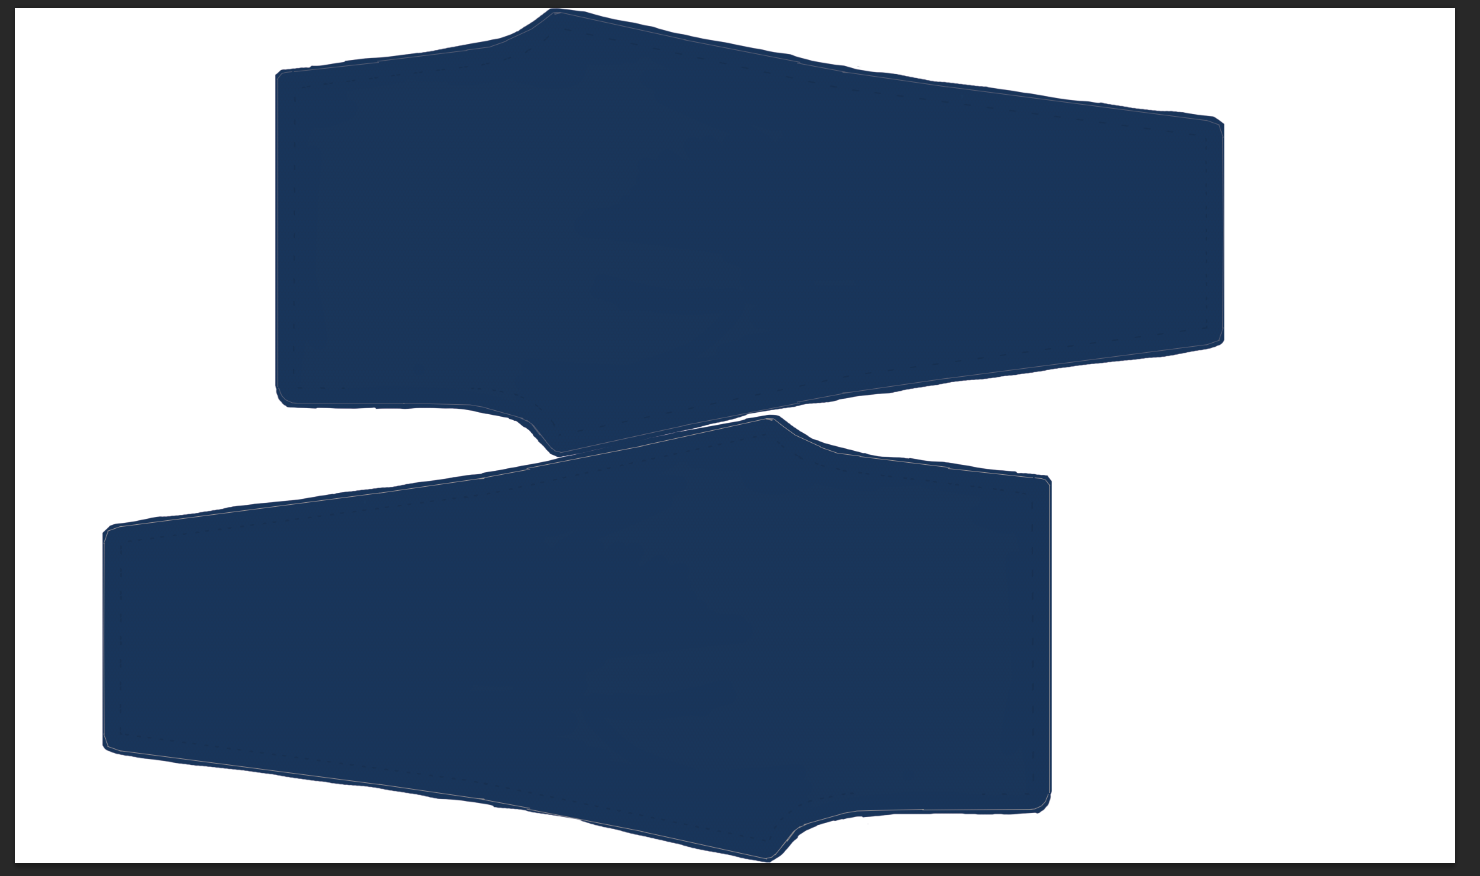
To test what I’m working on, I used some spare fabric from the leggings printing to rough out a sock-boot from my newly modified pattern. I did this the old-fashioned way, making a paper pattern, tracing onto the fabric, and then using permanent marker for the test web lines. The pattern under the boots below is an old version, so ignore that!
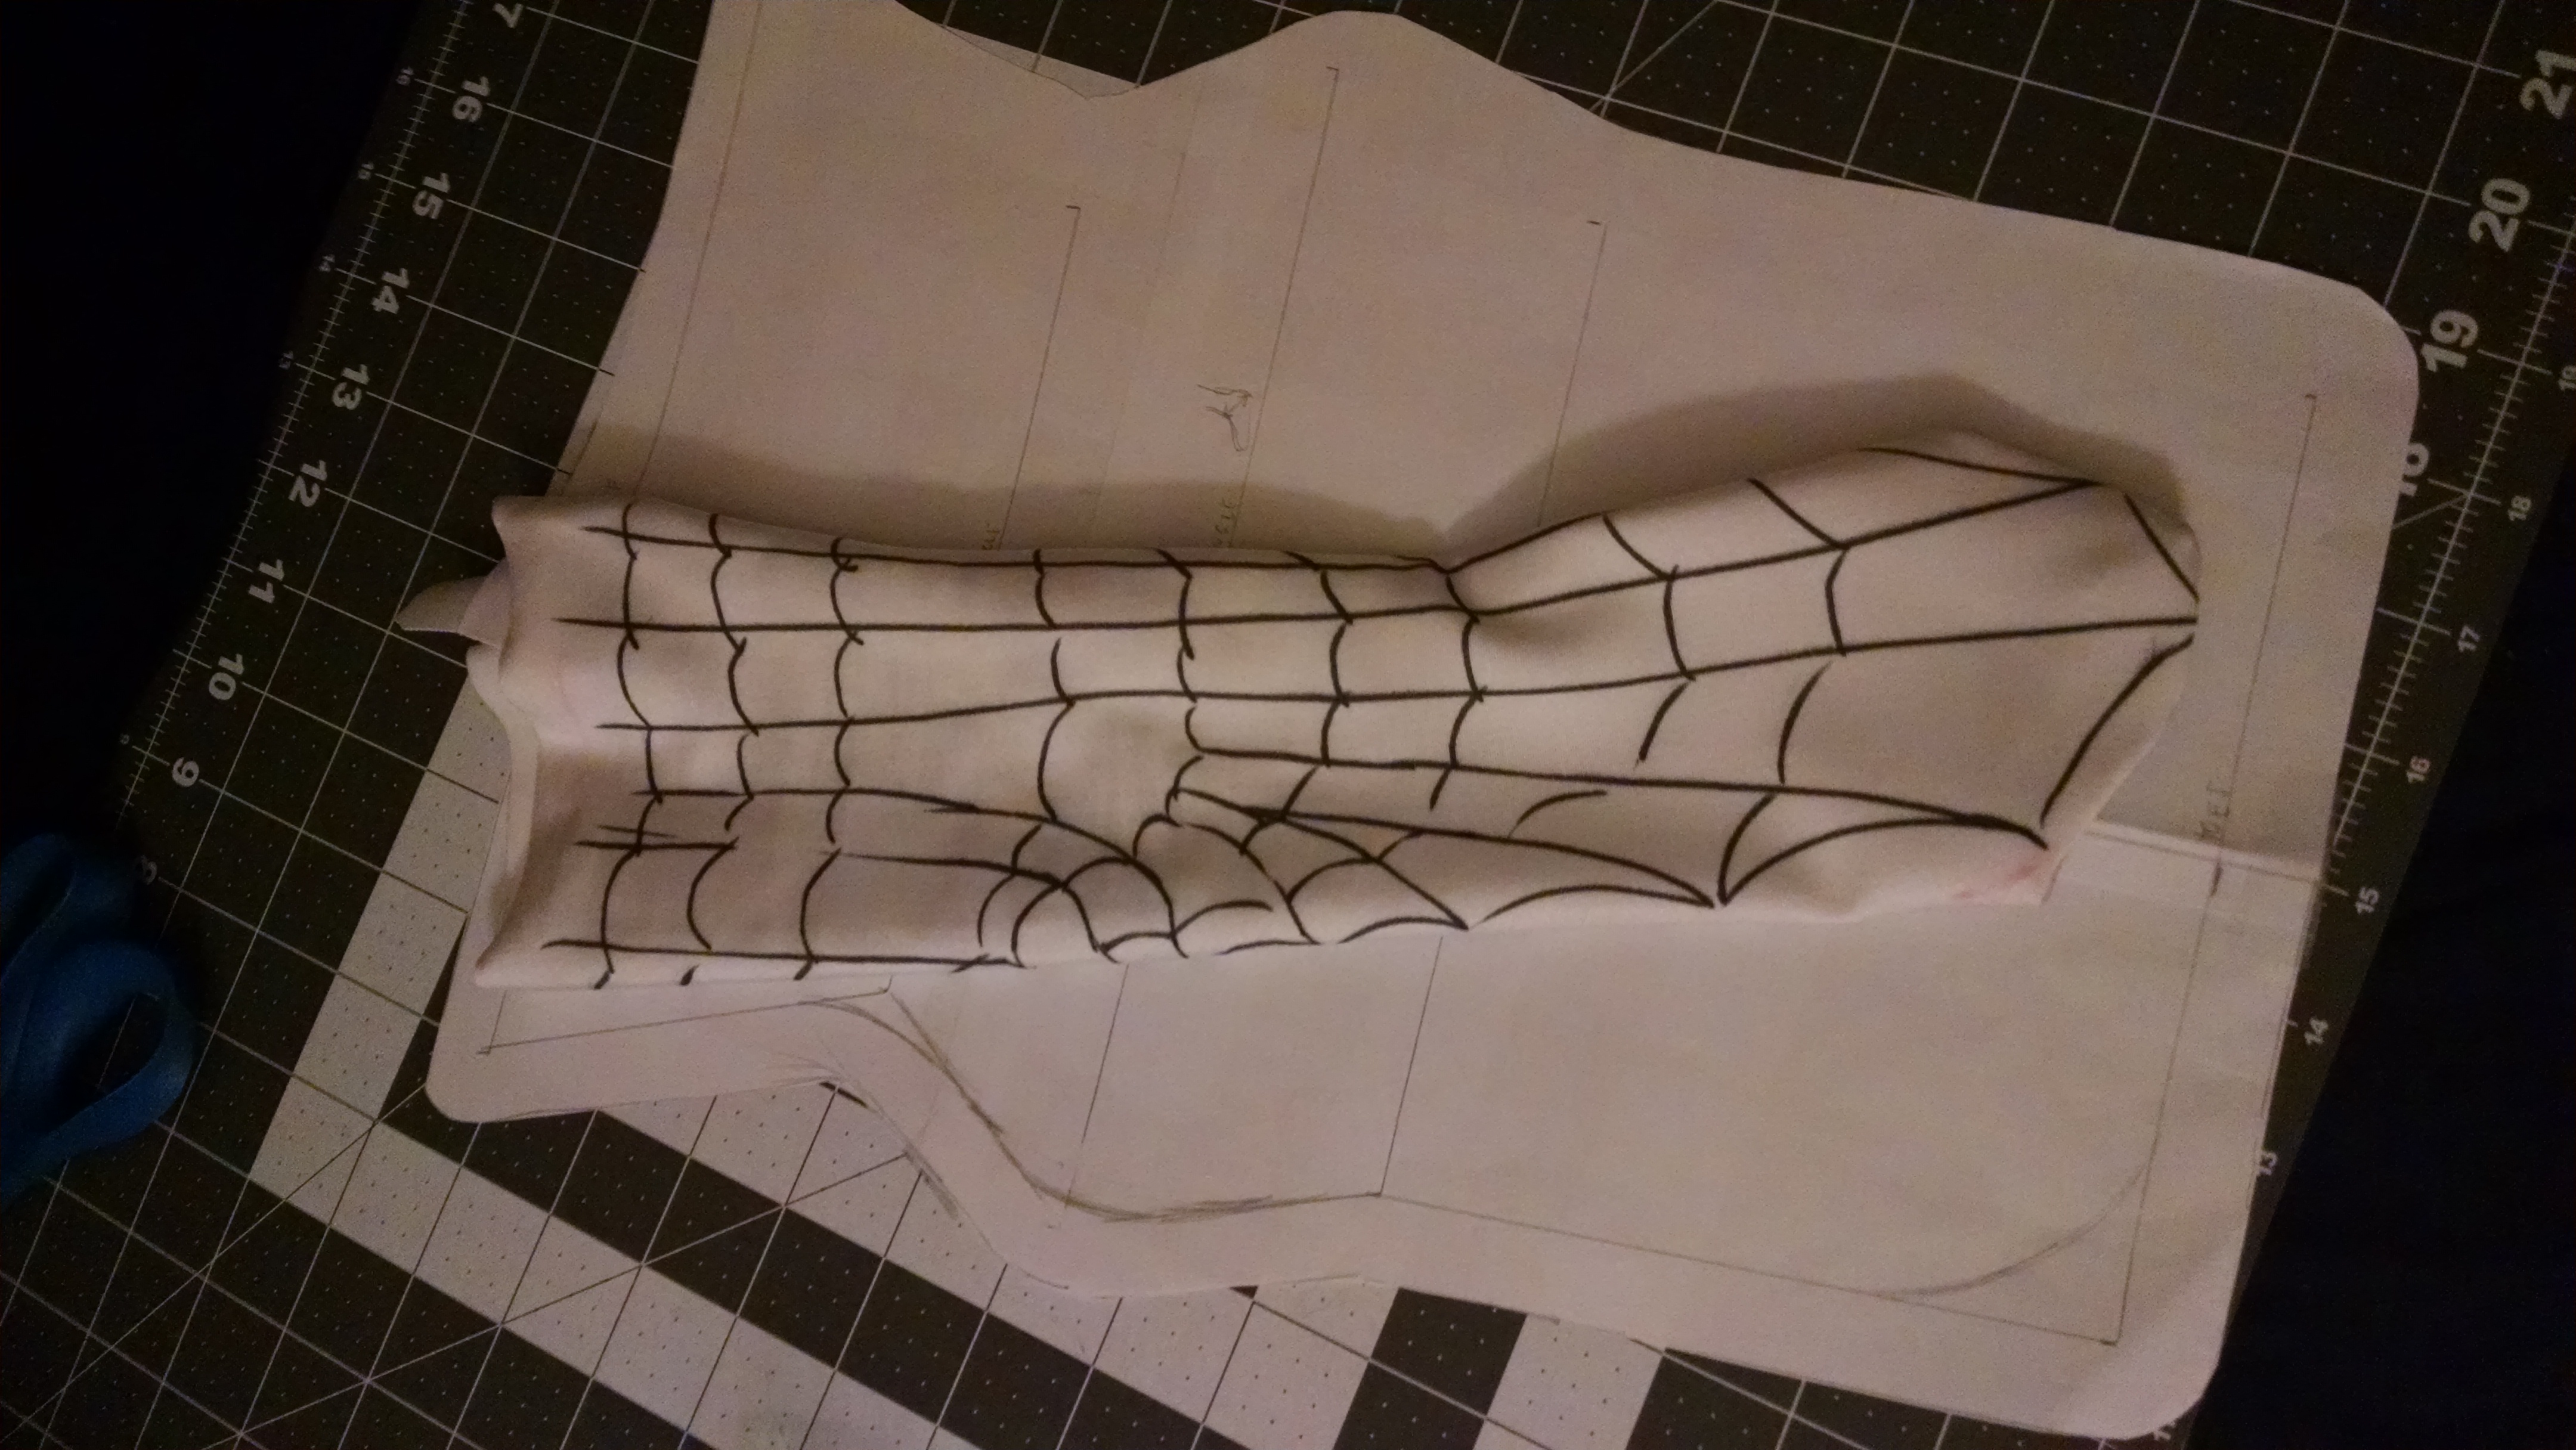


The pattern itself works fairly well, except that I need to make it longer/taller to give it a better chance of staying up on its own. The best knowledge from this mock-up came from drawing the lines and seeing where they fell. Now I think I am closer to having a good idea of how to do the lines for the digital pattern to get it to come out right in the final printing.
So…stay tuned and stuff.
Before you go any farther in this post (I mean, any farther than this paragraph), first go visit the following link. Read the tutorial/watch the video, etc. Go ahead. I’ll wait: http://so-sew-easy.com/leggings-pattern-tutorial/
…
Hi there. Welcome back. You should now have a basic understanding of the measurements you need, how to get them, and how to record/auto-calculate them using the spreadsheet provided via download link in the tutorial. (Please tell me you downloaded the spreadsheet. You didn’t? March right back there and download it right now, young man/young lady.)
Now, that is an excellent tutorial, and an easy one to sew together once it all’s said and done. I am just going to add three things to it, for our purposes:
A) How to go about making certain…adjustments if you are making a Spider-Man costume as opposed to a Spider-Woman costume, if you catch my drift.
B) Adjustments for a high–and I mean high–waist to accommodate our costume needs.
C) How to digitize the pattern so that we can color it and have it printed on fabric. But you’re an old hand at that process by now, right?
Measurements and Adjusting Where Needed
If you are a woman making leggings for a costume, then all you need to do is take and record your measurements based on the So Sew Easy tutorial, then you’re almost ready move to the next section on Digitizing the Pattern. BUT there is an adjustment that needs to be made for costume reasons, whatever your sex: the waist.
What a Waist
Since we are doing a multi-piece costume, we want to pay special attention to the interaction between the shirt and the leggings. It won’t do for a hero to show any belly during a battle–well, maybe for some heroes, but not Spidey.
We will ultimately want to incorporate some way for the shirt to attach to the pants, such as Velcro. But additionally, we want to build in some extra waist to keep things covered.
When you do your measurements, you can either:
I made my adjustments to go a bit above the belly button, which should end up with several inches of overlap from the shirt waist.
Now, for you guys…

“…it kind of rides up in the crotch a little bit…”
If you’re a guy, there is another particular measurement you’ll want to adjust: the Rise Depth.
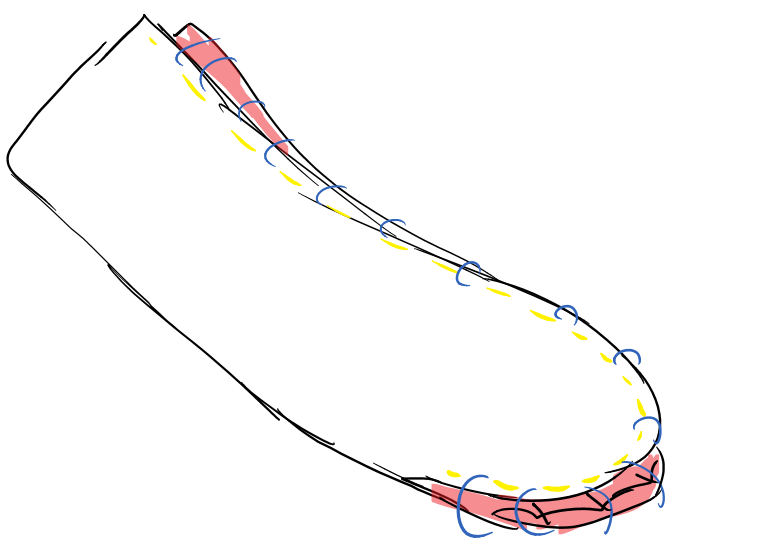
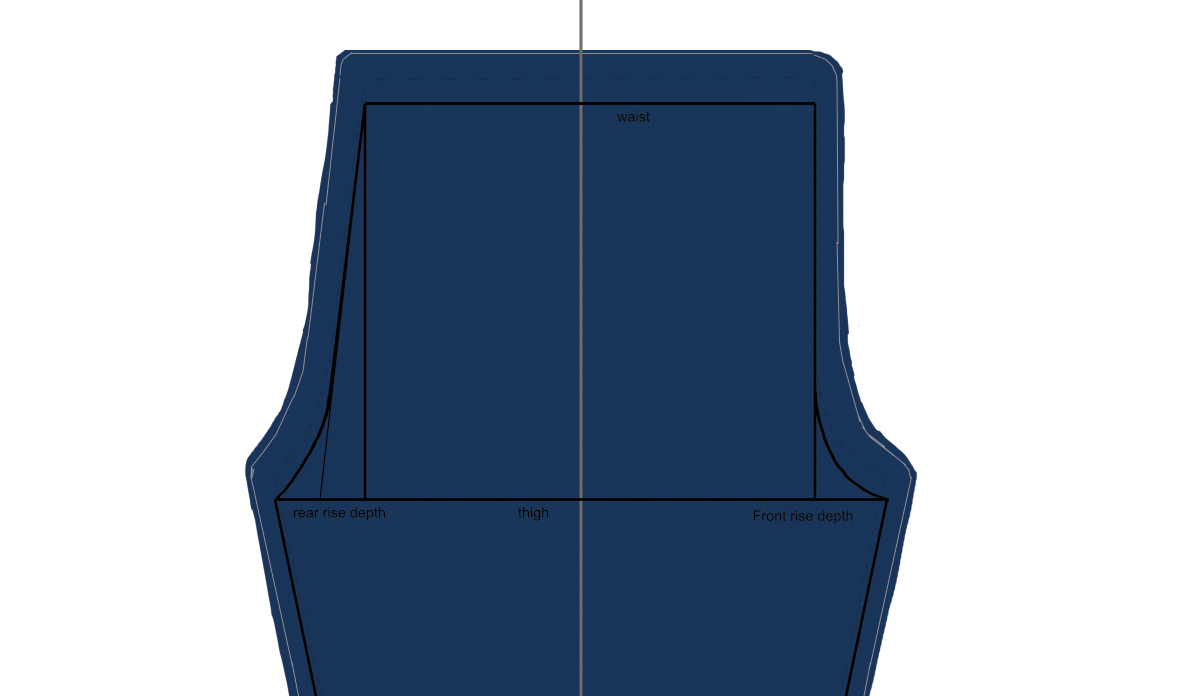
Let’s start with a little explanatory sketch of the pieces of the leggings. You might be more intuitive than I originally was about how all this works, but if you are like me, it isn’t immediately clear how the parts of the pattern relate to the parts of the body:

The part we are focusing on, as I said, is the Rise Depth. In the sketch above, that is basically comprised of the parts I have more honestly labeled Crotch, Butt 1, and Butt 2. After sewing, those three points will have converged beneath your nether region. The two front curves will be a seam running up your front, and the two back curves will be a seam running up your rear.
Here is a neater close-up of the area of concern from one half of the pattern:

When you do the measurements, you will be getting the Front Rise Depth and the Rear Rise Depth, the lengths marked with red double arrows. You will then make the curves based on that depth. Those curves will essentially become one curve running from the front center waist, under your crotch, and up to the back center waist.
I found that when I followed the Leggings tutorial, it worked great, but–as Deby at So Sew Easy designed it with women in mind–the crotch came out lacking enough room to be comfortable and appropriate for men. After some trial and error–and by that I mean actually sewing a couple of pairs of leggings from variations on the pattern, using un-printed spandex straight from the local fabric store–I got a satisfactory result.
Here was my genius method for a successful crotch:
A) I followed the tutorial for taking the measurements, including the rise depths.
B) I took a random guess and added maybe 0.75 inches to both the front and rear rise depths, for a total gain of 1.5 inches to that final, total curve.
The thing is, you don’t want to add too much, because then you end up with sag. While that may be more appropriate and comfortable, it is unbecoming for a super hero.
Here is the takeaway. You have two or three ways you can approach this:
So, once you’re comfortable with the meaning of the pattern and how it works, and the measurements you’ve taken, it’s time to move on…
Digitizing the Leggings Pattern
It should be clear from studying the So Sew Easy leggings tutorial that it served as the basis for the majority of my pattern-making and measurement-taking. Between that and your recent experience making a digital pattern for both the torso and the arm[s] of the shirt, you should basically know what to do with a minimum of explanation. So, to sum up, focusing on the differences from our former patterns:
1) Create a new Photoshop file with the following settings (there will be a different size this time):
2) Use the line tool to create the center line that is the total height, and then add the horizontal lines. Be sure to Combine Shapes when/if you want to keep it all on one layer.
3) For the top part, you will be adding some curves, as outlined in the So Sew Easy tutorial. Use one of our usual methods of achieving curves, such as tweaking an ellipse, etc. (Be sure to refer to the So Sew Easy tutorial while doing this, especially for tips on creating the Rear Rise Depth and associated curve.)
You should end up with something like this:

Adding the Color/Texture and Seam Allowance
Again, this isn’t your first rodeo, so to summarize:
1) You need your 5/8″ ruler lines, so either duplicate those from your shirt pattern file into this file, or make new ones in this file.
2) Use the 5/8″ ruler lines to create a Seam Allowance border around the entire leggings pattern outline. NOTE: In this case, you can use symmetry to your advantage for the bottom portion, but you’ll have to do both sides of the top separately, as it is not the same on both sides.
3) Once the Seam Allowance is in place, make a new layer for your color and move it under the leggings pattern and Seam Allowance layers.
4) Use the brush and paint bucket tools to add color around the outline of the pattern, letting the color bleed just slightly beyond the Seam Allowance border
5) If you’ve been using a Pattern Overlay, go ahead and add it to the color layer.
And voila:
Finishing up and Prep Time
Now, some simple steps to get this file finished up and ready for printing:
1) Save the file. And then…
2) Save As under a different name that indicates it is a FINAL version (as it will be after we edit; I like to do the Save As before doing the final edits, so that I don’t accidentally save edits that are hard to undo). Be sure to use the usual specs: tiff file, uncompressed. Should have been created at min 72 dpi.
3) OPTIONAL: Add SUBTLE seam lines using the pattern layer outline as a guide. As I’ve said before, this is not strictly necessary, as you will be marking the back of the fabric 5/8″ in, and if you measured your Seam Allowance properly, that should result in a good final sewing. But if you do choose to add seam lines, keep them discreet, and be aware of how you do the curved parts, because those are the seams that show on your crotch and butt. Just sayin’.
4) Hide or Delete the Leg Pattern layer (but if you are going to delete, make sure you saved the original file containing the pattern somewhere so you don’t have to redo).
5) Duplicate the remaining layers, then Flip Horizontal to get the other leg of the leggings. Don’t forget to Flip, as the two legs need to be mirror images of one another.
6) Now, if you’re around my size or not much bigger, you should be able to save yourself some money on printing by doing a little rotating and rearranging of the layout here to fit the leggings into 36″ of height. Aim for something like the pic below:
Once you crop it vertically, this comes in at just under 36″ high, and it fits well within the 58″ wide. And it will cost half as much to print as the vertical orientation!
But note that there is not a lot of extra room on top and bottom, so if your measurements are even a couple of inches more, you’ll go over 36″. But don’t fret! That just means you’ll want to fit another part of the costume pattern on the same file. The mask and boots will probably both fit. It’ll just be like paying for two printings at once, but you’ll only pay one shipping charge, so there’s that.
7) Once you’ve got your file arranged and cropped to 36″ height (if applicable) and 58″ width, save it and get it submitted to Fabric On Demand or your alternative printer choice (I haven’t looked for any others, in case you’re wondering).
8) Once you have the final, printed fabric, follow the sewing instructions at the So Sew Easy leggings tutorial to put it together! It’s pretty easy. The trickiest parts of sewing for me are always where multiple seams come together, like armpits and crotches.
And now you have custom-printed leggings!
Up Next: Probably Boots…I think…
If the top of your sleeve piece actually is more of an arch than a line, that’s actually fine as long as you did your measurements right.
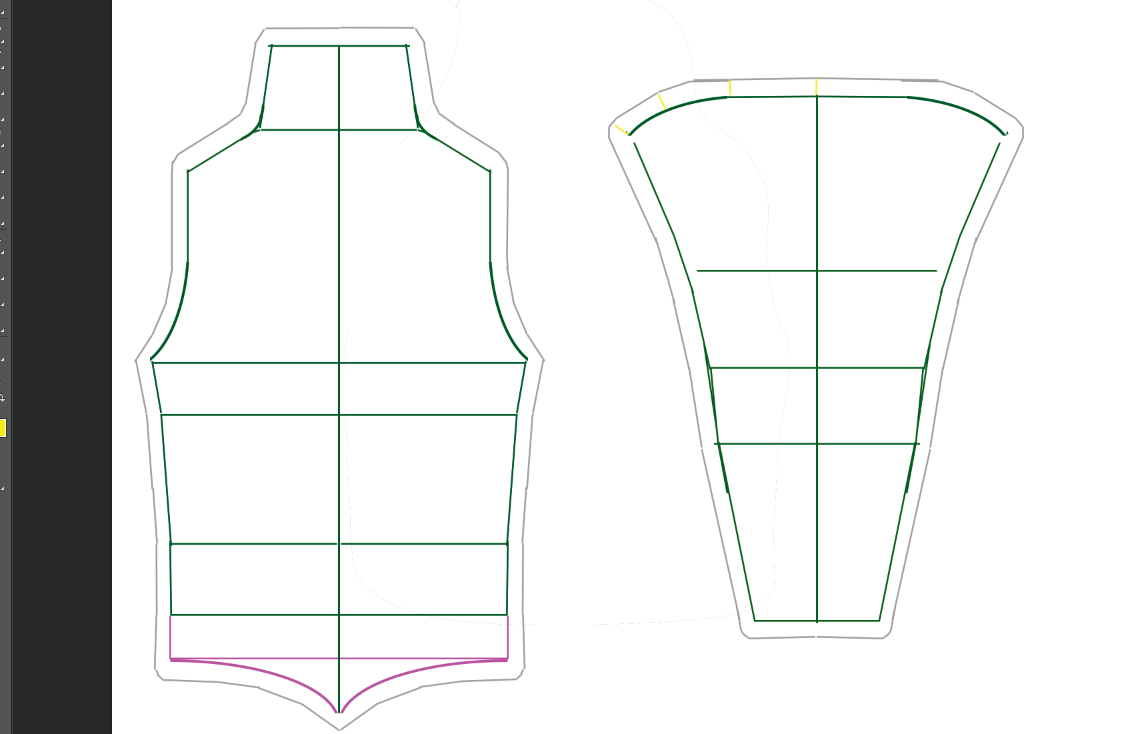
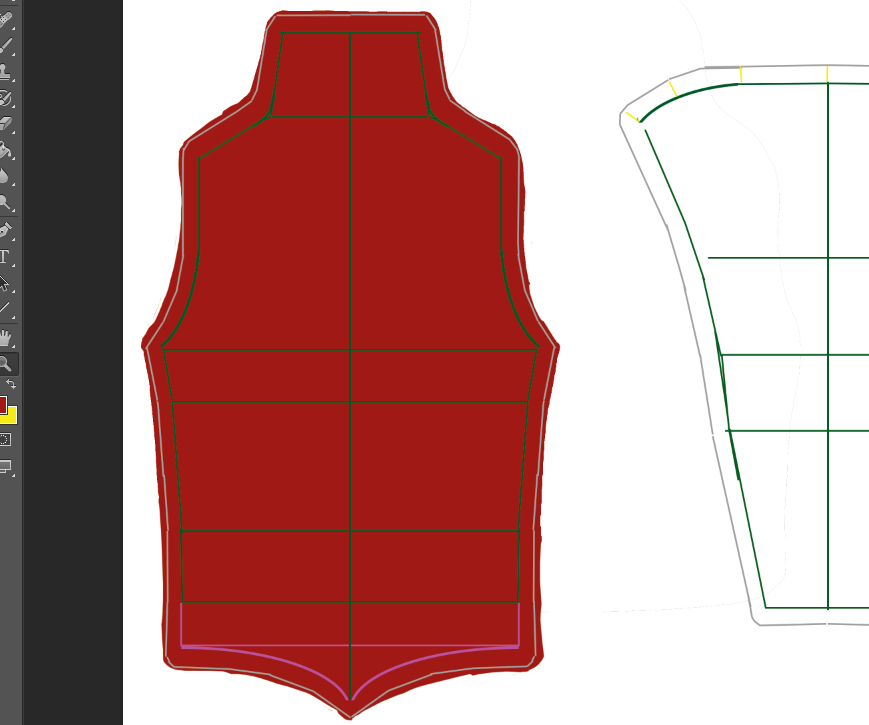
So, in the first part of the EARLY Guide for the shirt, we created the underlying pattern, which includes the dimensions based on your measurements and a Seam Allowance border for the eventual sewing process.
Before we go forward, let me just say this: We will ultimately hide the shirt dimensions layer[s] containing the horizontal and vertical measurements (the section inside the Seam Allowance in the pic above), but KEEP THAT LAYER throughout this design process. You will hide and unhide it as you go along, but it will be important to use for laying out the colors and lines and other design elements of the costume.
Anyway, in this second part, we will do the fun stuff, and add the colors, textures, and patterns for the shirt.
If you did a glove pattern/design based on the EARLY Guide for gloves, you will be familiar with the basic ideas here. Plus, if those gloves are meant to go with this shirt, you’ll want to be sure and use matching colors, textures, and such to bring it all together.
Laying Down the Color
Make a NEW LAYER, and place it under the torso dimension and seam allowance layers. Trace around the seam allowance line and fill that outline with the color. The important thing is to get the color to fill within the seam allowance line. It can go outside the seam allowance line as much as you want since, for the actual fabric, we will cut along that seam allowance line for the outside edge. But it’s nice to keep the edges neat, especially if you want to fit as many pieces onto a 36″ x 58″ piece of fabric as possible.
(NOTE: When choosing a color, you may want to go darker than you think you should. See notes below about allowing for fabric stretch in section F, part 3 of doing the costume layout.)
Choosing a Pattern Overlay–Or If You Even Want One
If you’ve seen the Spider-Man movies, and the Man of Steel movie, you’ve seen the thing they do with the costumes, the pattern overlay they add to the fabric to add texture. It’s not a bad touch. It does make the look more “interesting.”
But for our purpose, it’s totally optional. I’m of two minds about the way it has turned out for me. But I’ll cover that aspect briefly, and then you can take it or leave it. You can even add one now, and then remove it from all the pieces later. It’s easy to turn on and off in Photoshop.
If you’re not using Photoshop, there are probably other ways to do this, such as by making a custom layer manually, but that is beyond the scope of this Guide, I’m afraid.
Pattern Overlay Step 1: Get some Photoshop .pat files:
Photoshop has some built in pattern overlays, but they are not of the sort that I find to be suitable for this purpose.
The usual approach is to use some sort of hexagonal pattern, and I found a great free collection of those here at Shapes4Free. You could also do a search for “Photoshop .pat files free download,” but–of course–use caution downloading from unknown sites offering free stuff, as it is all too easy to end up with Malware (I know all too well. Curse you, video game emulators. {shakes fist})
Pattern Overlay Step 2: Import the .pat files into Photoshop:
Thanks to ObsidianDawn for reminding me how to do this for this Guide.
Once you’ve downloaded the .pat file[s], you’ll basically want to get those into the right folder to make them show up in Photoshop. There’s a good chance the files you downloaded need to be unzipped, so then you will want to unzip them into the right folder. Otherwise, just move the files into the right folder.
That folder should be something like: Program Files > Adobe > Photoshop (version) > Presets > Patterns
Once those .pat files are in the above folder, access the Layer styles in Photoshop and you should see the pattern[s] there, ready to use:
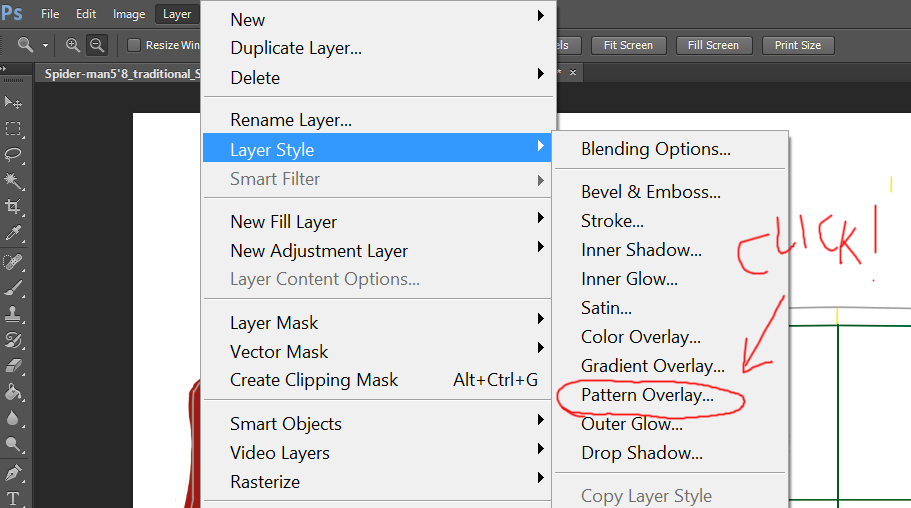
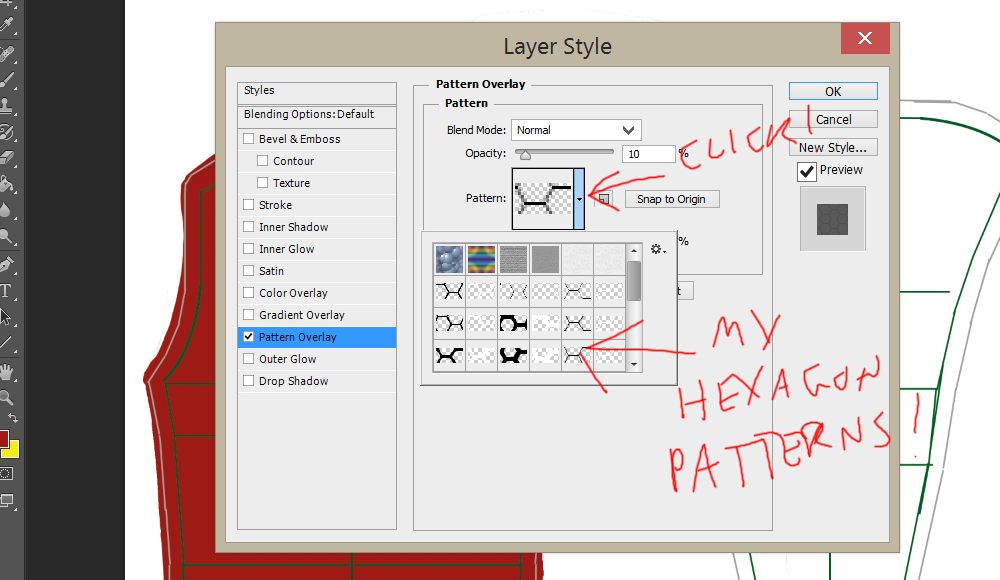
So, select the layer you want to overlay and then open up the dialog box above from the menu: Layer->Layer Style->Pattern Overlay. Choose the pattern you want, and adjust the Opacity (so far, I’ve used 10%, but it comes out almost too subtle on the actual fabric).
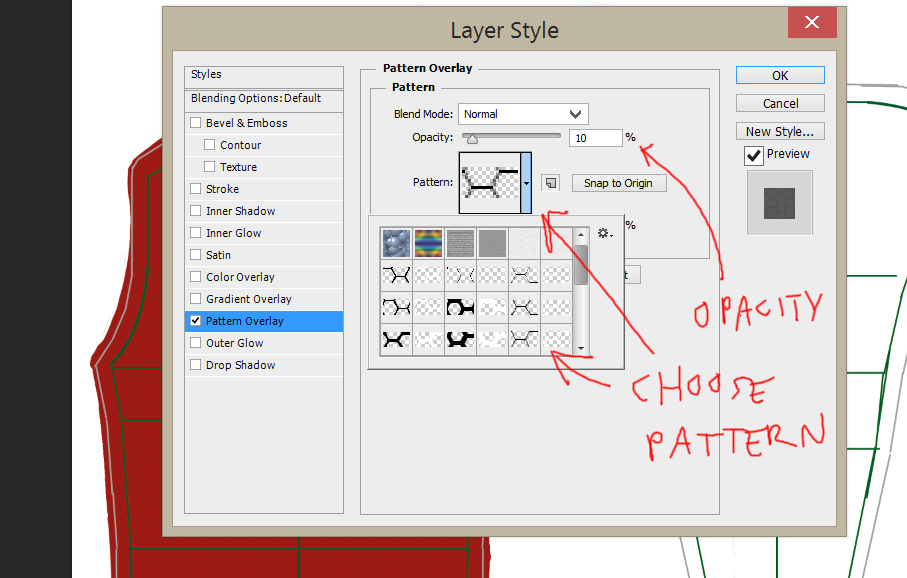
Click OK to lock it in and get a look at it. But then if you want to edit it after the fact, you can access the Layer Styles from the layer itself:
Laying Out and Detailing the Design
So, this is a tutorial for creating your own design more than it is offering a ready-to-use design, so this is where you will need to decide your own take on the Spidey (or other hero) costume and plan it out. I will offer some basic methods that worked okay for me.
But don’t worry. I will also show some examples of these ideas in action.
A) New Color = New Layer; New Design Element = New Layer:
Layers, layers, layers… Depending on how much you use Photoshop type programs, working in Layers may or may not be second nature to you. I remember when I first started doing art digitally, I had a tendency to just keep working on the same layer, because that’s how it works on paper, right? (I’m old, in case you didn’t know that.)
Anyway, sorry if I’m preaching to the choir, but keeping your colors and other major elements on distinct layers will make them much easier to edit.
B) Name Your Layers – and use descriptive names:
I don’t always follow this rule very well, which is why I am saying how important it is. It’s easy to get caught up in the creation process and forget to be organized. The next thing you know, you have 50 layers, and 40 of them are named things like Shape 6 or Ellipse 1, along with Layers 3, 8, and 4. Just sayin’: you’ll be very glad if you name your layers with descriptive names.
C) Use Symmetry to Save Work:
Again, maybe I’m preaching to the choir here, but as you’ve already seen, we want to use symmetry to our advantage. Most of this design is the same on both sides, so think in halves. Do one half, get it the way you are pretty sure you want it, and then copy it, flip it horizontally, and move it to the other side.
This will also apply–to a more limited degree–to the back/front symmetry of the torso. For example, the Spidey web pattern can be mostly the same for the front and back. The main difference will be that on the back, you cover up most of the middle portion with blue, and if you do a straight-across belt, you will alter then web pattern there. So you can copy and paste the web pattern from the front and only change what you need to.
D) Spider-Man Specific Tip: Webbing – use separate vertical and horizontal layers:
Spider-Man’s web pattern is made up of two basic components: long “vertical” lines and “horizontal” curves “jumping” from one line to the next.
I found it easiest to lay out the vertical lines (grouped into one layer) with the line tool, roughing out any curvy portions. Then, I would make a separate bitmap layer for the horizontal curve jumps, and use the brush tool. I zoom in pretty close to keep the lines smoother, and I might draw a curve (or chain of curves) several times to get it just right.
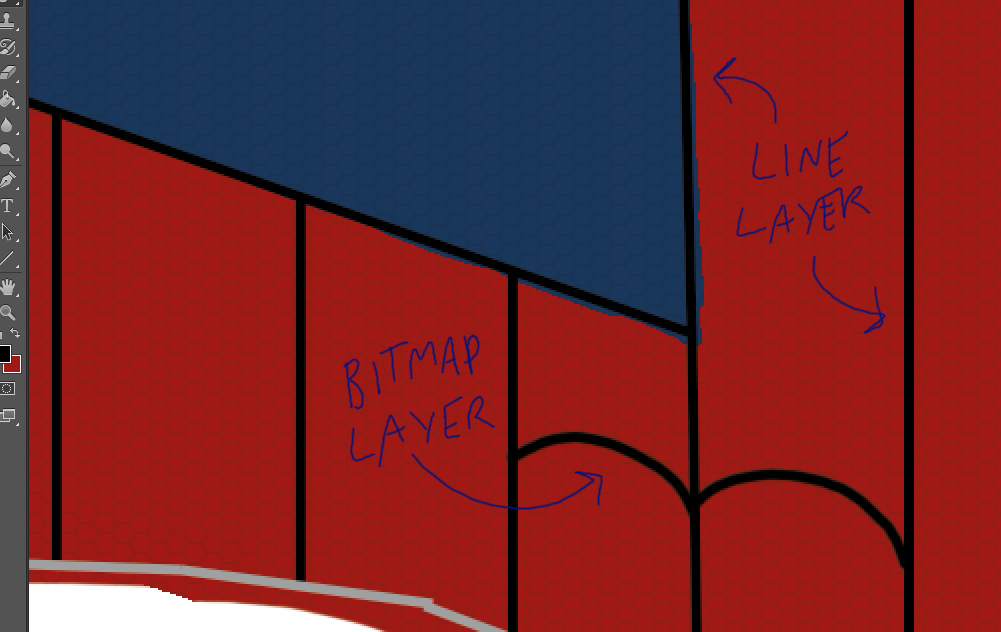
I use a tablet PC with a digital pen, so I can “draw” pretty readily. If you’re using a mouse on traditional PC/Mac, or can’t get the curves smooth even drawing them, you could try other methods, like modified ellipses or the Path tool. Those probably take longer, but may result in less overall frustration.
Once you’ve got a batch of web pattern (do it in half-sections, remember!), you can merge/flatten the vertical/horizontal layers into one so it is easier to copy and paste for mirroring.
As you do other sections, just try to keep the spacing and curvature of the web lines consistent.
E) Making the Symbols: Sketch->Lines & Shapes -> Rasterize & Refine:
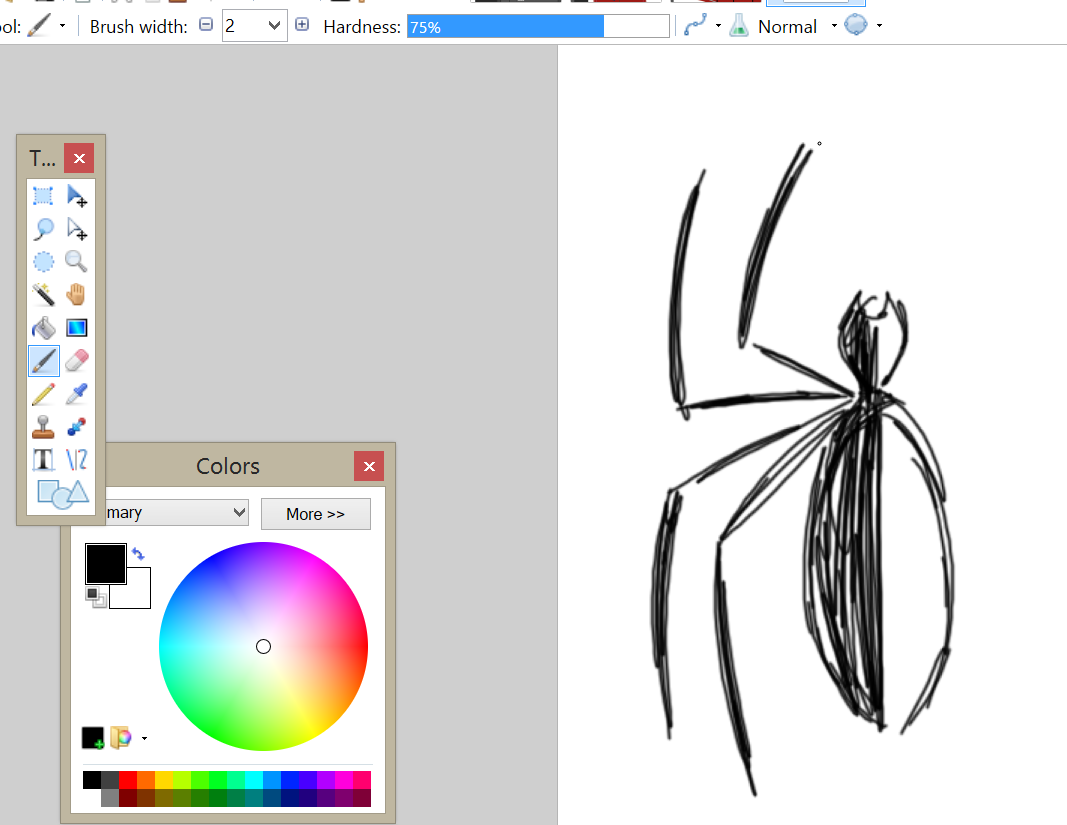
The symbols such as the Spider-Man’s chest spider logo and the spider symbol on his back (the comic version of which looks more like a tick) are pretty important parts of the design, but getting them to look symmetrical and clean can be challenging. I find this method to work well for me:
Do a rough sketch of the symbol (I like to use a simpler image editor for this).
Save the file as a PNG or JPG, and then place it in a Photoshop Layer. (File->Place->Select file). Move that layer/image to the general area where you want it to show up (you can center it later using the underlying torso dimensions lines, the usefulness of which was iterated in the intro to this post).
Take that layer’s opacity down enough that it’s visible but not distracting. Start laying down shapes and lines to get a rough layout of the symbol. (Yes, we will do half and copy and paste, but we can’t draw half-ellipses).
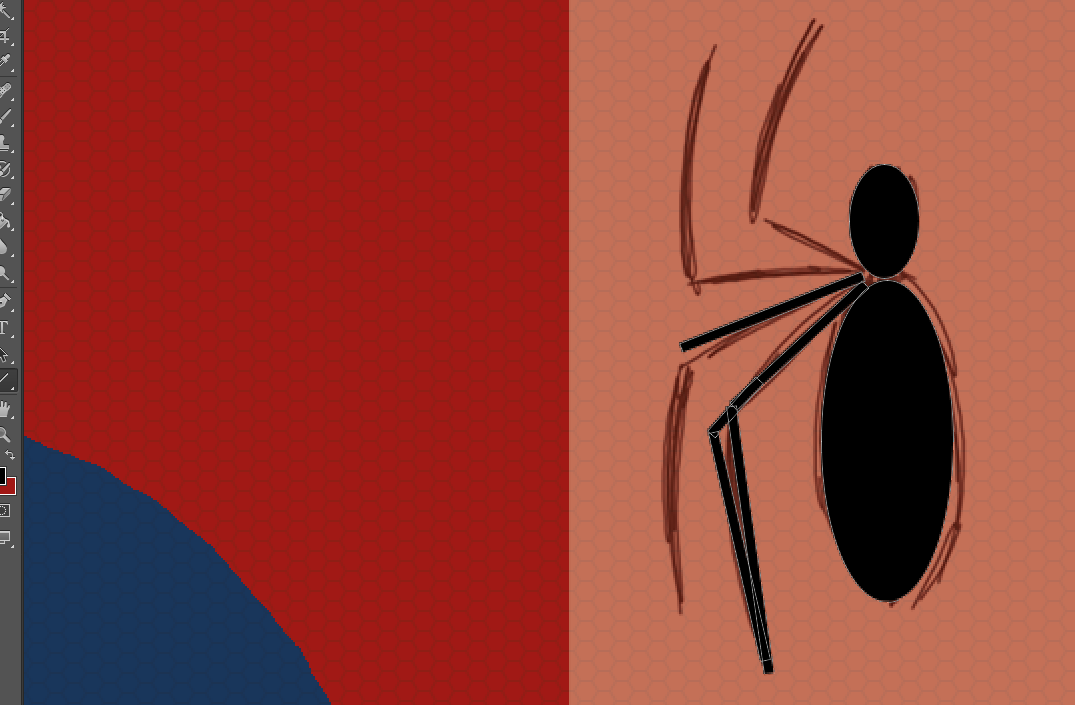
When you’re done getting the basic layout of the symbol, Rasterize your rough shapes/line layer:

Hide or delete the png/jpg sketch layer, and then refine the Rasterized half-symbol with the brush and eraser tools:
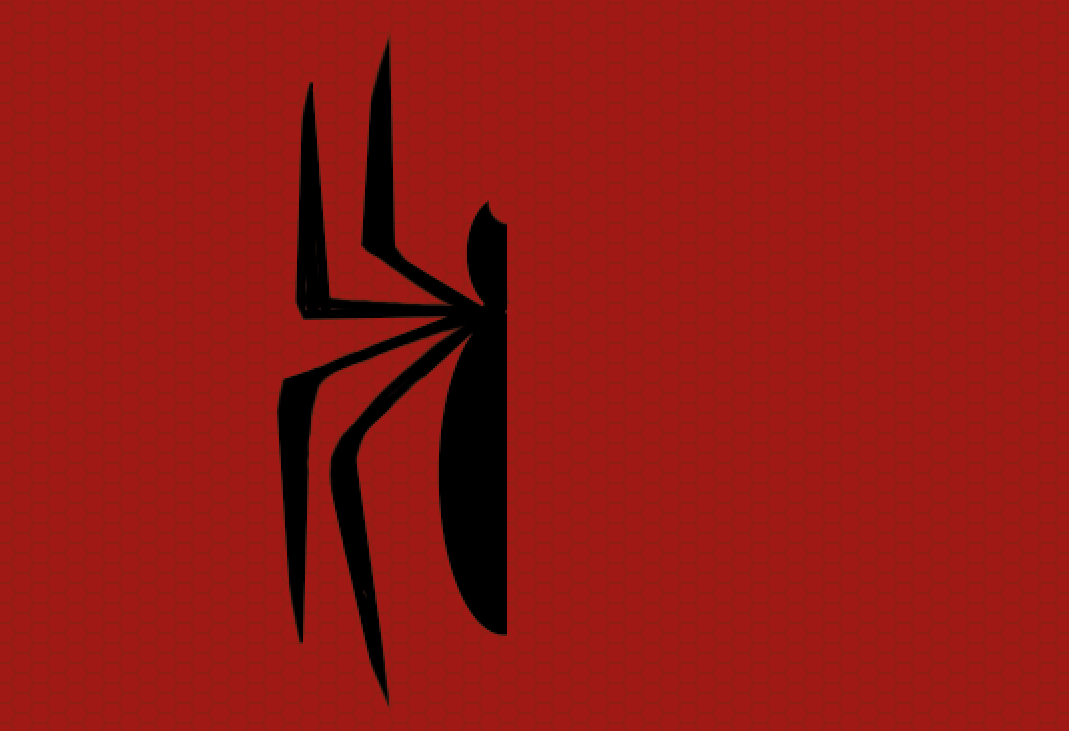
Once you’ve got the half-symbol polished up, duplicate the layer, flip it, move it, and you’re done:

F) General Notes & Guidelines for Laying out and Placing the lines, webs, and color sections:
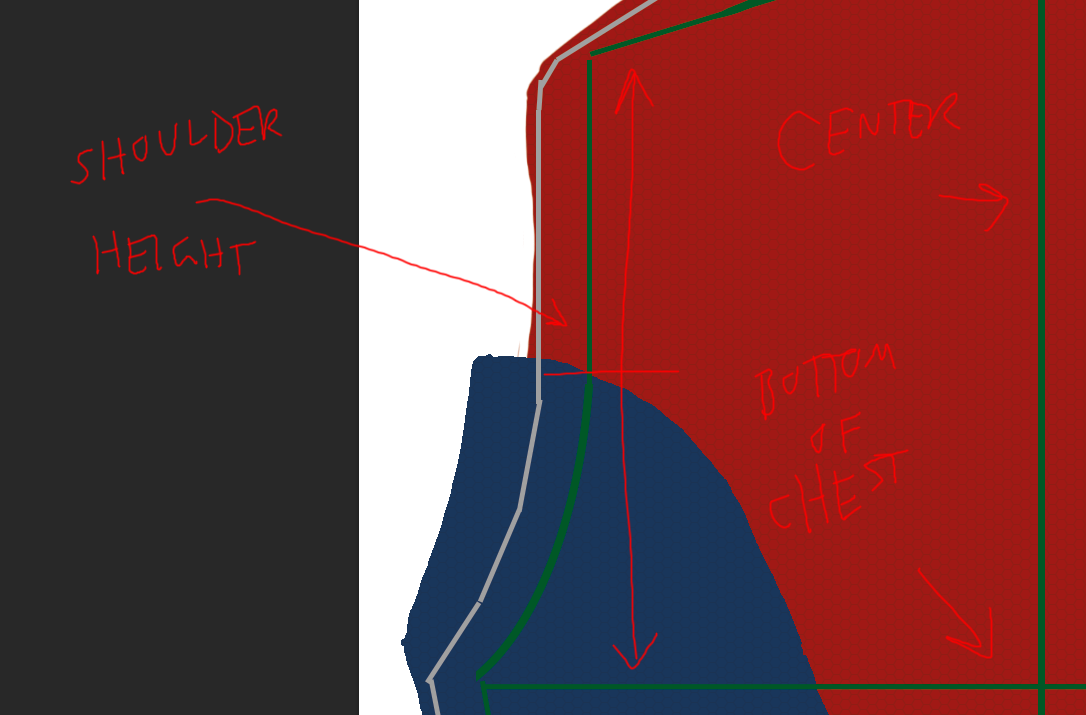
1) USE the torso dimensions layer’s horizontals and verticals to get an idea of where the lines and elements will lay out in the final product. For example, if you want the front symbol centered horizontally just a little above your chest, use the center line and chest circumference line of the torso dimensions layer to do so. If you want the blue of the sides of the torso to meet the sleeves about halfway between your armpit and shoulder, you have the “shoulder height” measurement to guide you in achieving that placement.
2) Use the Puzzle Method to line up Torso elements with Arm elements:
As with many of my methods, there is probably some more mathematical way to do the same thing, but for lining up elements across different pieces–such as the torso and the arm–it seems to make sense to move the layers into positions that simulate how they fit together in the final product:
For example, here I’ve lined up the shoulder lines of the torso and the arm (NOTE: Don’t line up the Seam Allowance lines, but the actual lines of the torso dimensions) and started sketching in the blue for the arm, so that it will match up with the blue from the torso. You will also want to do this when you do the webbing lines for the torso and the arm.
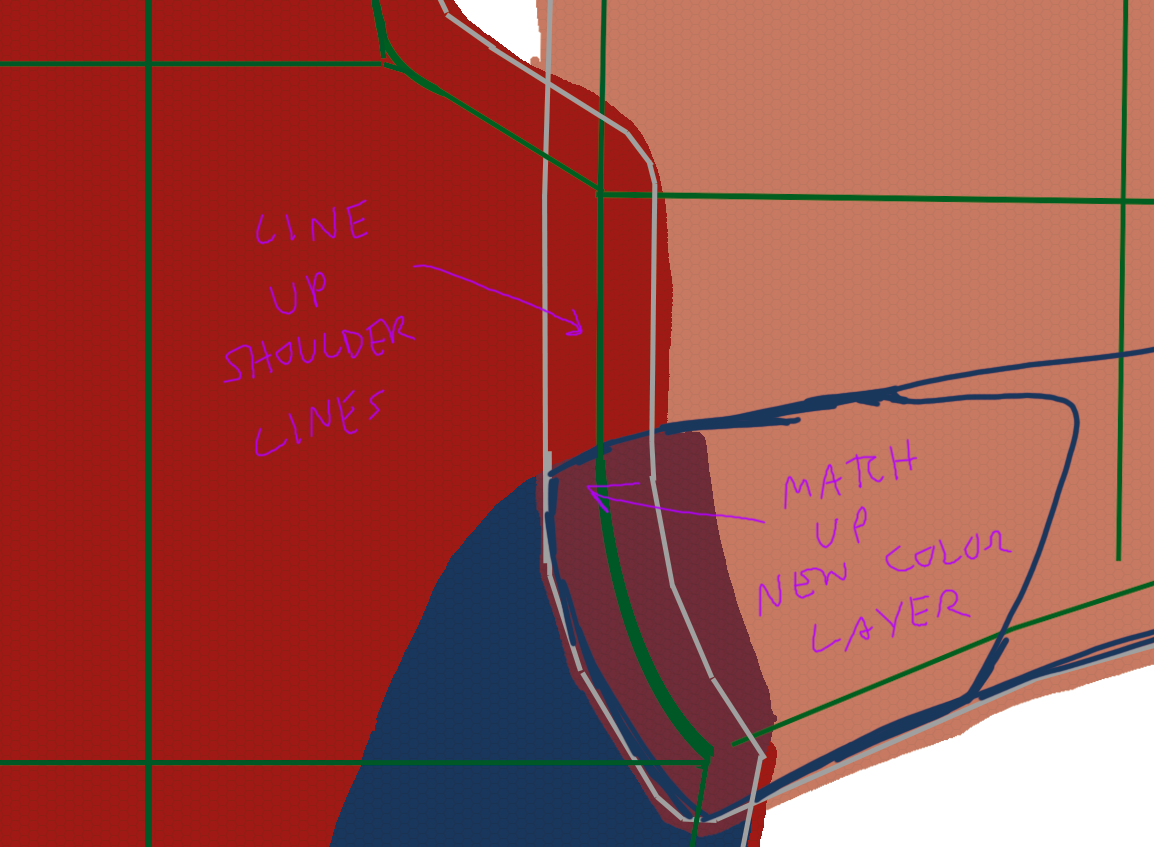
NOTE: (I know, lots of notes…) It’s possible that your shoulder width and height measurements are such that lining them up for the above process results in the sleeve attaching at a downward angle. That’s actually fine. That’s how mine usually comes out, actually. The important thing is that you did your measurements accurately.
3) Allow for Stretch in your design:
I don’t actually calculate the design stretch, but I suppose you could, since we made the torso dimensions a particular percentage of the actual (90-95% to be more specific).
Regardless, remember that your design will stretch horizontally by a certain amount, so if the amount of red you have in between the blue on the front of the Spidey costume seems a bit narrow, it will be wider when you actually wear the costume.
This can actually affect color as well, since Fabric On Demand will print the design on white fabric. The color saturation is good, but the farther you stretch it, the more faded the color looks. This doesn’t become a problem for the most part, but I think that you might do well to make your colors slightly darker than you think you should.
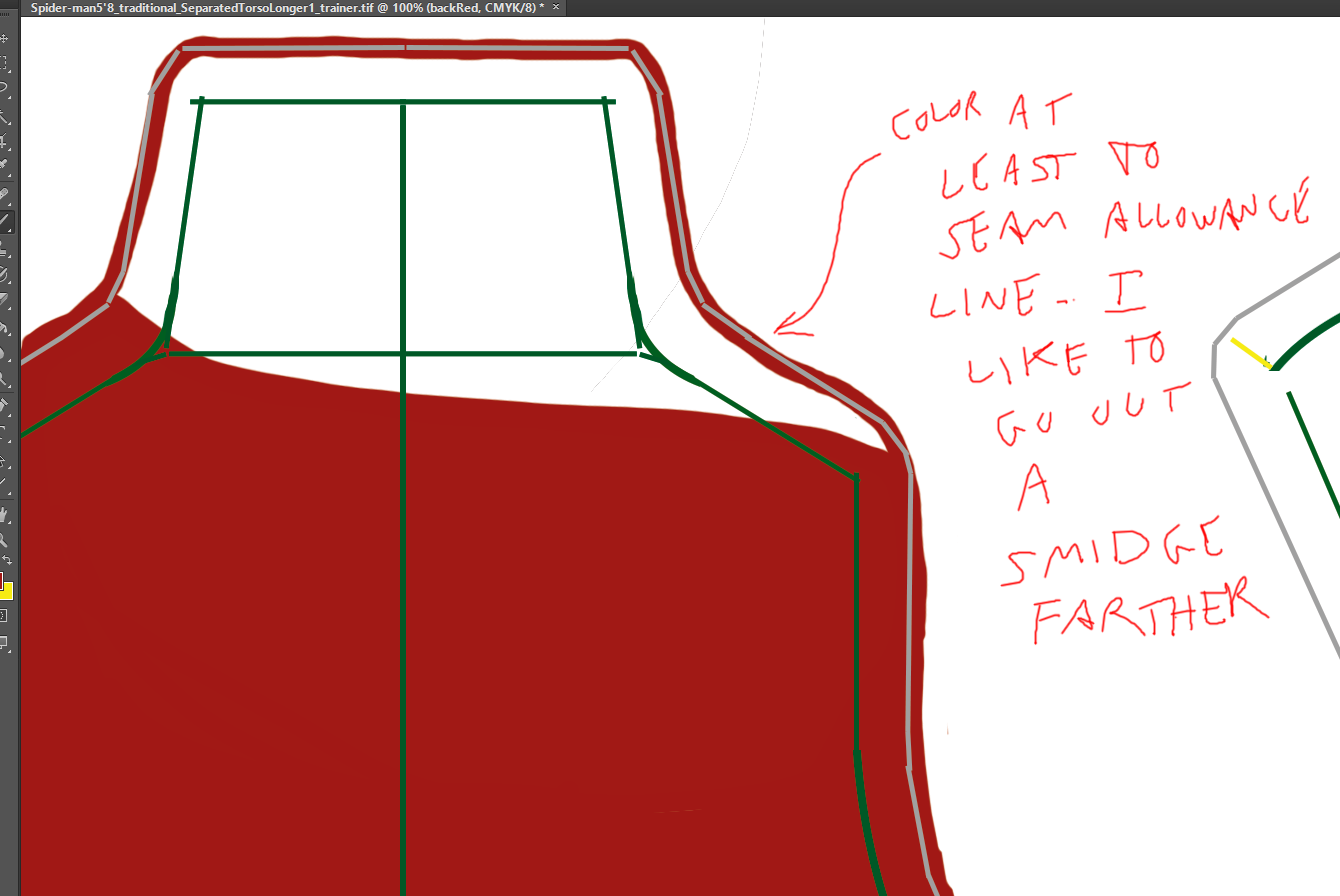
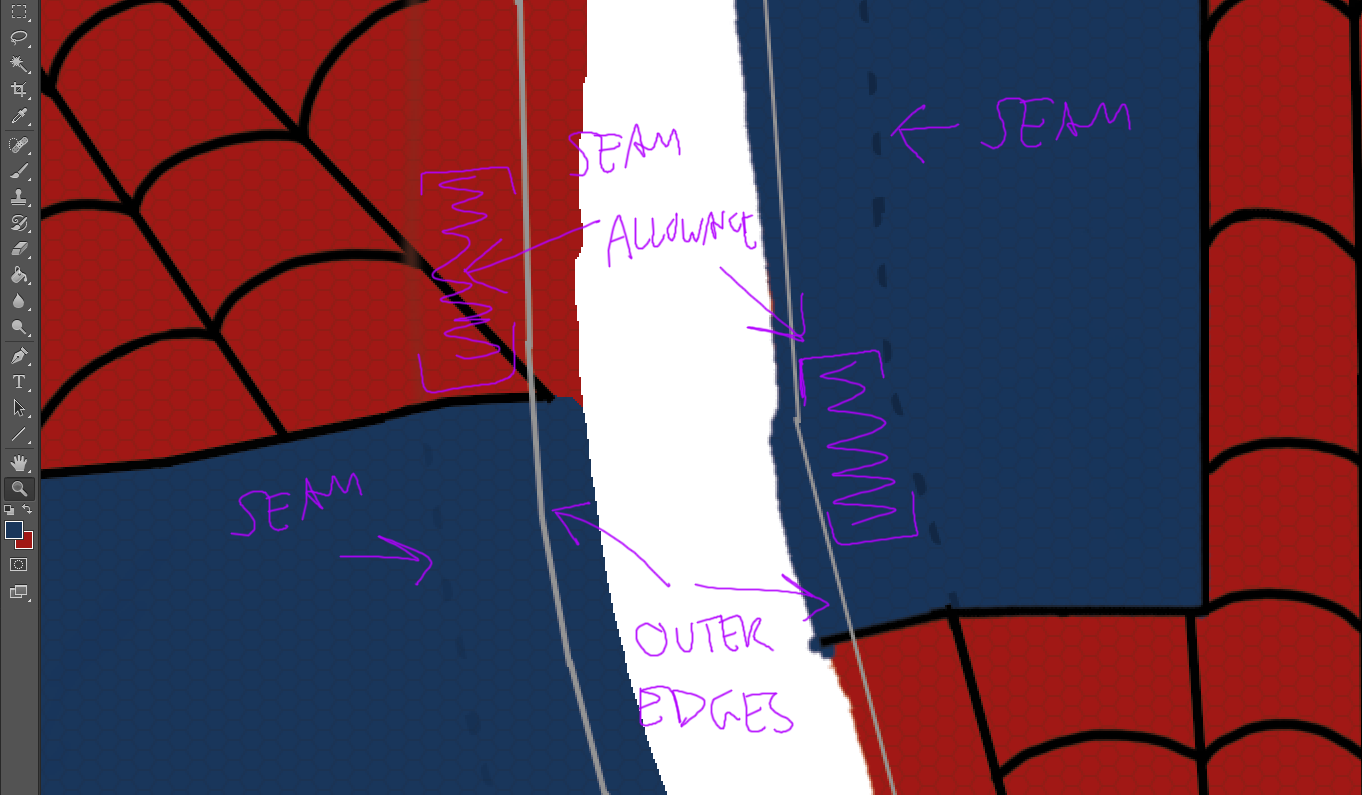
4) Understanding the Seam Allowance and Actual Seam:
This part might be a little confusing if you have little or no experience with sewing (I’m only about 6 months into it myself), but it is important for your design.
As you work on the design, it’s important to understand where the visible portion of the design on the final product will end, which will be where the actual seams are (NOT the seam allowance).
It’s good to allow for some “bleed” of your design beyond the seam lines, but be aware of where those seam lines are for the purposes of lining up webbing and colors and such.
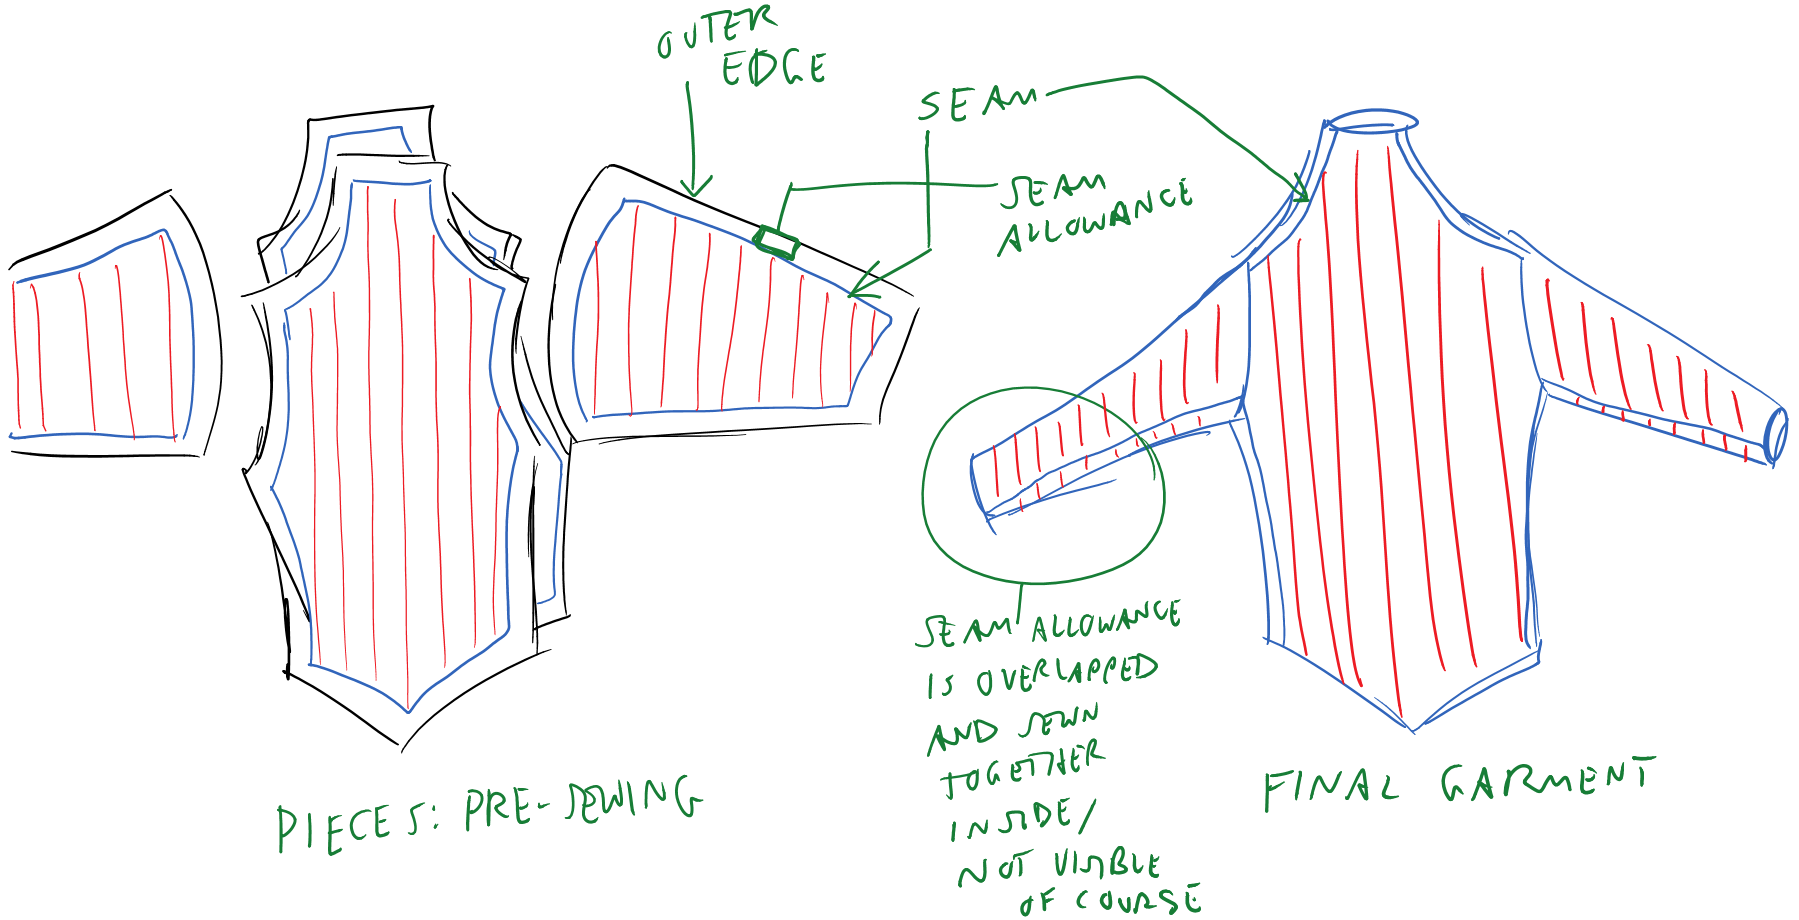
Your seams will coincide with the edges of the original torso dimensions, which you will hide for the finished file to be printed. You can make VERY SUBTLE seam markings, as in the pic below, but that is actually optional. I am not always making those marks anymore, as I end up needing to mark the backside of the fabric with chalk lines for the seams anyway.
You should keep the Seam Allowance’s outer edge line for the final printing (gray lines below), because this is the line you will cut along when you cut out the pieces, and it should be 5/8 of an inch out from your actual final seam, whether or not you keep visible (but SUBTLE) seam lines.
That pre-measured gap between the original torso dimensions and the out edge is what will allow you to properly mark the backside of the fabric with chalk lines in the right place.
5) Label your pieces:
So, since the Seam Allowance won’t be visible, you can use it to add some handy labels in your file. Just be sure to put these as close to the outer edge as you can, so they don’t sneak into the visible portion of the final product.
I like to label the left and right arms with an “L” and an “R.”
You might also want to get a good understanding of how the pieces fit together and label the spots where they will meet with little codes or something. Sort of a “fit Tab A into Slot B” sort of thing.
The Final Product: Pattern and Design:
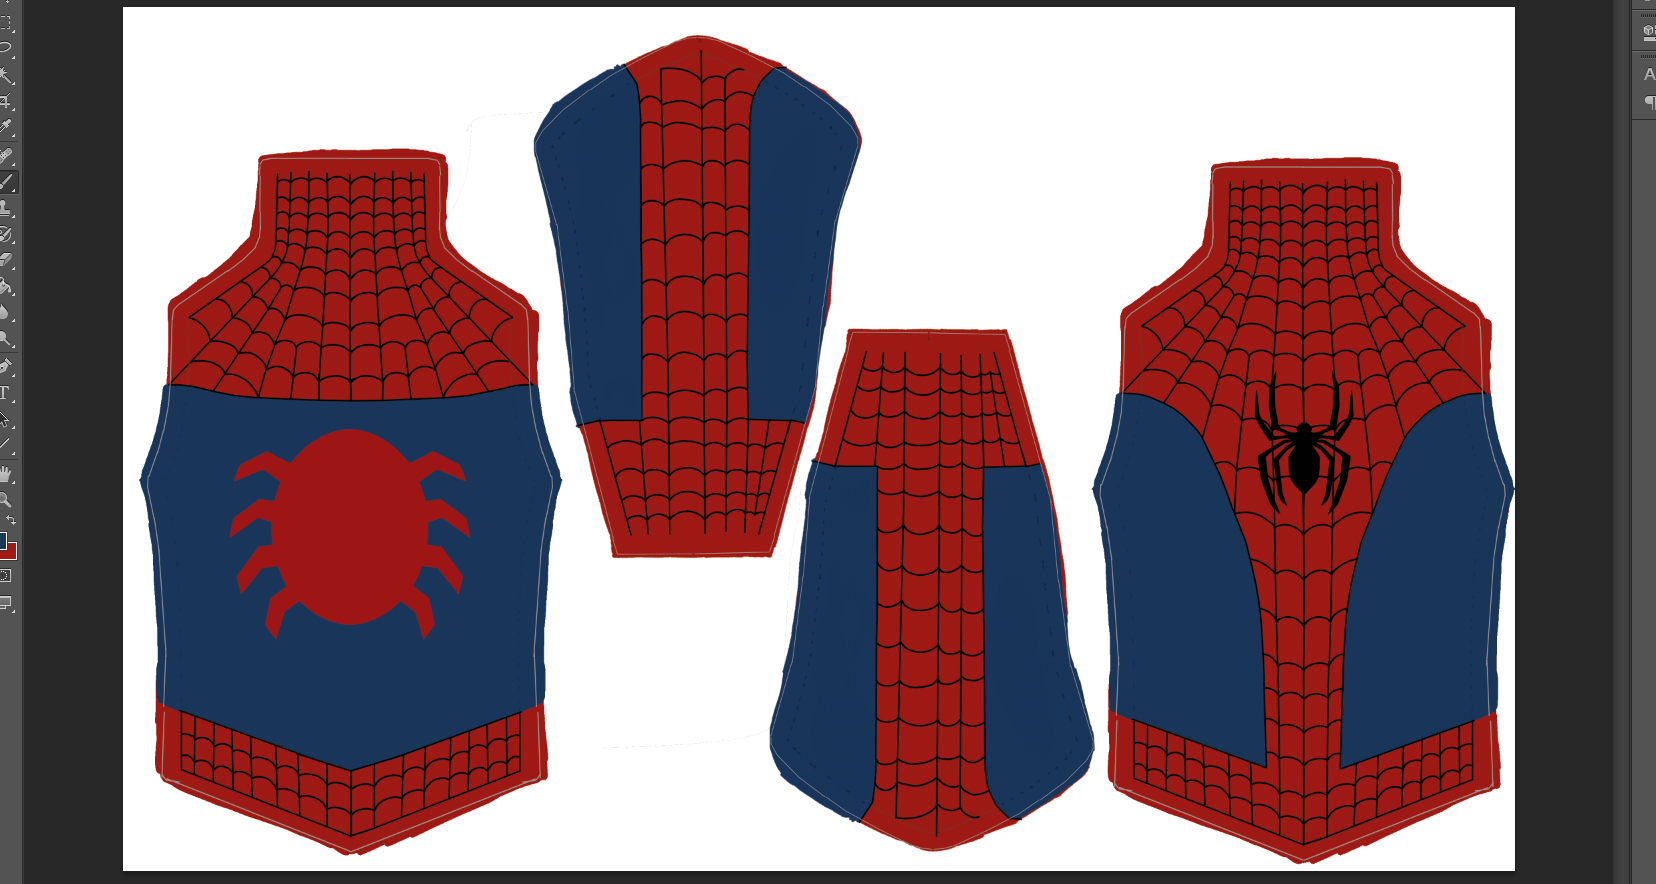
You should end up with something kind of like the pic above. (This is an earlier pattern/design file, not the end result of the one from the screenshots in this tutorial. The almost pointy shoulder-tops are actually the usual way it comes out.)
Now, as a preamble/disclaimer: No, I am not an employee of Fabric On Demand nor do I get paid for sending people their way. Feel free to find another company that does the same thing. FonD is just the company I have been using, having heard of them from Gun Head Design.
In any case, if you are using Fabric On Demand, you’ll want to prepare the file in the following way:
1) Pay and Send File: Go to Fabric On Demand, click the Get Stared button, and follow the instructions. The process of purchasing a printing and uploading a file is a little confusing at first, because really you can either order the fabric first or upload your file first. But you’ll figure it out. Just be sure to choose the Lycra Spandex fabric and the “Centered” design option.
If you have trouble getting the Upload to work, you can actually go ahead and complete the Order and Purchase first, and then send an email (indicated on the upload page) with the design file. Include the order number and other info in the email.
2) Approve Proof and Confirm: Once you’ve paid for your order and sent your file, you should get an email from them within one business day (in my experience) that includes a small version of your file as a “proof” for you to review. CHECK AND DOUBLE CHECK (I guess we’re into quadruple checking now) again to be sure it’s how you want, and if all is good reply to let them know they have the go ahead to print.
NOTE: The proof will be a downsized, lower-res version of your design, so it won’t look as crisp as your original. What you are looking for here is actual mistakes and such.
3) And Now We Wait… They say it takes 10 business days for processing, and that is usually about right. I usually choose the 2-3 day shipping option. So within basically a couple of weeks, you should have the printing. I did get one printing a few days earlier than I expected, but overall, 10 business days to process and a couple of days for delivery is pretty spot on.
Putting it Together
So, as new as I am to sewing, I will have to draw the line at an actual, in-depth sewing lesson here. You would do better to consult much better sources than me for the details. But I would refer you back to some of my sewing equipment and accessories advice from the gloves EARLY Guide. And I will provide a basic assembly guide for this pattern, since it is not something you can readily Google. Even still, if you find a tutorial on putting together a long-sleeve T-shirt pattern, there will be a lot of similarities.
Basic Shirt Assembly Guide
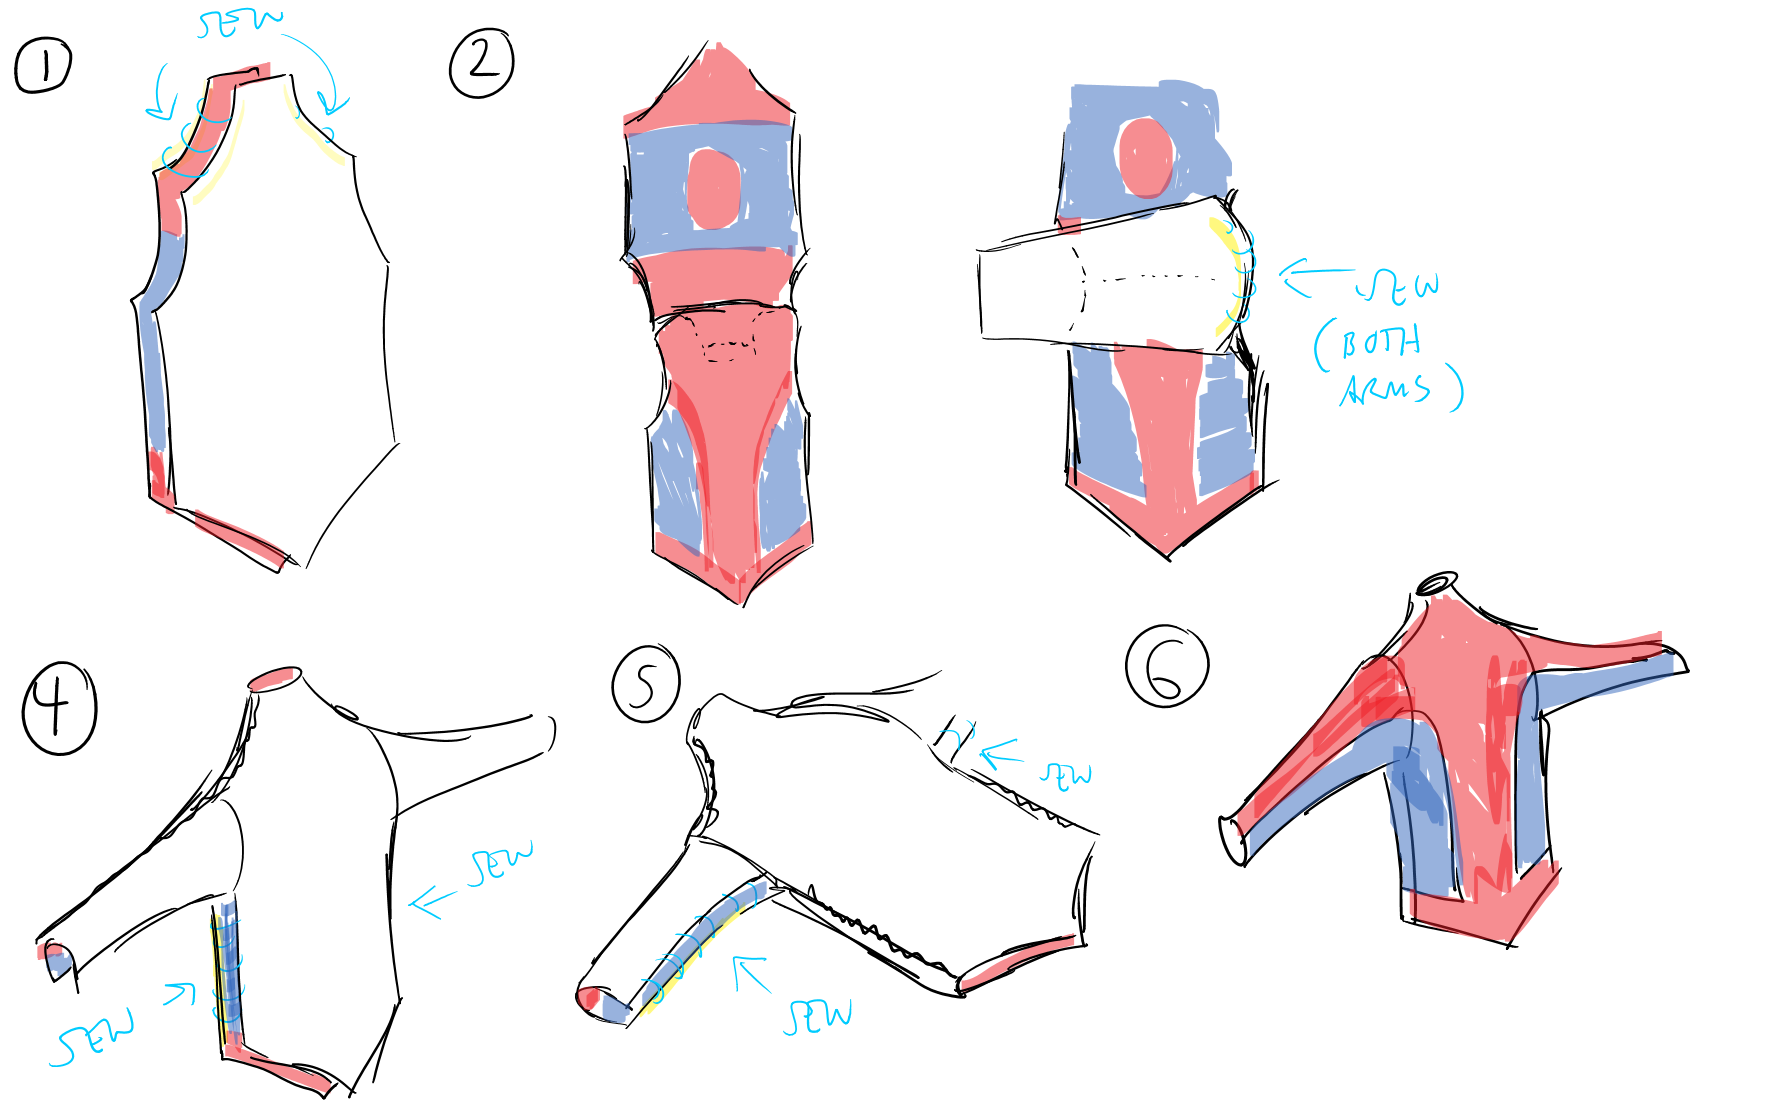
1) After cutting out the pieces along the outer edge line, lay the main torso pieces together with the colored sides facing. Pin/baste and sew the shoulder/neck edges together.
2) With the front and back now sewn at the shoulders/sides of the neck, lay those pieces out as pictured, with the colored sides facing up and the collar tucked inside out and under.
3) Choose which sleeve to attach first, match it up with the proper shoulder, and lay it as pictured above, with colored side down. This part can be confusing, so be careful to lay it out properly.
Pin/baste, being sure to line up where the torso blue meets the arm blue, and being sure to match up the end corners of the arm-armpits with the end corners of the torso-armpits front and back. These are curvy seams, so be careful to baste evenly and watch for bunching when sewing. Also, after basting, go ahead and check again that you are not attaching the sleeve wrong side out.
4) Turn the in-process shirt inside out as pictured, and then pin/baste sew the sides, preferably starting from the bottom and ending at the armpit.
5) Pin/baste sew the arms, preferably starting from the ends of the sleeves and ending at the armpits.
6) Turn it right-side-out and you should be mostly done, other than hemming the bottom, neck, and sleeves.
What’s Next?
So, this has been a long guide, but I think I mentioned before that it introduced a lot of concepts and methods for the first time.(Is it redundant to say that something was introduced for the first time?) The upcoming guides for the other pieces will refer these processes, but assume your familiarity with them and focus on what’s different for those particular costume pieces.
And actually, the next Guide should be pretty easy for me and for you. It will be how to make the leggings, and much of the heavy lifting will be done by the tutorial I started with (and have linked to a billion times) at So Sew Easy.
Hi all.
I am finishing up the second part of the EARLY Guide for the shirt portion of the costume, but I am continually aware of how poorly qualified I am to advise on this process. I just started teaching myself to sew 6 months ago, and while I am very happy with my progress and all I have learned and accomplished, I have yet to be able to present a truly finished costume.
So I was glad when I ran across a link on the Gun Head Design page that I had somehow missed until now (because I was too buried in my own costume process, I suppose).
As a disclaimer, NO I do not work for RPC Studios, nor do I get any payment from them for mentioning them, nor am I affiliated with them in any way whatsoever. (Same with Fabric On Demand, whom I have mentioned more than once in these Guides and posts and such.)
Anyway, at RPC’s site, you can get a costume made based on your measurements for around $400 (UPDATE: Looks like closer to $700+ as the lenses/frames don’t seem to be included). That may sound pricey at first, but I can profess from experience that unless you are an experienced seamstress or seamster, you will spend AT LEAST that much making the costume yourself, what with the trial and error and so forth.
Now, it’s not all about price. There are pros and cons to ordering from RPC or some such place as opposed to making your own.
Cons:
Pros:
Here is an image from their site showcasing some of their costumes:
I personally don’t love the style, especially if you get the raised webbing option. Also don’t love the rather visible seams on the pants of the movie symbiote costumes… But if these are your style, then rock on.
You also have the option of purchasing and/or customizing a design from Gun Head or 4 Neo Designs, getting it printed by Fabric On Demand or a similar place, and then hiring a professional sewster to put it together for you. You could then either make your own accessories or order them from RPC Studio.
I just want to make the professional options clear as I remind you that I am very new at this and can make no guarantees about my guides.
You’ve been warned. This whole costume making thing has been quite the rabbit hole for me.
All right? Well, if you end up sticking with me, be on the lookout for the next part of the Shirt Pattern/Design Guide, coming soon! 🙂
Someone asked about my glossed-over statement regarding “digitizing” the easy glove pattern, and about the pieces of the multi-piece costume in general. So I figured I could do some posts with some basic guides to how I am doing each piece. I cannot promise that these will be done in a timely fashion, but I am certainly willing to share.
DISCLAIMERS:
Guides Part 1: The Gloves
Original Source/Reference: http://www.instructables.com/id/Make-Gloves-for-Yourself/
Equipment Needed for my version: Scissors; chalk (a pack of colored chalk for contrast with different fabrics); white paper; pencil; ruler; scanner (smartphone camera will work if you’re careful and get a good straight down shot); computer; pins (such as for sewing); sewing machine (as the original source says, you could hand sew these, but it would take a long time);thread (useful for sewing things); stretch needle (it’s worth it for Lycra sewing)
Optional: A rolling or walking type of foot attachment for your sewing machine. This helps spandex feed more evenly.
External Screenprinting Resource for my version: Fabric on Demand
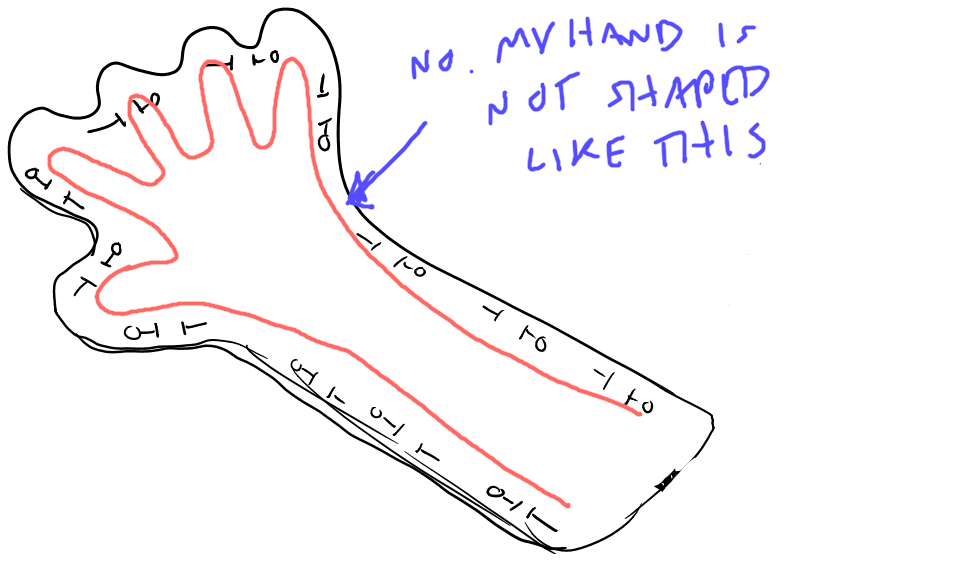
Step 1: Using the pencil, trace your hand and about 1/2 to 3/4 of your forearm onto a piece of white paper. (I excluded my forearm in the pic below. Ignore that.) Be sure to spread your fingers out pretty well.
Step 2: Using the ruler, take some horizontal and vertical measurements that you can use to create an accurately sized image file in later steps. Where you take the measurements is less important than getting the proportions and size right, but the below method seemed to work for me.
Step 3: Ideally, you should SCAN the tracing of your hand & forearm. If you don’t have access to a scanner, you can use your smartphone (or digital camera, if you’re into that kind of thing) to take a picture. Just be sure to get as close to a straight down shot as you can, so you don’t end up warping the proportions too greatly. I actually took the above pic with a smartphone (for this guide. I scanned the image for my original process), and it came out okay.
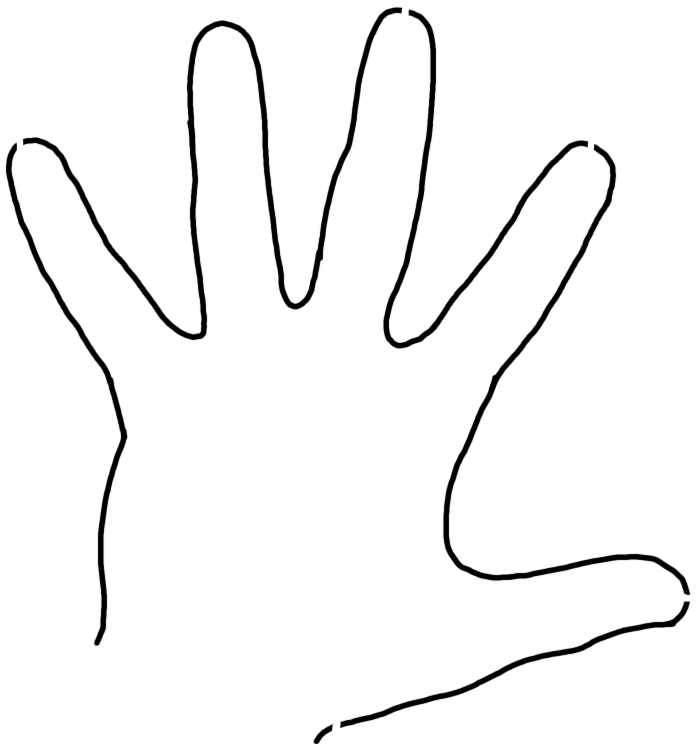
Step 4: Open up the scanned/photographed hand trace in an image editor* and do a clean version of the lines by tracing on a transparent image layer, like so (note the line gaps I left at the measurement end points):
You’ll want to keep the original image or paper that has the measurements on it for later reference.
*Interlude: Notes on Image Editors
I primarily use two image editors for my sewing pattern adventures: PAINT.net (yes, it’s a program, not a website) and Photoshop CS6.
PAINT.net is free. Photoshop CS6 is…what’s the opposite of free?
It’s not a deal breaker if you can’t access Photoshop. Ultimately, what you need is something that can save in one of the formats allowed by Fabric on Demand ( .jpg, .tiff, .png, .psd, .ai, .eps, .pdf), but you also want it to be something that works for you in the creation process.
Things to Look For in the Image Editor:
Again, my experience with this has been in Photoshop for the main stuff and with PAINT.net for simple stuff, such as the clean lines for the hand trace. PAINT.net does not seem to handle large files very well, so it worked best for simple planning and sketching type purposes.
You could try GIMP, but I have not used it for this purpose and am honestly not a huge fan of that software in general. But I haven’t used the most recent versions of the last several months, so maybe improvements have been made.
And that’s all I have to say about that.
Step 5: If you’re already in the Image Editor you will use for the final file, go ahead and “Save As” under a new filename.
If you started with a simple Image Editor for the last step and are moving to Photoshop, import the clean hand trace image as a new layer into your PS file.
FILE SETTINGS AND RELATED NOTES:
Refer to your hand measurements, and resize the hand trace layer to match the measurements. (You might have to change the measurement units in the software from pixels to inches.)
Step 6: Make a new bitmap layer under the hand trace layer. Then, choose the base color for your glove and paint the shape under/around the hand trace lines.
Choose a pattern overlay if you want.
Extend the color out a good bit around the lines, maybe an inch and a half or so. The extra in fabric form will be cut off eventually, but is important for the process.

Note that I guesstimated the forearm, but you were good and traced that part too.
Step 7: Now we have half of one glove. Now we need the other side of that one glove. Duplicate the layer, and then flip it horizontally:
Step 8: Now we have both halves of one glove to eventually sew together.
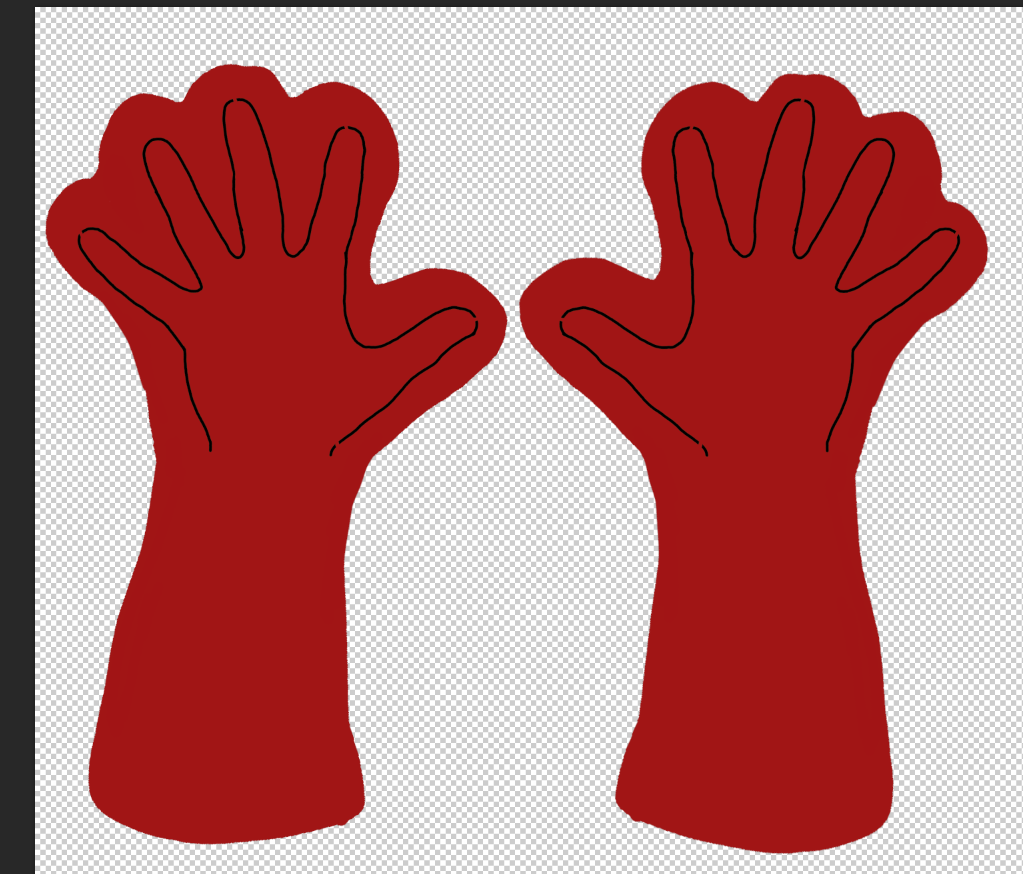
But now you have to decide if you just want gloves that are a solid color, or if there will be more detail. If you just want solid colored gloves, skip to the next step. But Spider-Man gloves, for example, need a web pattern.
The focus of this tutorial is not to go into specific details of creating and implementing a design for your particular costume, but I basically used a combination of the line tool and the brush tool, eventually ending up with a single, merged bitmap layer for the webs on the back of the glove. I then copied and pasted that web pattern layer, lined it up properly with the other half of the glove, and modified the palm portion to reflect the pattern I wanted for my Spidey glove:
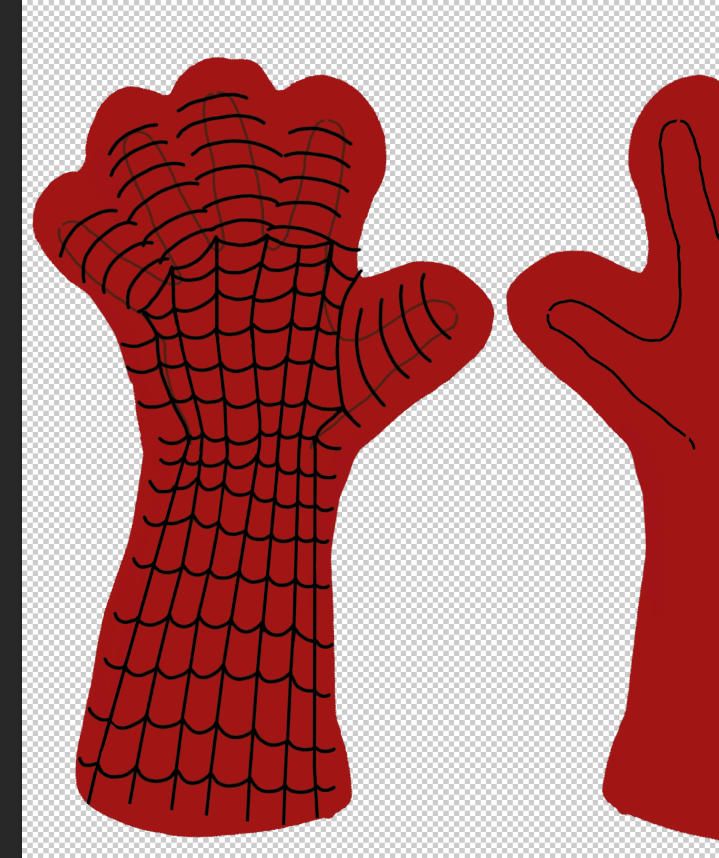
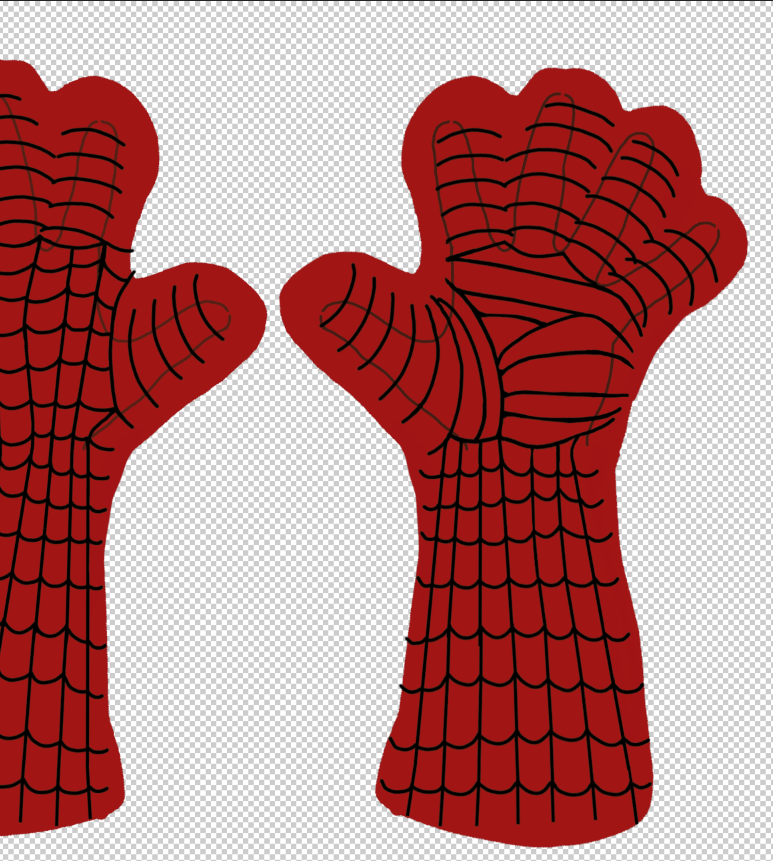
Two points here:
(A) Note that I still have the hand trace in place to give me and idea of where–generally–to place the lines where I want them to eventually fall.
(B) Note that I carried the web lines to the edges-or almost, in some cases. We will be cutting off the excess fabric around the edges, but we won’t know exactly how much we’ll cut off until later. That depends on the size of your hands and thickness of your wrists and forearm. So we are giving ourselves flexibility. That will make more sense in a bit.
Step 9: Now, it’s time to delete the layers containing your hand traces. You don’t need those anymore. You will actually be doing a new tracing of your hand and forearm onto the printed fabric with chalk. We just needed the digital hand trace to guide our sizing and design.
Now, after getting rid of the hand trace layers, copy and paste the remaining layers, and then flip them horizontally to get both sides of the glove for the opposing hand. Makes sense, right?

All Hands on Deck? (Sorry, couldn’t help myself.)
Checklist time:
Step 10: As I mentioned before, you might want to hold off on ordering the fabric with just the gloves, and wait until you have other designs to fit onto a 36″ x 58″ inch file. Just trying to look out for you.
Step 11: Order your fabric and so forth. Wait until it arrives before you start sewing.
Step 12: Once you have the printed fabric, cut out around the edges of the glove color. You’ll want to stick to the outline fairly closely, to have the best chance of lining things up.
12A) Take the front and back of one glove, and lay them together with the printed sides against each other.
 12B) Pin the two pieces together. Line them up as best you can, and pin relatively close to the edges. The un-printed sides of the fabric should be the outside on the top and bottom of this pinned-together affair here.

12C) Lay the relevant hand down on the fabric, centering as well as possible (if this is a glove with a web pattern or other bold lines, you should be able to see those lines through the back to help with hand placement). Using the chalk (in this case, the back of the fabric is white, so you’ll want non-white chalk), trace the outline of your hand and forearm, aiming to keep the chalk as level as possible.
NOTE: This is going to be a rather messy trace, regardless, but this is spandex, and we have some wiggle room. The part that always comes out a bit tight for me is the wrist, because you have to shove your hand through that part to put the glove on, so you may want to consider tracing a bit to the outside there.
It’s okay if there are minor gaps (such as if the pins get in the way), or even if it’s a dotted line.
Step 13: Now, you’re ready to saw the two parts together.
Set your machine to a stretch stitch. If it doesn’t have a stretch stitch, use a medium zig zag stitch. If you have no idea what I’m talking about (I am pretty new to sewing myself), then go read up on sewing via Google and/or books. And then practice and practice, and then practice some more. I’m still practicing, but just on increasingly expensive fabric printings.
Sew along the chalk line. It’s going to get tricky around the fingertips. If you’re a sewist, you know that there are some ways to turn tricky corners. I sometimes do that. But for this, I just as often make several passes at different angles to get non-pointy fingertips.
Step 14: After you’ve sewn all around the arm and hand and fingers, you can cut off the excess fabric. Leave a decent bit of room outside the stitches. Then, turn the gloves right side out–getting the fingers turned out can be a pain–and try on your new gloves!
Step 15: If you’re like me–or just a normal, fallible human being–you might have to do it all over again. That happens.
But at some point, you should end up with a glove! Yay.
Italy & the UK in way too short a time
"A Word of Substance"
Who knew vampires need medical insurance?