

Someone asked about my glossed-over statement regarding “digitizing” the easy glove pattern, and about the pieces of the multi-piece costume in general. So I figured I could do some posts with some basic guides to how I am doing each piece. I cannot promise that these will be done in a timely fashion, but I am certainly willing to share.
DISCLAIMERS:
- These pieces are not fully designed by me. Generally speaking, I started with someone else’s idea or guide and built on/tweaked it, albeit heavily in some cases.
- At this stage, I don’t actually have a final set of all these pieces that I have put together as a full costume, so there are still some details and tweaks to work out.
- Some of the pieces are more “tested” than others, and I will try to indicate how tested or untested each is when I post guides.
- The Gloves pattern and method below seems to work pretty well for me, incidentally.
Guides Part 1: The Gloves
Original Source/Reference: http://www.instructables.com/id/Make-Gloves-for-Yourself/
Equipment Needed for my version: Scissors; chalk (a pack of colored chalk for contrast with different fabrics); white paper; pencil; ruler; scanner (smartphone camera will work if you’re careful and get a good straight down shot); computer; pins (such as for sewing); sewing machine (as the original source says, you could hand sew these, but it would take a long time);thread (useful for sewing things); stretch needle (it’s worth it for Lycra sewing)
Optional: A rolling or walking type of foot attachment for your sewing machine. This helps spandex feed more evenly.
External Screenprinting Resource for my version: Fabric on Demand
Step 1: Using the pencil, trace your hand and about 1/2 to 3/4 of your forearm onto a piece of white paper. (I excluded my forearm in the pic below. Ignore that.) Be sure to spread your fingers out pretty well.
Step 2: Using the ruler, take some horizontal and vertical measurements that you can use to create an accurately sized image file in later steps. Where you take the measurements is less important than getting the proportions and size right, but the below method seemed to work for me.
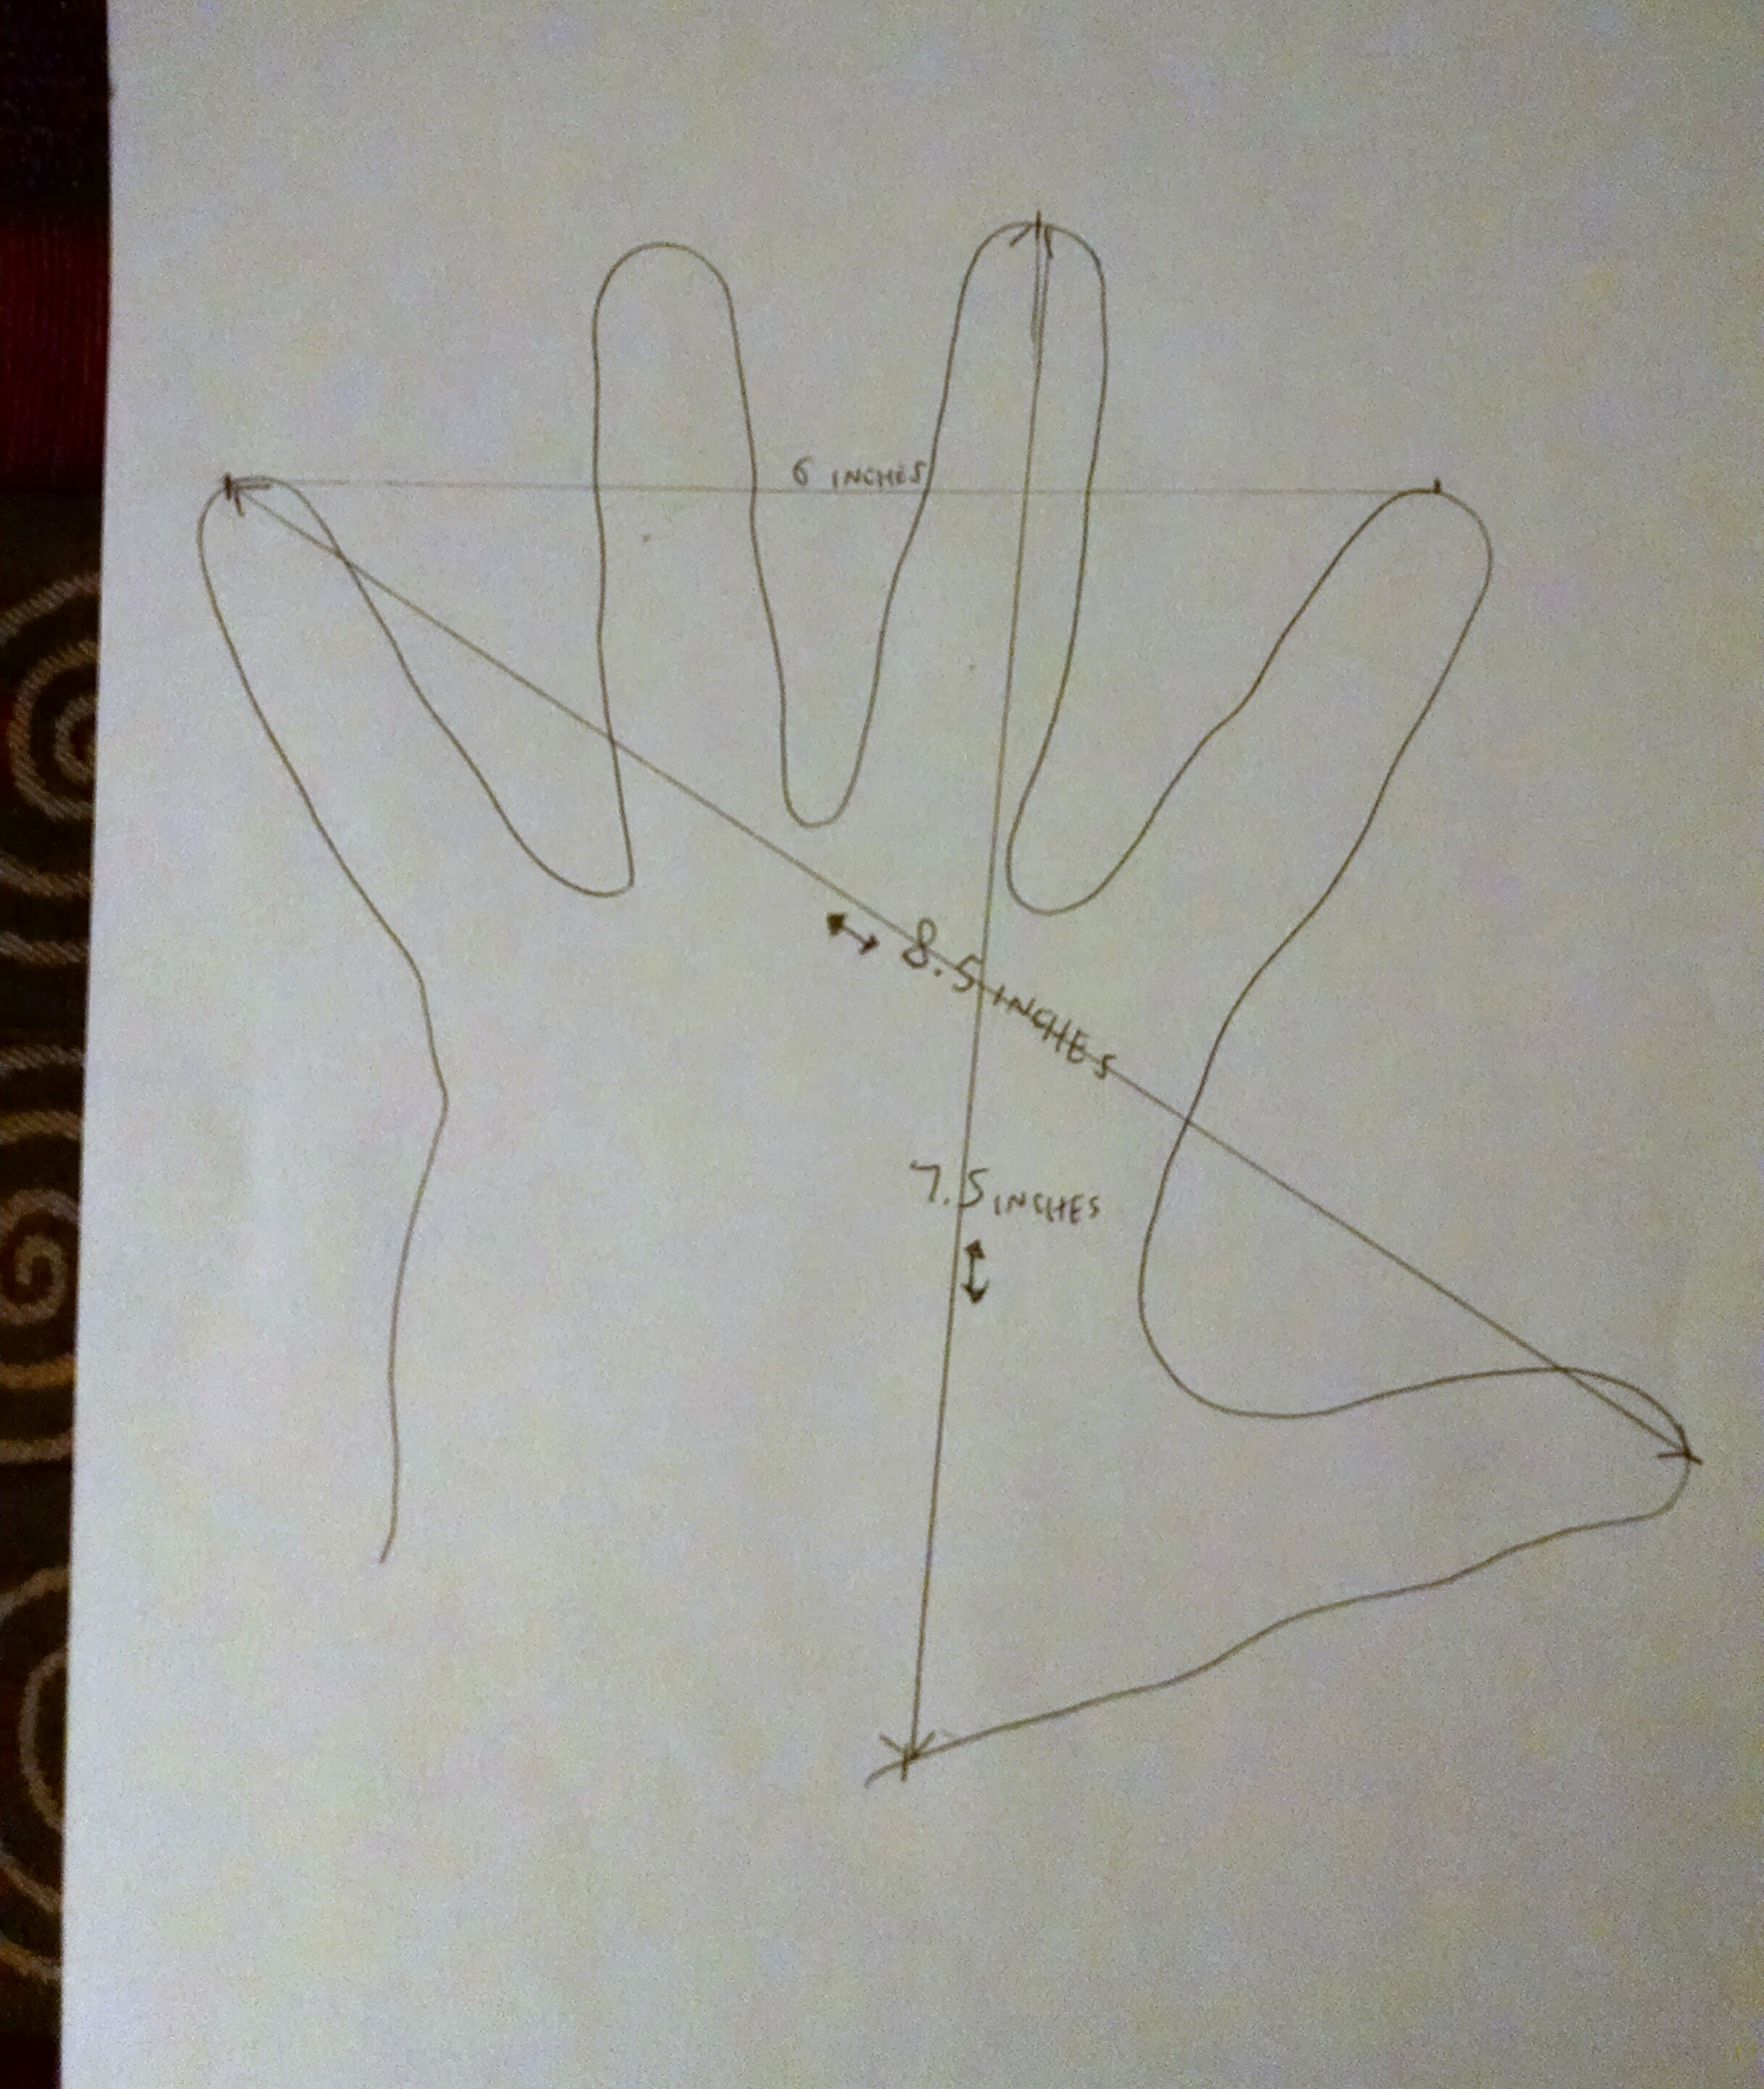
Step 3: Ideally, you should SCAN the tracing of your hand & forearm. If you don’t have access to a scanner, you can use your smartphone (or digital camera, if you’re into that kind of thing) to take a picture. Just be sure to get as close to a straight down shot as you can, so you don’t end up warping the proportions too greatly. I actually took the above pic with a smartphone (for this guide. I scanned the image for my original process), and it came out okay.
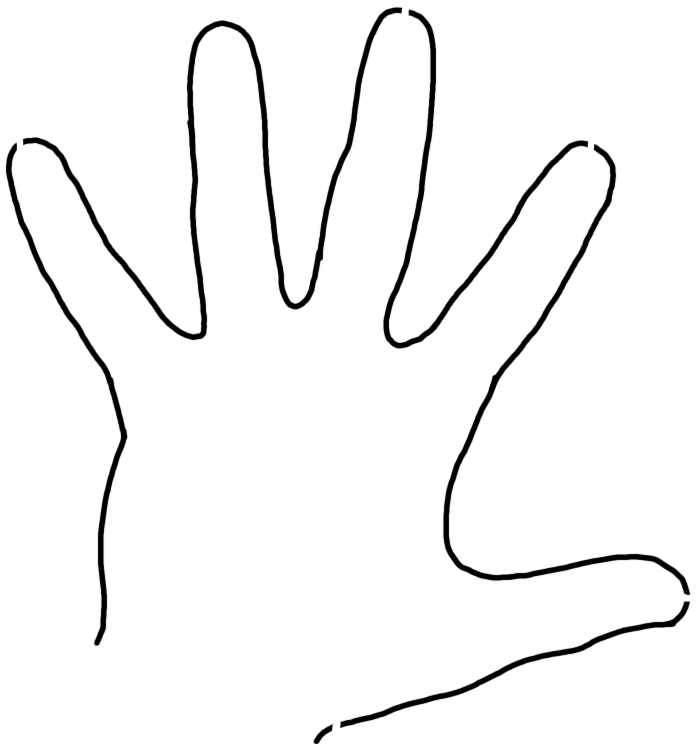
Step 4: Open up the scanned/photographed hand trace in an image editor* and do a clean version of the lines by tracing on a transparent image layer, like so (note the line gaps I left at the measurement end points):
You’ll want to keep the original image or paper that has the measurements on it for later reference.
*Interlude: Notes on Image Editors
I primarily use two image editors for my sewing pattern adventures: PAINT.net (yes, it’s a program, not a website) and Photoshop CS6.
PAINT.net is free. Photoshop CS6 is…what’s the opposite of free?
It’s not a deal breaker if you can’t access Photoshop. Ultimately, what you need is something that can save in one of the formats allowed by Fabric on Demand ( .jpg, .tiff, .png, .psd, .ai, .eps, .pdf), but you also want it to be something that works for you in the creation process.
Things to Look For in the Image Editor:
- Ability to do multiple layers.
- You’re going to want line and shape tools.
- For super hero costumes, having some sort of subtle pattern overlay (like a semi-transparent hexagonal pattern over the color) is a big thing now, and while that is probably easiest to do in Photoshop and similar programs, it is possible to do that in simpler programs.
- Ability to handle large files
Again, my experience with this has been in Photoshop for the main stuff and with PAINT.net for simple stuff, such as the clean lines for the hand trace. PAINT.net does not seem to handle large files very well, so it worked best for simple planning and sketching type purposes.
You could try GIMP, but I have not used it for this purpose and am honestly not a huge fan of that software in general. But I haven’t used the most recent versions of the last several months, so maybe improvements have been made.
And that’s all I have to say about that.
Step 5: If you’re already in the Image Editor you will use for the final file, go ahead and “Save As” under a new filename.
If you started with a simple Image Editor for the last step and are moving to Photoshop, import the clean hand trace image as a new layer into your PS file.
FILE SETTINGS AND RELATED NOTES:
- For fabric on demand, you will want the resolution to be between 72 and 300 dpi.
- The size of the file for the gloves will be roughly 36″ tall.
- When you order a printing from Fabric on Demand, you will usually be ordering a minimum of 36″ x 58″ of fabric. That is to say, the Lycra is in rolls that are 58″ wide and you pay by the yard of length. So you will usually want to see what all you can fit in that space so that you don’t waste money doing two orders of fabric for what could have fit in one order. For example, I managed to fit gloves, mask, and boots in a 36″ x 58″ order.
Refer to your hand measurements, and resize the hand trace layer to match the measurements. (You might have to change the measurement units in the software from pixels to inches.)
Step 6: Make a new bitmap layer under the hand trace layer. Then, choose the base color for your glove and paint the shape under/around the hand trace lines.
Choose a pattern overlay if you want.
Extend the color out a good bit around the lines, maybe an inch and a half or so. The extra in fabric form will be cut off eventually, but is important for the process.

Note that I guesstimated the forearm, but you were good and traced that part too.
Step 7: Now we have half of one glove. Now we need the other side of that one glove. Duplicate the layer, and then flip it horizontally:
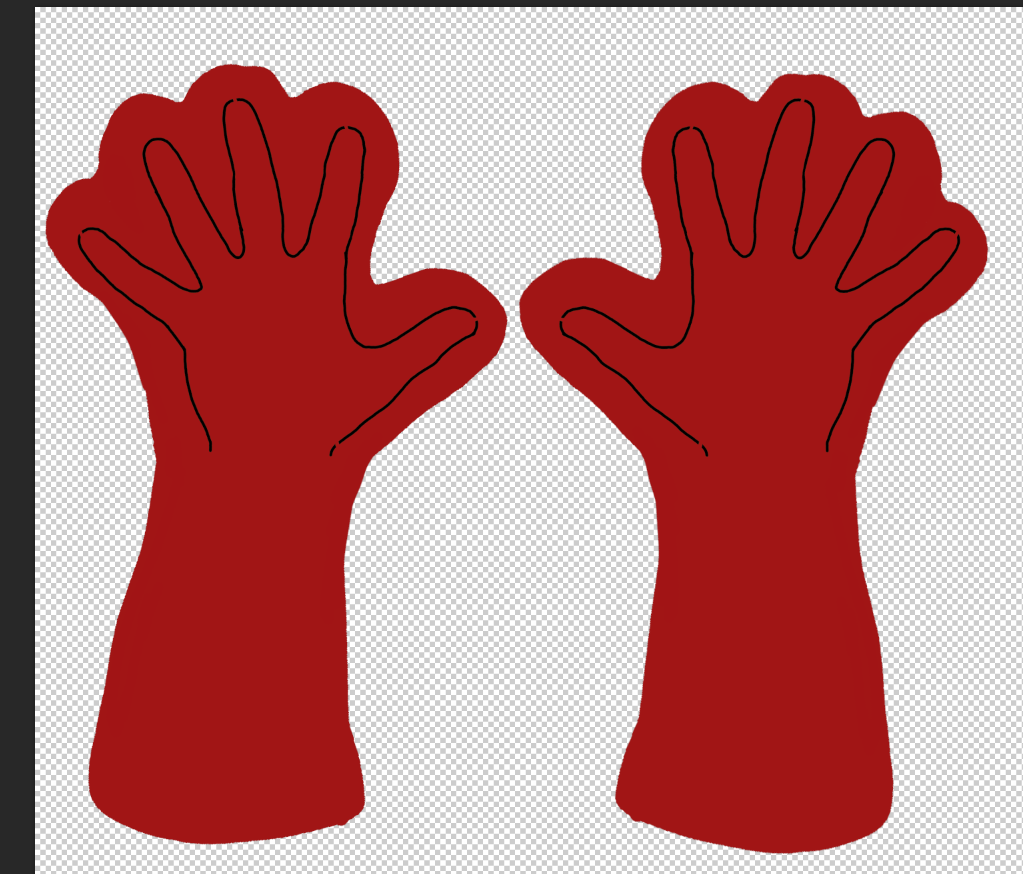
Step 8: Now we have both halves of one glove to eventually sew together.
But now you have to decide if you just want gloves that are a solid color, or if there will be more detail. If you just want solid colored gloves, skip to the next step. But Spider-Man gloves, for example, need a web pattern.
The focus of this tutorial is not to go into specific details of creating and implementing a design for your particular costume, but I basically used a combination of the line tool and the brush tool, eventually ending up with a single, merged bitmap layer for the webs on the back of the glove. I then copied and pasted that web pattern layer, lined it up properly with the other half of the glove, and modified the palm portion to reflect the pattern I wanted for my Spidey glove:
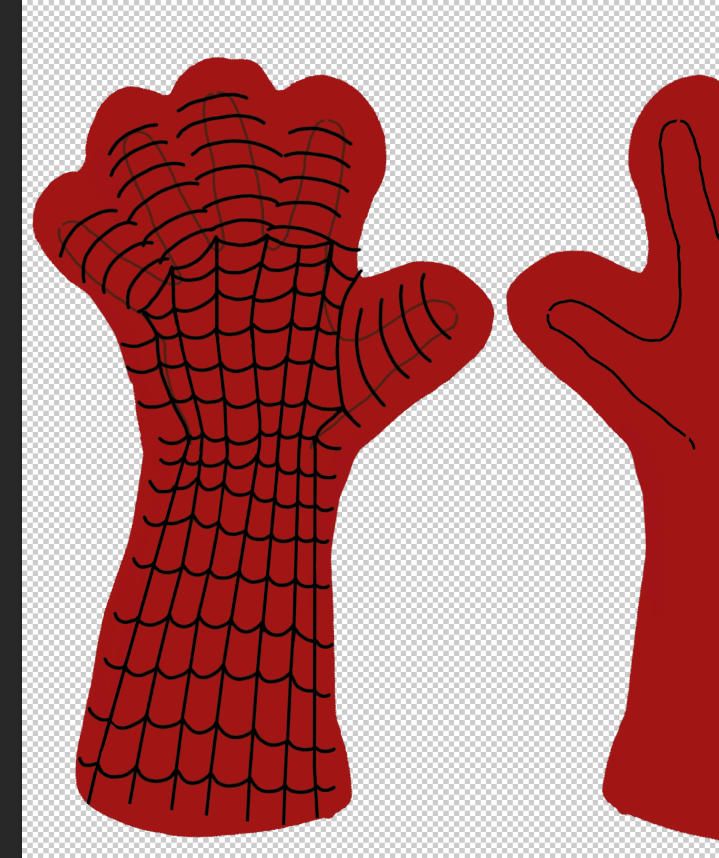
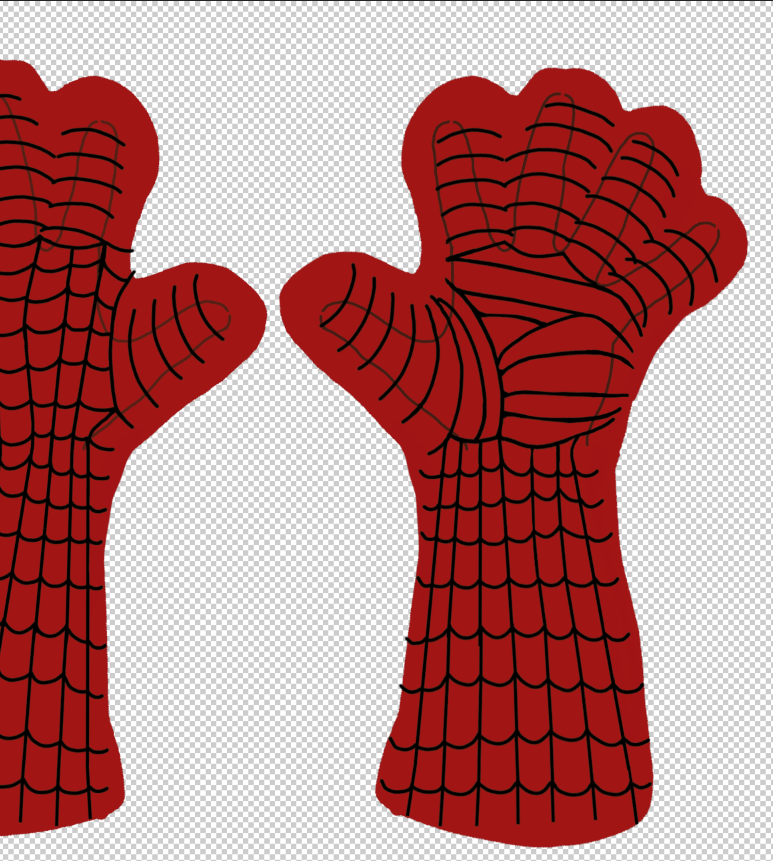
Two points here:
(A) Note that I still have the hand trace in place to give me and idea of where–generally–to place the lines where I want them to eventually fall.
(B) Note that I carried the web lines to the edges-or almost, in some cases. We will be cutting off the excess fabric around the edges, but we won’t know exactly how much we’ll cut off until later. That depends on the size of your hands and thickness of your wrists and forearm. So we are giving ourselves flexibility. That will make more sense in a bit.
Step 9: Now, it’s time to delete the layers containing your hand traces. You don’t need those anymore. You will actually be doing a new tracing of your hand and forearm onto the printed fabric with chalk. We just needed the digital hand trace to guide our sizing and design.
Now, after getting rid of the hand trace layers, copy and paste the remaining layers, and then flip them horizontally to get both sides of the glove for the opposing hand. Makes sense, right?

All Hands on Deck? (Sorry, couldn’t help myself.)
Checklist time:
- You did resize the hand trace layer to the measurements you took on paper, right?
- You might find that your gloves are too long to fit in the 36″ as oriented above, but since you should have made a 58″ wide file, you could lay it all side by side if needed.
- You did give your file a resolution between 72 and 300 dpi, right? (I’ve been using 72 dpi. Keeps the files a reasonable size.)
- You might want to hold your hands up to the screen and visualize how the layers you have translate into the backs and palms of both hands, to be sure that you have done all the horizontal flipping properly. It’d be a shame to shell out money and wait for your fabric only to discover you have two left gloves.
- Did you want to add a pattern overlay? Even though it makes the most sense to do that before copying and pasting the color layer, you can just add it to each color layer individually, or play around with different looks before finishing up. Just a thought.
Step 10: As I mentioned before, you might want to hold off on ordering the fabric with just the gloves, and wait until you have other designs to fit onto a 36″ x 58″ inch file. Just trying to look out for you.
Step 11: Order your fabric and so forth. Wait until it arrives before you start sewing.
Step 12: Once you have the printed fabric, cut out around the edges of the glove color. You’ll want to stick to the outline fairly closely, to have the best chance of lining things up.
12A) Take the front and back of one glove, and lay them together with the printed sides against each other.
 12B) Pin the two pieces together. Line them up as best you can, and pin relatively close to the edges. The un-printed sides of the fabric should be the outside on the top and bottom of this pinned-together affair here.

12C) Lay the relevant hand down on the fabric, centering as well as possible (if this is a glove with a web pattern or other bold lines, you should be able to see those lines through the back to help with hand placement). Using the chalk (in this case, the back of the fabric is white, so you’ll want non-white chalk), trace the outline of your hand and forearm, aiming to keep the chalk as level as possible.
NOTE: This is going to be a rather messy trace, regardless, but this is spandex, and we have some wiggle room. The part that always comes out a bit tight for me is the wrist, because you have to shove your hand through that part to put the glove on, so you may want to consider tracing a bit to the outside there.
It’s okay if there are minor gaps (such as if the pins get in the way), or even if it’s a dotted line.
Step 13: Now, you’re ready to saw the two parts together.
Set your machine to a stretch stitch. If it doesn’t have a stretch stitch, use a medium zig zag stitch. If you have no idea what I’m talking about (I am pretty new to sewing myself), then go read up on sewing via Google and/or books. And then practice and practice, and then practice some more. I’m still practicing, but just on increasingly expensive fabric printings.
Sew along the chalk line. It’s going to get tricky around the fingertips. If you’re a sewist, you know that there are some ways to turn tricky corners. I sometimes do that. But for this, I just as often make several passes at different angles to get non-pointy fingertips.
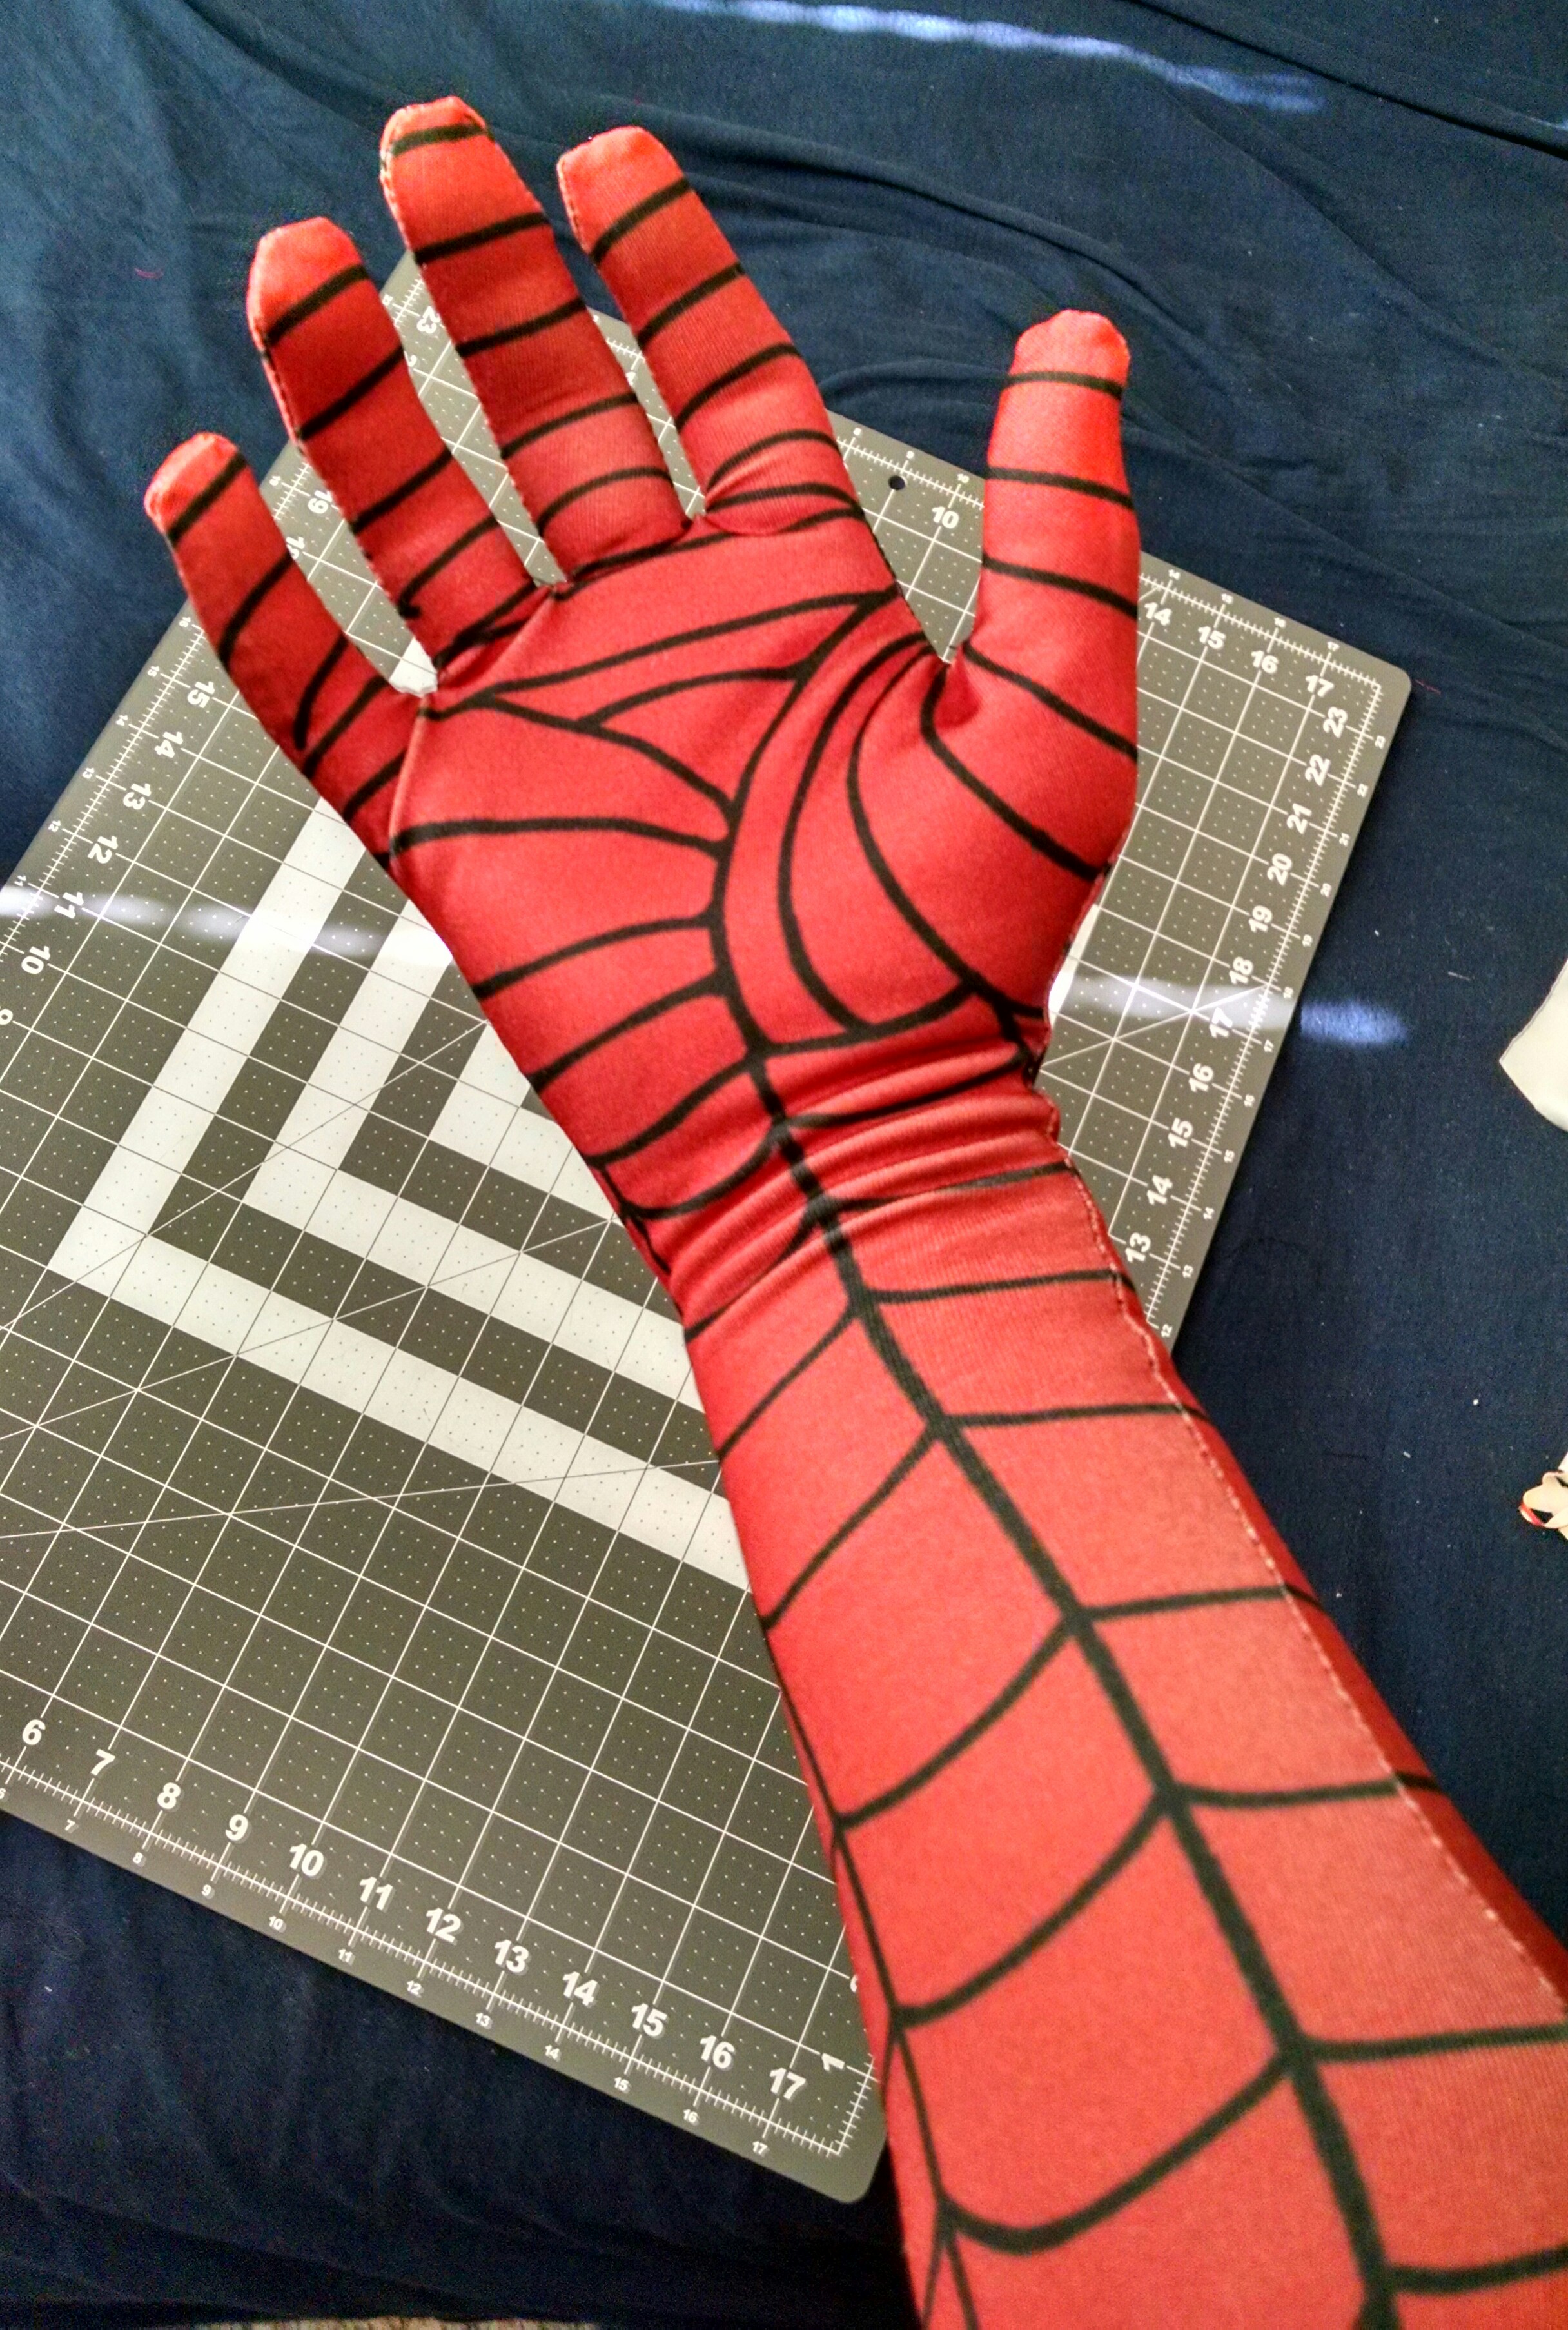
Step 14: After you’ve sewn all around the arm and hand and fingers, you can cut off the excess fabric. Leave a decent bit of room outside the stitches. Then, turn the gloves right side out–getting the fingers turned out can be a pain–and try on your new gloves!
Step 15: If you’re like me–or just a normal, fallible human being–you might have to do it all over again. That happens.
But at some point, you should end up with a glove! Yay.

Thank you for this man. It was extremely helpful. I can’t wait to see the rest of the guide 🙂
LikeLike
No problem! Glad it’s helpful!
LikeLike
When is the next part coming out? 🙂
LikeLike
Ha. Yeah, I’m working on one for the shirt. Lots of detail, but it’s getting there. I just hope you aren’t basing any Halloween costume plans on these guides! I’m really new at this myself, and can’t make any guarantees! Still, thanks for the interest, and I hope at least some of it is useful.
LikeLike
I’m not, don’t worry 🙂 Is there some way I can private message you?
LikeLike
You can email viscosity08@gmail.com
LikeLike
Wow you’ve gotten so far! I remember when you were just beginning and couldnt get the webs to aline. It looks great. Well done!
LikeLike
Thank you! I do feel like I’ve made some progress! 🙂
LikeLike